VALVE BODY ASSEMBLY INSTALLATION
-
INSTALL SHIFT SOLENOID VALVE
-
Coat new O-rings with ATF and install them to the shift solenoid valves (S1, S2, SL).
-

Install the shift solenoid valve SL with the bolt.
- Torque:
- 10 N*m { 102 kgf*cm, 7 ft.*lbf }
-
Install the shift solenoid valve S1 and S2 with the bolt.
- Torque:
- 6.4 N*m { 65 kgf*cm, 56 in.*lbf }
-
Install the shift solenoid valve SLT and solenoid lock plate with the bolt.
- Torque:
- 6.4 N*m { 65 kgf*cm, 56 in.*lbf }
-
-
INSTALL TRANSMISSION VALVE BODY ASSEMBLY
-
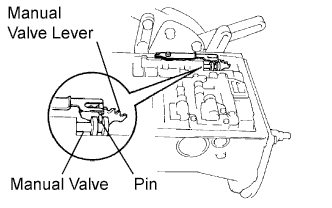
Align the groove of the manual valve with the pin of the lever.
-
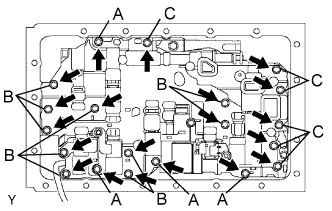
Install the 20 bolts.
- Torque:
- 11 N*m { 112 kgf*cm, 8 ft.*lbf }
Bolt length Bolt A 23 mm (0.91 in.) Bolt B 28 mm (1.10 in.) Bolt C 36 mm (1.42 in.)
-
-
CONNECT TRANSMISSION WIRE
-
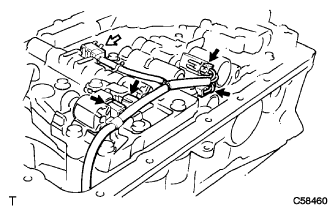
Connect the ATF temperature sensor connector and shift solenoid valve connectors.
-
-
INSTALL VALVE BODY OIL STRAINER ASSEMBLY
-
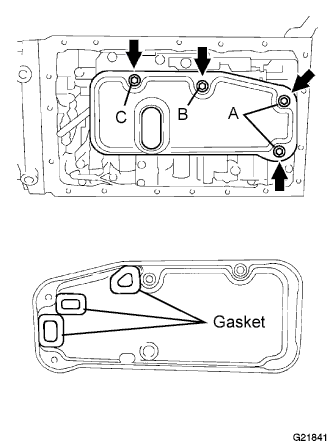
Install 3 new gaskets.
-
Install the oil strainer with the 4 bolts.
- Torque:
- 11 N*m { 112 kgf*cm, 8 ft.*lbf }
Bolt length Bolt A 14 mm (0.55 in.) Bolt B 20 mm (0.79 in.) Bolt C 23 mm (0.91 in.)
-
-
INSTALL AUTOMATIC TRANSMISSION OIL PAN SUB-ASSEMBLY
-
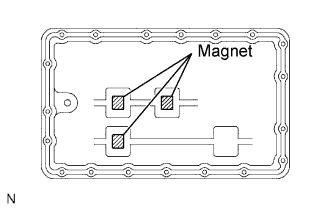
Install the 3 magnets in the indications of the oil pan sub-assembly.
-
Remove any packing material and be careful not to drop oil on the contacting surfaces of the transmission case and oil pan sub-assembly .
Note
Apply seal packing to the contact surface and install the oil pan with in 10 minutes of application.
-
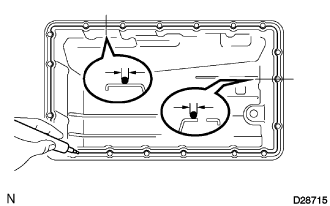
Apply FIPG to the oil pan, as shown in the illustration.
FIPG Toyota Genuine Seal Packing 1281, Three Bond 1281 or equivalent -
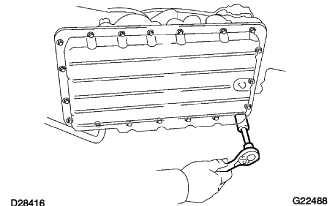
Install the oil pan sub-assembly with 19 bolts.
- Torque:
- 7.4 N*m { 75 kgf*cm, 65 in.*lbf }
-
-
INSTALL TRANSMISSION OIL FILLER TUBE SUB-ASSEMBLY
-
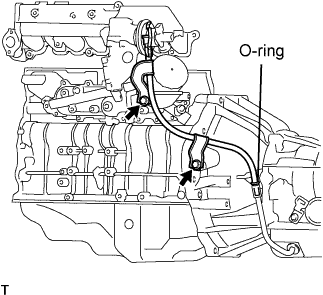
Coat a new O-ring with ATF, and install it to the oil filler tube.
-
Install the oil filler tube to the automatic transmission with the 2 bolts.
- Torque:
- 12 N*m { 122 kgf*cm, 9 ft.*lbf }
-
-
CONNECT BATTERY NEGATIVE TERMINAL
-
ADD AUTOMATIC TRANSMISSION FLUID
-
INSPECT AUTOMATIC TRANSMISSION FLUID
Tech Tips
Drive the vehicle so that the engine and transmission are at normal operating temperature.
Fluid temperature 70 to 80 °C (158 to 176 °F)
-
Park the vehicle on a level surface and set the parking brake.
-
With the engine idling and the brake pedal depressed, move shift the lever into all positions from P to L and return to the P position.
-
Take out the dipstick and wipe it clean.
-
Put it back all the way.
-
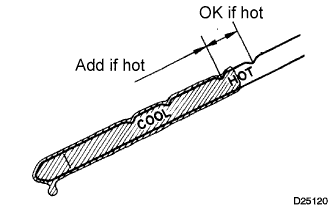
Take it out again and check that the fluid level is within the HOT range.
If the fluid level is below the HOT range, add new fluid and recheck the fluid level. If the fluid level exceeds the HOT range, drain the fluid once, add the proper amount of new fluid and recheck the fluid level.
-
-
PERFORM INITIALIZATION