FRONT DOOR ADJUSTMENT

-
INSPECT FRONT DOOR
-
Check that the clearance of areas A to D are within the standard range.
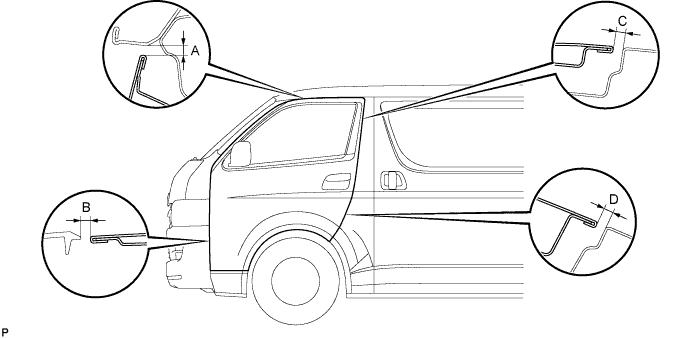
Standard Area Measurement Area Measurement A 5.4 +- 1.5 mm (0.213 +- 0.059 in.) C 5.1 +- 1.5 mm (0.201 +- 0.059 in.) B 5.5 +- 1.5 mm (0.217 +- 0.059 in.) D 5.1 +- 1.5 mm (0.201 +- 0.059 in.)
-
-
ADJUST FRONT DOOR
-
Disconnect the cable from negative (-) battery terminal from the battery.
CAUTION:
Work must be started at least 90 seconds after the engine switch is turned off and the negative (-) terminal cable is disconnected from the battery. (The SRS is equipped with a back-up power source. If work is started within 90 seconds of disconnecting the cable from the negative (-) battery terminal and turning the engine switch off, the SRS may deploy.)
-
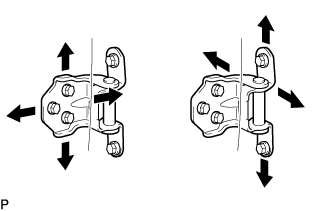
Using SST, loosen the bolts on the pillar side to adjust the door front and back, up and down.
- SST
- 09812-00010
- Torque:
- 27 N*m { 275 kgf*cm, 20 ft.*lbf }
-
Loosen the bolts on the door side to adjust the door up and down, and the door front side to side.
- Torque:
- 27 N*m { 275 kgf*cm, 20 ft.*lbf }
Note
Perform this procedure after replacement of the centering bolt with the supplied one.
-
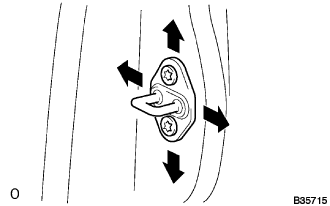
When adjusting the door rear side to side, and the front door lock striker plate assembly, use a "torx" socket wrench (T40) to loosen the "torx" screws until the striker can move. Lightly tap it with a brass bar for adjustment.
- Torque:
- 23 N*m { 235 kgf*cm, 17 ft.*lbf }
-
Connect the negative (-) terminal cable to the battery.
-
Initialize both systems.
-
Inspect the SRS warning light.
-