FRONT CRANKSHAFT OIL SEAL REMOVAL

-
REMOVE FRONT SEAT ASSEMBLY RH (for Hi-back Seat Type)
-
Perform the same procedure as above on the opposite side. Click here
-
-
REMOVE FRONT SEAT ASSEMBLY RH (for Low-back Seat Type)
-
Perform the same procedure as above on the opposite side. Click here
-
-
REMOVE FRONT DOOR SCUFF PLATE RH
-
REMOVE ENGINE SERVICE HOLE SUB COVER SUB-ASSEMBLY
-
Roll up the carpet, and remove the 5 bolts and engine service hole sub cover.
-
-
REMOVE ENGINE UNDER COVER NO.1 (w/ Engine Under Cover No.1)
-
REMOVE FAN & GENERATOR V BELT
-
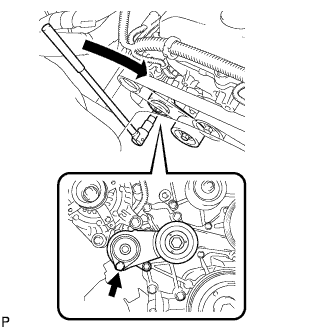
Use the hexagon-shaped part indicated by the arrow in the illustration to move the tensioner pulley downward and decrease the tension in the drive belt. Then remove the drive belt.
Note
When removing the drive belt, do not use the idle pulley's bolt.
Tech Tips
After removing the drive belt, move the tensioner upward to the maximum amount.
-
-
REMOVE CRANKSHAFT PULLEY
-
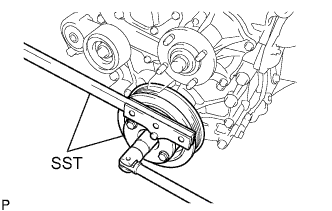
Using SST, loosen the pulley bolt.
- SST
- 09213-54015 ( 91651-60855 )
- 09330-00021
Tech Tips
Tighten the pulley bolt to 2 or 3 threads of the crankshaft.
-
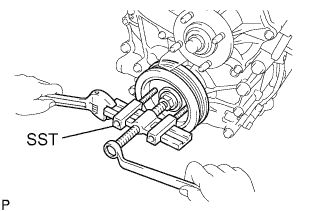
Using SST, remove the pulley bolt and pulley.
- SST
- 09950-50013 ( 09951-05010, 09952-05010, 09953-05010, 09954-05021 )
Tech Tips
Apply grease to the thread and tip of the SST (center bolt) prior to use.
-
-
REMOVE TIMING GEAR CASE OR TIMING CHAIN CASE OIL SEAL
-
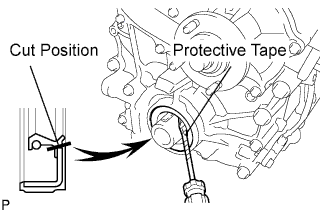
Using a screwdriver with its tip taped, pry out the oil seal.
Note
After the removal, check the crankshaft for damage. If it is damaged, smooth the surface with 400-grit sandpaper.
-