DRIVE BELT INSTALLATION
-
INSTALL TENSIONER PULLEY
Note
Perform the following procedure when it is necessary to replace the tensioner pulley.
Tech Tips
The tensioner pulley service kit consists of a bolt, dust seal and tensioner pulley.
-
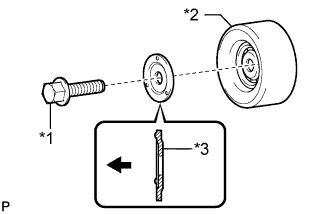
Text in Illustration *1 Bolt *2 Tensioner Pulley *3 Dust Seal 
Front Install the dust seal and bolt to the tensioner pulley as shown in the illustration.
Note
-
The dust seal must be oriented correctly when installed. If the dust seal is installed incorrectly, the bearing may be damaged.
-
Do not touch the seal surface of the bearing.
Tech Tips
Be sure to use the bolt from the service kit.
-
-
Tighten the bolt by hand until the flange of the bolt contacts the dust seal and the tensioner pulley is fixed in place.
Note
Do not use any tools.
-
Tighten the bolt.
- Torque:
- 50 N*m { 510 kgf*cm, 37 ft.*lbf }
-
-
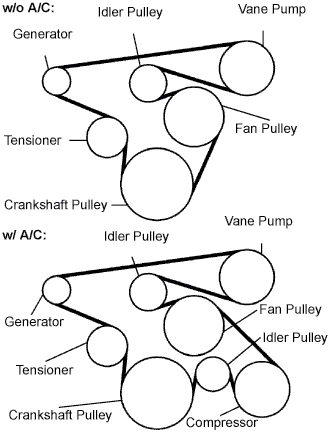
INSTALL FAN & GENERATOR V BELT
-
Install the drive belt to the pulleys except the drive belt tensioner pulley.
-
Use the hexagon-shaped part indicated by the arrow in the illustration to move the tensioner pulley downward and then install the drive belt to the tensioner pulley.
Note
-
The backside of the drive belt should face the tensioner pulley.
-
Check that the drive belt is properly set to each pulley.
-
-
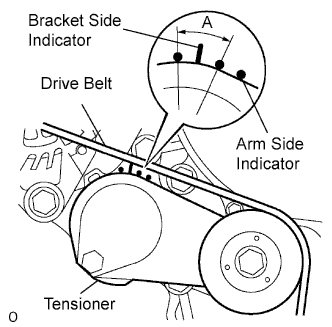
After a new belt has been installed, check that the tensioner indicator mark is within range A shown in the illustration.
-
-
INSTALL ENGINE SERVICE HOLE SUB COVER SUB-ASSEMBLY
-
Install the engine service hole cover with the 5 bolts.
- Torque:
- 13 N*m { 133 kgf*cm, 10 ft.*lbf }
-
-
INSTALL FRONT DOOR SCUFF PLATE RH
-
INSTALL FRONT SEAT ASSEMBLY RH (for Hi-back Seat Type)
-
Perform the same procedure as above on the opposite side. Click here
-
-
REMOVE FRONT SEAT ASSEMBLY RH (for Low-back Seat Type)
-
Perform the same procedure as above on the opposite side. Click here
-