SUCTION CONTROL VALVE REMOVAL
PROCEDURE
-
REMOVE NO. 1 ENGINE COVER
-
REMOVE AIR CLEANER CAP SUB-ASSEMBLY
-
REMOVE AIR CLEANER FILTER ELEMENT SUB-ASSEMBLY
-
REMOVE AIR CLEANER CASE SUB-ASSEMBLY
-
CLEAN SUCTION CONTROL VALVE AND SURROUNDING AREA
-
Using cleaning spray or a brush, clean the suction control valve and the surrounding area.
Note
After cleaning with cleaning spray, do not blow air as doing so will cause any dust or sand in the surrounding area to become airborne and adhere to the cleaned area.
-
-
REMOVE SUCTION CONTROL VALVE ASSEMBLY
Note
-
Before replacing the suction control valve, be sure to clean the surrounding area.
-
When replacing the suction control valve, make sure that your hands are clean and do not use gloves, etc.
-
Disconnect the connector from the suction control valve.
-
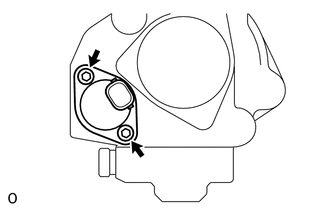
Using a 5 mm hexagon wrench, remove the 2 bolts, suction control valve and O-ring from the fuel supply pump.
Note
-
Do not reuse the suction control valve, O-ring once it has been removed.
-
Make sure that the O-ring does not remain attached to the fuel supply pump.
-
-