ECM INSTALLATION
PROCEDURE
-
INSTALL ECM
-
Install the 2 brackets to the ECM with the 4 screws.
- Torque:
- 3.0 N*m { 31 kgf*cm, 27 in.*lbf }
-
Install the ECM with bracket with the 2 bolts.
- Torque:
- 13 N*m { 127 kgf*cm, 9 ft.*lbf }
-
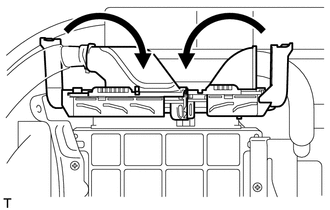
Connect the 2 ECM connectors and lower the 2 levers.
Note
-
When connecting the connector, make sure that dirt, water or other foreign matter is not stuck between the connector and ECM.
-
Make sure that the 2 levers are securely lowered.
-
-
-
INSTALL NO. 2 AIR CLEANER INLET
-
Install the No. 2 air cleaner inlet with the bolt.
- Torque:
- 7.0 N*m { 71 kgf*cm, 62 in.*lbf }
-
-
INSTALL NO. 1 AIR CLEANER INLET
-
Install the No. 1 air cleaner inlet with the clip.
-
-
INSTALL AIR CLEANER CASE SUB-ASSEMBLY
-
INSTALL AIR CLEANER FILTER ELEMENT SUB-ASSEMBLY
-
INSTALL AIR CLEANER CAP SUB-ASSEMBLY
-
INSTALL RADIATOR SUPPORT OPENING COVER
-
INSTALL NO. 1 ENGINE COVER
-
CONNECT CABLE TO NEGATIVE BATTERY TERMINAL
Note
When disconnecting the cable, some systems need to be initialized after the cable is reconnected Click here.
-
PERFORM REGISTRATION
-
Perform learning values write.
-
for DPF: Click here
-
for CCo: Click here
-
-
-
PERFORM INITIALIZATION
-
Perform the supply pump initialization procedure.
-
for DPF: Click here
-
for CCo: Click here
-
-
-
PERFORM THROTTLE VALVE FULLY CLOSED POSITION LEARNING