CONTINUOUSLY VARIABLE TRANSAXLE SYSTEM, Diagnostic DTC:P2763, P2764
| DTC Code | DTC Name |
|---|---|
| P2763 | Torque Converter Clutch Pressure Control Solenoid Control Circuit High (Shift Solenoid Valve DSU) |
| P2764 | Torque Converter Clutch Pressure Control Solenoid Control Circuit Low (Shift Solenoid Valve DSU) |
DESCRIPTION
The ECM controls the signal to shift solenoid valve DSU and performs lock-up clutch pressure control in response to the input torque value.
| DTC Code | DTC Detection Condition
|
Trouble Area |
|---|---|---|
| P2763 |
|
|
| P2764 |
|
|
MONITOR DESCRIPTION
These DTCs indicate an open or short circuit in the shift solenoid valve DSU circuit. The ECM controls lock-up by turning shift solenoid valve DSU on/off. When there is an open or short circuit in the shift solenoid valve DSU circuit, the ECM detects the problem, illuminates the MIL and stores the DTC.
WIRING DIAGRAM
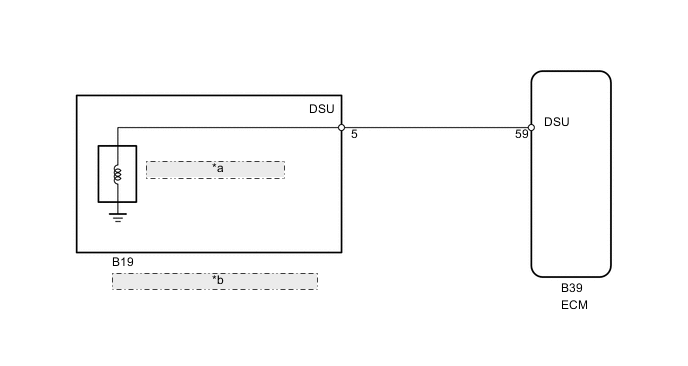
| *a | Shift Solenoid Valve DSU |
| *b | Transmission Wire (Continuously Variable Transaxle Assembly) |
PROCEDURE
-
INSPECT TRANSMISSION WIRE (SHIFT SOLENOID VALVE DSU)
-
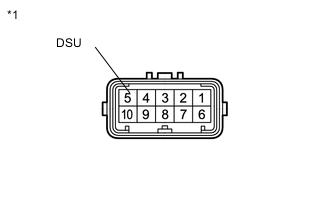
Text in Illustration *1 Component without harness connected
(Transmission Wire)
Disconnect the transmission wire connector.
-
Measure the resistance according to the value(s) in the table below.
Standard Resistance Tester Connection Condition Specified Condition 5 (DSU) - Body ground 20°C (68°F) 11 to 15 Ω
NG 
REPLACE CONTINUOUSLY VARIABLE TRANSAXLE ASSEMBLY Click here
OK 
-
-
CHECK HARNESS AND CONNECTOR (TRANSMISSION WIRE - ECM)
-
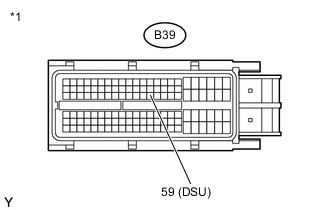
Text in Illustration *1 Front view of wire harness connector
(to ECM)
Disconnect the ECM connector.
-
Measure the resistance according to the value(s) in the table below.
Standard Resistance Tester Connection Condition Specified Condition B39-59 (DSU) - Body ground 20°C (68°F) 11 to 15 Ω
NG 
REPAIR OR REPLACE HARNESS OR CONNECTOR
OK
-
-
REPLACE ECM
-
Replace the ECM Click here.
NEXT
-
-
PERFORM INITIALIZATION
Note
-
Performing reset memory will clear the learned values of both the yaw rate sensor (deceleration sensor 0 point calibration) and CVT oil pressure (CVT oil pressure calibration). Make sure to perform reset memory, yaw rate sensor 0 point calibration and CVT oil pressure calibration when replacing any of the parts shown in the following table:
Replaced Part
-
Continuously variable transaxle assembly
-
ECM
-
Oil pressure sensor
-
Yaw rate sensor
-
-
After performing reset memory, always perform yaw rate sensor (deceleration sensor 0 point) calibration first, and then CVT oil pressure calibration.
-
Always perform 0 point calibration with the vehicle on level ground (Inclination: 0 +/-0.25°).
-
Do not shake or vibrate the vehicle during 0 point calibration.
-
Using the intelligent tester, perform reset memory, deceleration sensor 0 point calibration and CVT oil pressure calibration Click here.
-
Check that no DTC is stored.
NEXT
END
-
-
REPLACE CONTINUOUSLY VARIABLE TRANSAXLE ASSEMBLY
-
Replace the continuously variable transaxle assembly Click here.
NEXT
-
-
PERFORM INITIALIZATION
Note
-
Performing reset memory will clear the learned values of both the yaw rate sensor (deceleration sensor 0 point calibration) and CVT oil pressure (CVT oil pressure calibration). Make sure to perform reset memory, yaw rate sensor 0 point calibration and CVT oil pressure calibration when replacing any of the parts shown in the following table:
Replaced Part
-
Continuously variable transaxle assembly
-
ECM
-
Oil pressure sensor
-
Yaw rate sensor
-
-
After performing reset memory, always perform yaw rate sensor (deceleration sensor 0 point) calibration first, and then CVT oil pressure calibration.
-
Always perform 0 point calibration with the vehicle on level ground (Inclination: 0 +/-0.25°).
-
Do not shake or vibrate the vehicle during 0 point calibration.
-
Using the intelligent tester, perform reset memory, deceleration sensor 0 point calibration and CVT oil pressure calibration Click here.
-
Check that no DTC is stored.
NEXT
END
-