SEAT POSITION SENSOR INSTALLATION
CAUTION / NOTICE / HINT
CAUTION:
Wear protective gloves. Sharp areas on the parts may injure your hands.
Tech Tips
-
Use the same procedure for RHD and LHD vehicles.
-
The procedure listed below is for LHD vehicles.
PROCEDURE
-
INSTALL SEAT POSITION AIRBAG SENSOR
Note
-
If the seat position airbag sensor has been dropped, or there are any cracks, dents or other defects in the case or connector, replace the seat position airbag sensor with a new one.
-
When installing the seat position airbag sensor, be careful that the SRS wiring does not interfere with other parts and that it is not pinched between other parts.
-
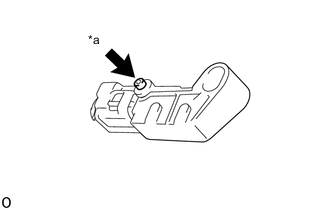
Text in Illustration *a Adjustment Support Align the adjustment support and set the seat position airbag sensor in to place.
-
Using a T30 "TORX" socket wrench, temporarily install the seat position airbag sensor with a new "TORX" bolt.
Tech Tips
Temporarily install the seat position airbag sensor so that the sensor does not fall off of the adjustment support.
-
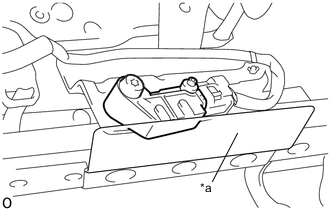
Text in Illustration *a Detection Plate With the seat position airbag sensor above the detection plate, adjust the clearance between the seat position airbag sensor and the detection plate.
-
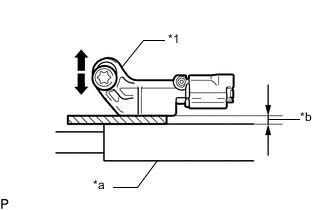
Text in Illustration *1 Seat Position Airbag Sensor *a Detection Plate *b Clearance (0.6 mm to 2.0 mm) 
1.0 mm Feeler Gauge Insert a 1.0 mm (0.0393 in.) feeler gauge between the seat position airbag sensor and detection plate.
-
Move the seat position airbag sensor up and down to adjust the clearance between it and the detection plate.
Tech Tips
Move the feeler gauge back and forth and adjust the position of the seat position airbag sensor so that a small amount of resistance can be felt.
-
Using a T30 "TORX" socket wrench, tighten the "TORX" bolt.
- Torque:
- 8.0 N*m { 82 kgf*cm, 71 in.*lbf }
-
Pull out the feeler gauge.
-
Check the clearance between the seat position airbag sensor and seat rail.
OK 0.6 mm (0.0236 in.) to 2.0 mm (0.0787 in.) -
Check that the seat position airbag sensor and seat slide position sensor protector are not loosely installed.
-
Connect the connector.
-
-
-
INSTALL SEAT SLIDE POSITION SENSOR PROTECTOR
for Manual Seat: Click here
for Power Seat: Click here
-
INSTALL FRONT SEAT ASSEMBLY LH
for Manual Seat: Click here
for Power Seat: Click here
-
CONNECT CABLE TO NEGATIVE BATTERY TERMINAL
Note
When disconnecting the cable, some systems need to be initialized after the cable is reconnected Click here.
-
CHECK SRS WARNING LIGHT