REAR DOOR COURTESY SWITCH INSTALLATION

Tech Tips
-
Use the same procedure for the RH and LH sides.
-
The procedure described below is for the LH side.
-
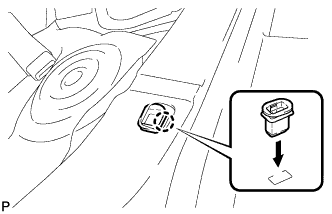
INSTALL REAR DOOR COURTESY LIGHT SWITCH ASSEMBLY
-
Using a T30 "TORX" socket wrench, install the rear door courtesy light switch assembly with the screw.
- Torque:
- 6.3 N*m { 64 kgf*cm, 56 in.*lbf }
Tech Tips
There are 2 diameters for the "TORX" screws: 6 mm (0.236 in.) and 7 mm (0.276 in.). The diameter of a supplied "TORX" screw is 7 mm (0.276 in.).
-
Connect the connector.
-
-
INSTALL REAR SIDE SEATBACK ASSEMBLY
-
Engage the hook to install the rear side seatback assembly LH.
-
Install the 2 bolts.
- Torque:
- 18 N*m { 184 kgf*cm, 13 ft.*lbf }
-
Connect the connector.
-
Connect the rear seat outer belt to the rear seat shoulder belt guide LH.
-
-
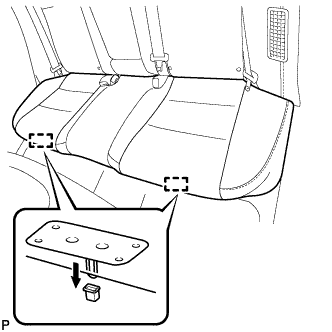
INSTALL REAR SEAT CUSHION LOCK HOOK
-
Engage the claw to install a new rear seat cushion lock hook.
Note
Rear seat cushion lock hooks must not be reused.
Tech Tips
Use the same procedure for the RH side and the LH side.
-
-
INSTALL REAR SEAT CUSHION ASSEMBLY
-
Place the rear seat cushion assembly in the cabin.
Note
Be careful not to damage the vehicle body.
-
Engage the 2 hooks of the seat cushion to the vehicle body as shown in the illustration.
-
Confirm that the seat cushion is firmly installed.
Note
When installing the seat cushion, make sure that the seat belt buckles are not under the seat cushion.
-
-
CONNECT CABLE TO AUXILIARY BATTERY NEGATIVE TERMINAL
Note
When disconnecting the cable, some systems need to be initialized after the cable is reconnected Click here.
-
INSTALL LUGGAGE TRIM SERVICE HOLE COVER
-
Engage the claw to connect the luggage trim service hole cover.
-
-
INSPECT SRS WARNING LIGHT