BATTERY SMART UNIT INSTALLATION

-
INSTALL BATTERY SMART UNIT
CAUTION:
Wear insulated gloves.
-
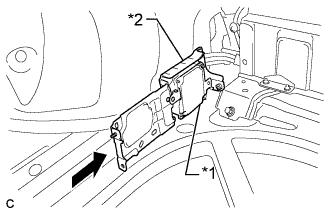
Text in Illustration *1 Battery Smart Unit *2 No. 2 Hybrid Vehicle Battery Shield Panel Install the battery smart unit together with the No. 2 hybrid vehicle battery shield panel to the side of the HV battery from the rear of the vehicle.
Tech Tips
When installing the battery smart unit and No. 2 hybrid vehicle battery shield panel to the vehicle, they can only be installed together.
-

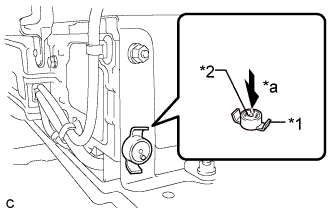
Text in Illustration *a Black Label Install the battery smart unit with the bolt.
- Torque:
- 7.5 N*m { 76 kgf*cm, 66 in.*lbf }
Note
Check color of the label.
-
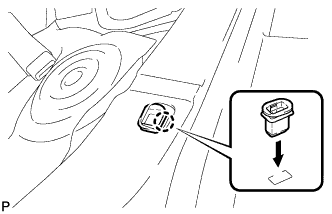
Connect the connector.
Note
The connector should be connected securely.
-
Install the No. 2 hybrid vehicle battery shield panel with the 2 bolts and nut.
- Torque:
- 7.5 N*m { 76 kgf*cm, 66 in.*lbf }
-
Connect the 3 wire harness clamps.
-
Connect the 2 connectors.
Note
The connectors should be connected securely.
-
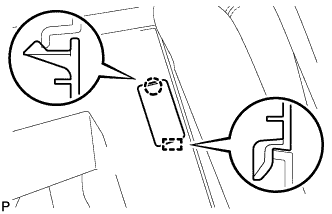
Text in Illustration *1 Battery Cover Lock Striker *2 Button *a Push Install the battery cover lock striker, then push the button to lock it.
-
-
INSTALL BATTERY COOLING BLOWER ASSEMBLY
Note
-
Be sure not to touch the fan part of the battery cooling blower assembly.
-
Do not lift the battery cooling blower assembly using the wire harness.
-
Install the battery cooling blower assembly with the 3 nuts.
- Torque:
- 7.5 N*m { 76 kgf*cm, 66 in.*lbf }
-
Connect the connector.
-
-
INSTALL NO. 2 HYBRID BATTERY INTAKE DUCT
-
Engage the 2 claws to install the No. 2 hybrid battery intake duct.
-
Install the clip.
Note
Ensure that the duct is installed securely.
-
-
INSTALL NO. 2 HYBRID VEHICLE BATTERY UPPER COVER BRACKET
-
Install the No. 2 hybrid vehicle battery upper cover bracket with the 2 nuts.
- Torque:
- 7.5 N*m { 76 kgf*cm, 66 in.*lbf }
-
-
INSTALL NO. 1 HYBRID BATTERY INTAKE DUCT
-
Install the No. 1 hybrid battery intake duct with the 3 clips.
Note
Ensure that the duct is installed securely.
-
-
INSTALL REAR SIDE SEATBACK ASSEMBLY LH
-
Engage the hook to install the rear side seatback assembly LH.
-
Install the 2 bolts.
- Torque:
- 18 N*m { 184 kgf*cm, 13 ft.*lbf }
-
Connect the connector.
-
Connect the rear seat outer belt to the rear seat shoulder belt guide LH.
-
-
INSTALL REAR SEATBACK ASSEMBLY
-
Lift the rear seat back assembly LH.
-
Engage the guide and claw to install the No. 2 room partition cover.
-
Connect the rear seat outer belt to the rear seat center shoulder belt guide.
-
Lift the rear seat back assembly RH.
-
-
INSTALL REAR SEAT CUSHION LOCK HOOK
-
Engage the claw to install a new rear seat cushion lock hook.
Note
Rear seat cushion lock hooks must not be reused.
Tech Tips
Use the same procedure for the RH side and the LH side.
-
-
INSTALL REAR SEAT CUSHION ASSEMBLY
-
Place the rear seat cushion assembly in the cabin.
Note
Be careful not to damage the vehicle body.
-
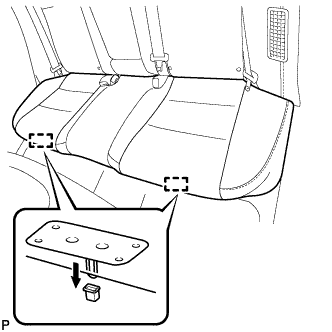
Engage the 2 hooks of the seat cushion to the vehicle body as shown in the illustration.
-
Confirm that the seat cushion is firmly installed.
Note
When installing the seat cushion, make sure that the seat belt buckles are not under the seat cushion.
-
-
INSTALL SERVICE PLUG GRIP