FRONT CONSOLE BOX DISASSEMBLY

-
REMOVE NO. 1 CONSOLE BOX CARPET
-

Remove the No. 1 console box carpet.
-
-
REMOVE INSTRUMENT PANEL CUP HOLDER DAMPER
-

Pull the instrument panel cup holder damper in the direction indicated by the arrow to remove the instrument panel cup holder damper.
-
-
REMOVE CONSOLE BOX POCKET
-

Pull the console box pocket in the direction indicated by the arrow to disengage the 2 guides and remove the console box pocket.
-
-
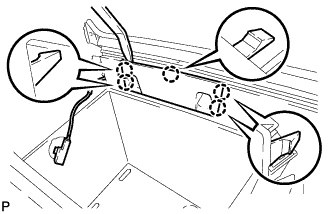
REMOVE FRONT CONSOLE BOX COVER
-

Disengage the clamp.
-
Remove the 3 screws.
-
Disengage the 2 claws and remove the front console box cover.
-
-
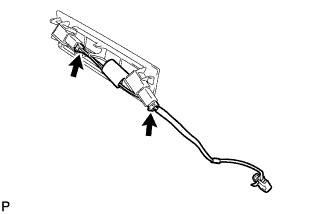
REMOVE STEREO JACK ADAPTER ASSEMBLY
-

Disengage the 2 claws and remove the stereo jack adapter assembly as shown in the illustration.
-
-
REMOVE REAR CONSOLE UPPER PANEL SUB-ASSEMBLY
-

Slide the rear console upper panel sub-assembly in the direction indicated by the arrow and remove the rear console upper panel sub-assembly.
-
-
REMOVE NO. 2 CONSOLE BOX DUCT
-

Remove the 2 screws and the No. 2 console box duct.
-
-
REMOVE CONSOLE MOUNTING RETAINER ASSEMBLY
-
Using a moulding remover, disengage the 5 claws and remove the console mounting retainer assembly.
-
-
REMOVE CONSOLE BOX WIRE
-
Disconnect the connectors to remove the console box wire.
-
-
REMOVE CONSOLE BOX ILLUMINATION LIGHT ASSEMBLY
-
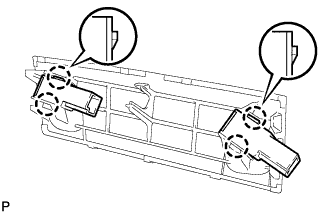
Disengage the 4 claws and remove the 2 console box illumination light assemblies.
-
-
REMOVE CENTER POWER POINT SOCKET ASSEMBLY
-

Text in Illustration *1 Protective Tape Using a screwdriver, disengage the 2 claws and remove the center power point socket assembly as shown in the illustration.
Tech Tips
Tape the screwdriver tip before use.
-
-
REMOVE CENTER POWER OUTLET SOCKET COVER
-

Disengage the 2 claws and remove the center power outlet socket cover.
-
-
REMOVE REAR CONSOLE END PANEL SUB-ASSEMBLY
-

Disengage the 4 clips and remove the rear console end panel sub-assembly.
-
-
REMOVE REAR CONSOLE ARMREST ASSEMBLY
-

Using a screwdriver, remove the 2 E-rings.
Note
Be careful not to allow the E-rings to pop out when removing them.
-

Text in Illustration *1 Protective Tape Using a screwdriver, pull out the box door hinge shafts.
Tech Tips
-
Tape the screwdriver tip before use.
-
The illustration is for the LH side.
-
Use the same procedure for the RH side and LH side.
-
-
Remove the rear console armrest assembly.
-