REAR SEAT OUTER BELT ASSEMBLY INSTALLATION

-
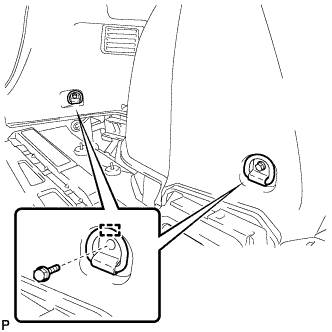
INSTALL REAR SEAT OUTER BELT ASSEMBLY
-
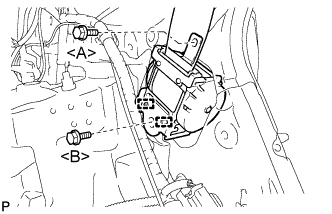
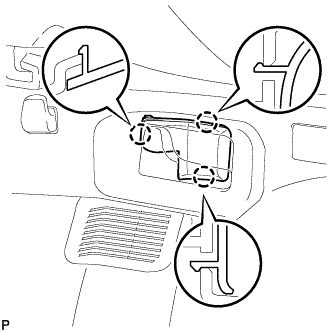
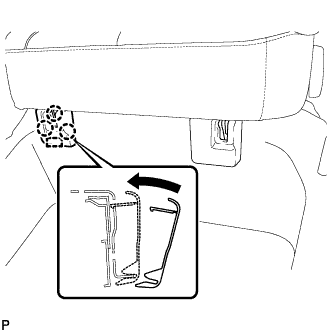
Engage the 2 guides.
-
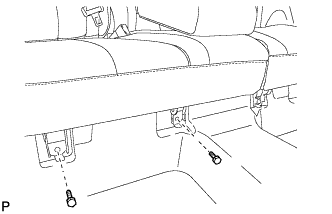
Install the rear seat outer belt assembly with the 2 bolts.
- Torque:
- Bolt <A>
- 7.5 N*m { 77 kgf*cm, 66 in.*lbf }
- Bolt <B>
- 42 N*m { 428 kgf*cm, 31 ft.*lbf }
-
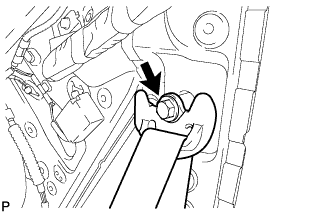
Connect the shoulder anchor of the rear seat outer belt assembly with the bolt.
- Torque:
- 42 N*m { 428 kgf*cm, 31 ft.*lbf }
-
Check if the ELR locks.
Note
The check should be performed with the outer belt assembly installed.
-
With the belt assembly installed, check that the belt locks when it is pulled out quickly.
-
-
-
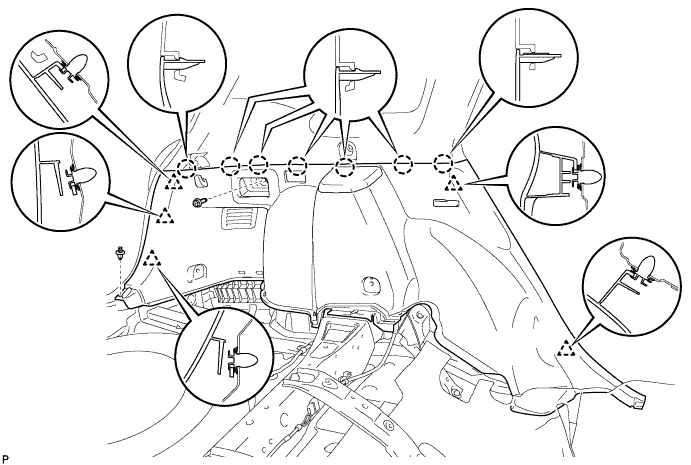
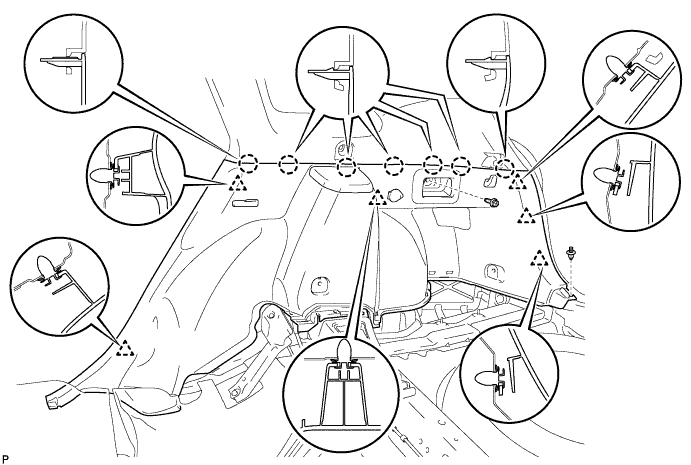
INSTALL ROOF SIDE INNER GARNISH ASSEMBLY
-
Pass the floor anchor of the rear seat outer belt assembly LH through the roof side inner garnish assembly LH.
-
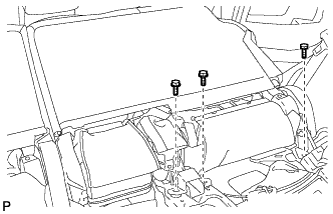
Insert the upper edge of the roof side inner garnish assembly LH into the roof headlining. Lift the lower edge of the garnish up and push it in over the 3 stud bolts while ensuring ample clearance.
Note
Do not damage the roof headlining assembly or roof side inner garnish assembly.
-
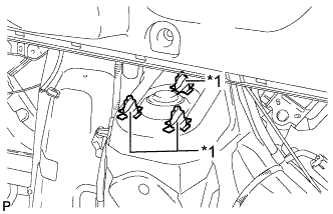
Engage the 10 clips to install the roof side inner garnish assembly LH with the bolt.
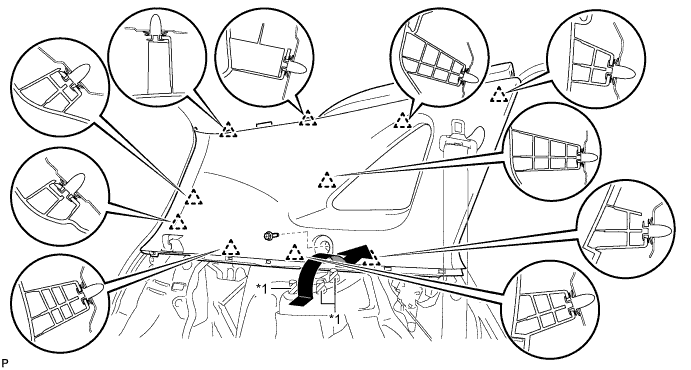
Text in Illustration *1 Stud Bolt - - -
Text in Illustration *1 Protective Tape Remove the applied protective tape.
-
w/ Rear Speaker:
-
Disconnect the connector.
-
-
-
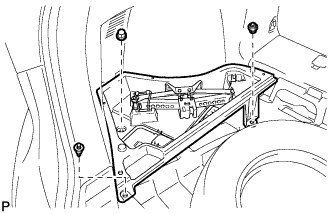
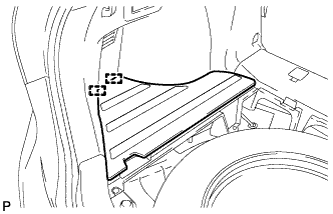
INSTALL DECK TRIM SIDE PANEL ASSEMBLY LH (for LH Side)
-
Connect the connector.
-
Engage the 7 claws and the 5 clips.
-
Install the deck trim side panel assembly LH with the bolt and clip.
-
-
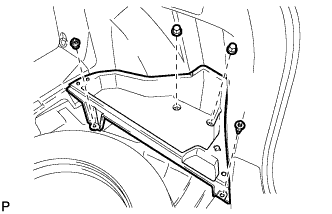
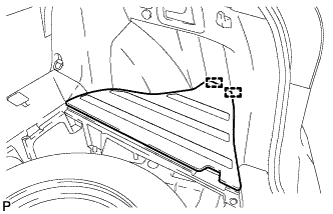
INSTALL DECK TRIM SIDE PANEL ASSEMBLY RH (for RH Side)
-
Connect each connector.
-
Engage the 7 claws and the 6 clips.
-
Install the deck trim side panel assembly RH with the bolt and clip.
-
-
CONNECT REAR SEAT OUTER BELT ASSEMBLY
-
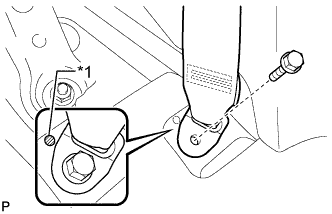
Text in Illustration *1 Protruding Part Connect the floor anchor end of the rear seat outer belt assembly and install the bolt.
- Torque:
- 42 N*m { 428 kgf*cm, 31 ft.*lbf }
Note
Do not allow the anchor part of the rear seat outer belt assembly to overlap the protruding part of the floor panel.
-
-
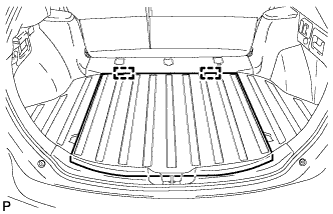
INSTALL LUGGAGE HOLD BELT STRIKER ASSEMBLY
-
Engage the 2 guides.
-
Install the 2 luggage hold belt striker assemblies with the 2 bolts.
-
-
INSTALL RECLINING REMOTE CONTROL BEZEL
-
Engage the 3 claws to install the reclining remote control bezel LH.
-
-
INSTALL REAR SEAT ASSEMBLY LH (for LH Side)
-
Place the rear seat assembly LH in the cabin.
Note
Be careful not to damage the vehicle body.
-
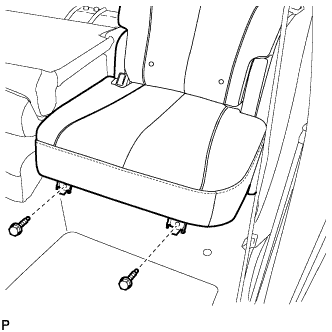
Temporarily install the 2 bolts on the front side of the seat.
-
Temporarily install the 2 bolts on the rear side of the seat.
-
Install the rear seat assembly LH with the 4 bolts.
- Torque:
- 37 N*m { 377 kgf*cm, 27 ft.*lbf }
-
-
CONNECT REAR SEAT NO. 2 RECLINING CONTROL CABLE SUB-ASSEMBLY (for LH Side)
-
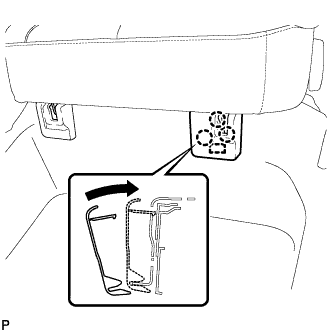
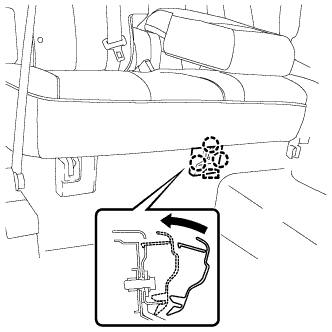
Remove the rear seat No. 2 reclining control cable from the carpet hole.
-
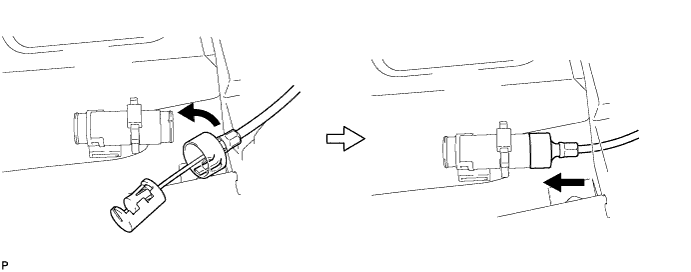
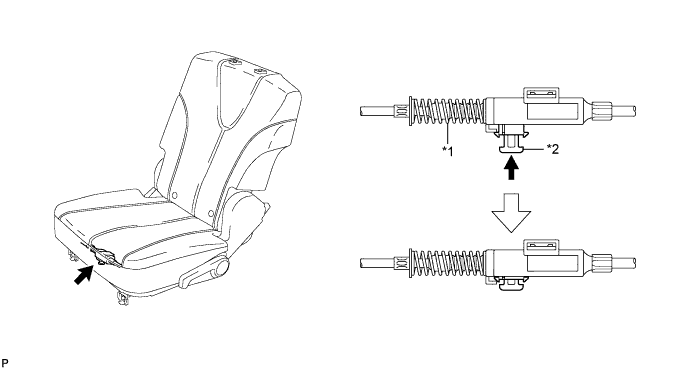
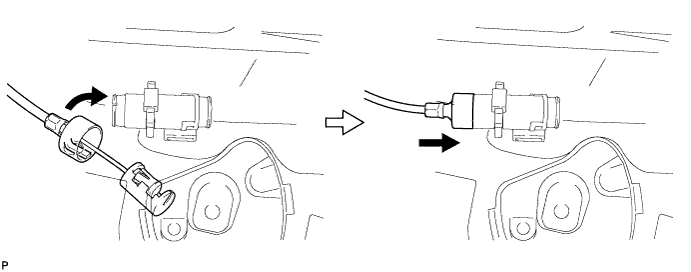
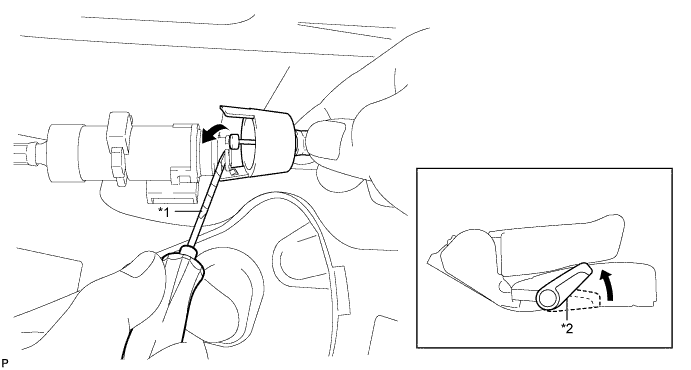
Connect the rear seat No. 2 reclining control cable sub-assembly as shown in the illustration.
Text in Illustration *1 Protective Tape *2 Seat Track Adjusting Handle -
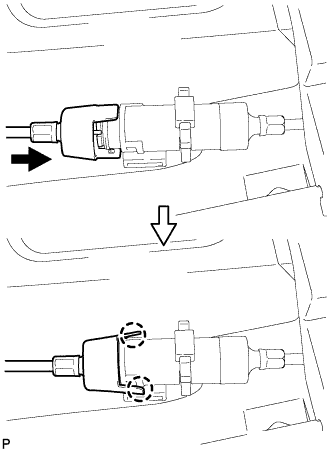
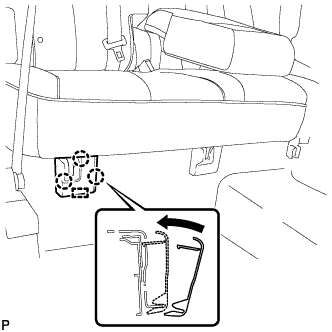
Engage the 2 claws and connect the rear seat No. 2 reclining control cable sub-assembly as shown in the illustration.
-
Return the seatback to the upright position.
-
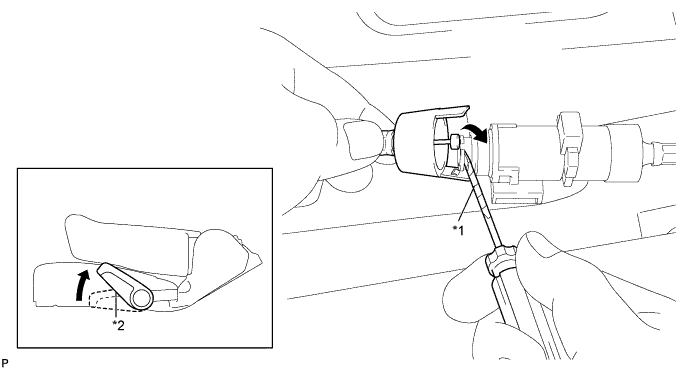
Pull up the adjuster's lock piece to lock it as shown in the illustration.
Text in Illustration *1 Adjuster Spring *2 Lock Piece Note
When pressing the lock piece, make sure the adjuster's spring is not compressed.
-
-
INSTALL REAR SEAT OUTER TRACK BRACKET COVER (for LH Side)
-
Engage the guide and 3 claws and install the rear seat outer track bracket cover as shown in the illustration.
-
-
INSTALL REAR SEAT INNER TRACK BRACKET COVER (for LH Side)
-
Engage the guide and 3 claws and install the rear seat inner track bracket cover as shown in the illustration.
-
-
INSTALL REAR SEAT HEADREST ASSEMBLY (for LH Side)
-
INSTALL REAR SEAT ASSEMBLY RH (for RH Side)
-
Place the rear seat assembly RH in the cabin.
Note
Be careful not to damage the vehicle body.
-
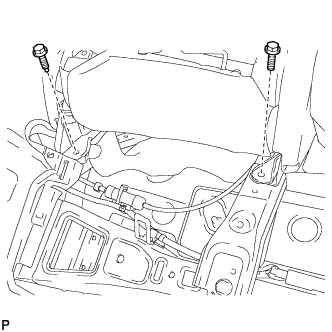
Temporarily install the 2 bolts on the front side of the seat.
-
Temporarily install the 3 bolts on the rear side of the seat.
-
Install the rear seat assembly RH with the 5 bolts.
- Torque:
- 37 N*m { 377 kgf*cm, 27 ft.*lbf }
-
-
CONNECT REAR SEAT RECLINING CONTROL CABLE SUB-ASSEMBLY (for RH Side)
-
Connect the rear seat reclining control cable as shown in the illustration.
-
Connect the rear seat reclining control cable sub-assembly as shown in the illustration.
Text in Illustration *1 Protective Tape *2 Seat Track Adjusting Handle -
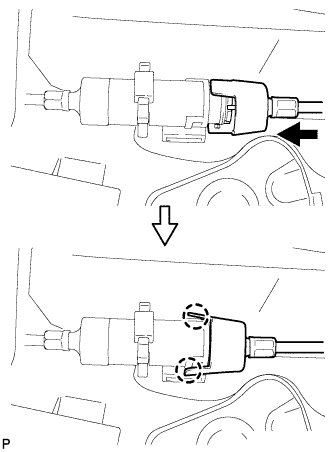
Engage the 2 claws and connect the rear seat reclining control cable sub-assembly as shown in the illustration.
-
Return the seatback to the upright position.
-
Pull up the adjuster's lock piece to lock it as shown in the illustration.
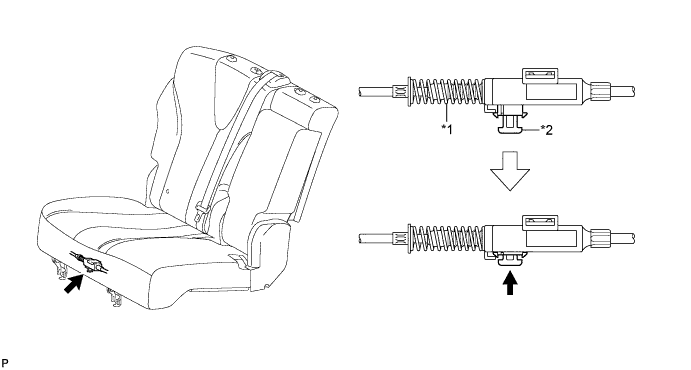
Text in Illustration *1 Adjuster Spring *2 Lock Piece Note
When pressing the lock piece, make sure the adjuster's spring is not compressed.
-
-
INSTALL REAR SEAT OUTER TRACK BRACKET COVER (for RH Side)
-
Engage the 3 claws and guide, and install the rear seat outer track bracket cover as shown in the illustration.
-
-
INSTALL REAR SEAT INNER TRACK BRACKET COVER (for RH Side)
-
Engage the 3 claws and guide, and install the rear seat inner track bracket cover as shown in the illustration.
-
-
INSTALL REAR SEAT CENTER HEADREST ASSEMBLY (for RH Side)
-
INSTALL REAR SEAT HEADREST ASSEMBLY (for RH Side)
-
INSTALL REAR FLOOR FINISH PLATE
-
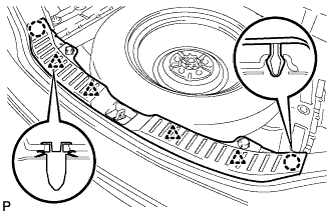
Engage the 4 clips and 2 claws to install the rear floor finish plate.
-
-
INSTALL REAR SEAT SUB FLOOR PANEL ASSEMBLY
-
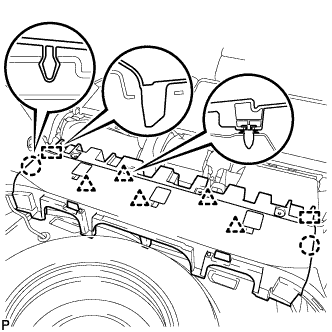
Engage the 2 guides, 2 claws and 5 clips to install the rear seat sub floor panel assembly.
-
-
INSTALL NO. 1 DECK BOARD
-
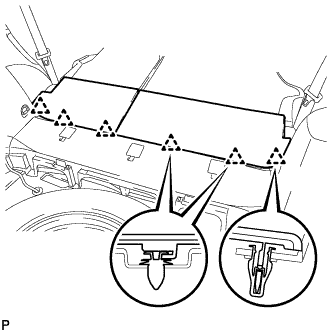
Engage the 6 clips to install the No. 1 deck board.
-
-
INSTALL DECK SIDE TRIM BOX LH
-
Install the deck side trim box LH with the 3 clips.
-
-
INSTALL NO. 3 DECK BOARD SUB-ASSEMBLY
-
Engage the 2 guides to install the No. 3 deck board sub-assembly.
-
-
INSTALL DECK SIDE TRIM BOX RH
-
Install the deck side trim box RH with the 4 clips.
-
-
INSTALL NO. 2 DECK BOARD SUB-ASSEMBLY
-
Engage the 2 guides to install the No. 2 deck board sub-assembly.
-
-
INSTALL DECK BOARD ASSEMBLY
-
Engage the 2 guides to install the deck board assembly.
-
-
INSTALL TONNEAU COVER ASSEMBLY
-
Install the tonneau cover assembly.
-
-
CONNECT REAR DOOR OPENING TRIM WEATHERSTRIP
-
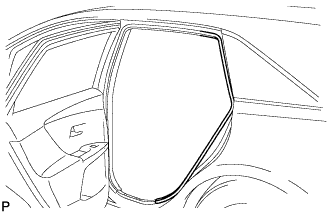
Connect the rear door opening trim weatherstrip.
-
-
INSTALL REAR DOOR SCUFF PLATE
-
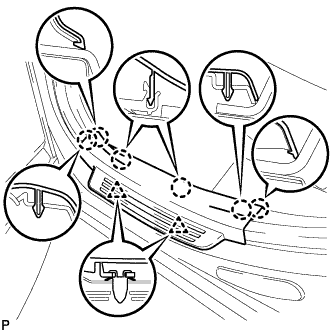
Engage the 2 clips and 6 claws to install the rear door scuff plate LH.
-