REAR STRUT ROD INSTALLATION

Tech Tips
-
Use the same procedure for the RH side and LH side.
-
The procedure listed below is for the LH side.
-
INSTALL REAR STRUT ROD ASSEMBLY (for 2WD)
-
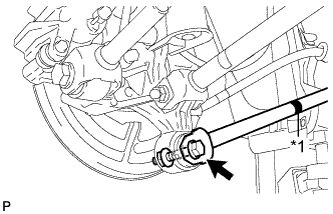
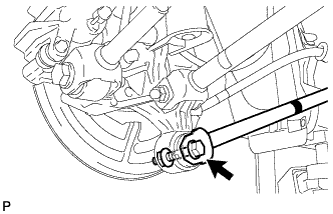
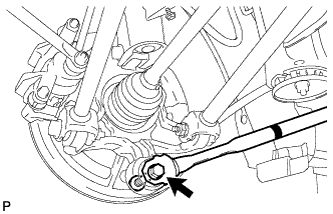
Text in Illustration *1 Identification Mark Temporarily install the rear strut rod assembly to the rear axle carrier sub-assembly with the bolt and the nut.
Note
-
Ensure that the identification mark faces the inside of the vehicle.
-
Since a stopper nut is used, temporarily tighten the bolt.
-
-
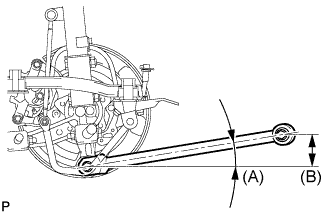
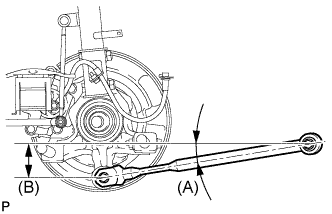
Set the rear strut rod assembly in the tightening position shown in the illustration.
Standard angle (A) 9°54' (9.9°) Standard length (B) 83.9 mm (3.30 in.) -
Fully tighten the bolt in the tightening position.
- Torque:
- 80 N*m { 816 kgf*cm, 59 ft.*lbf }
-
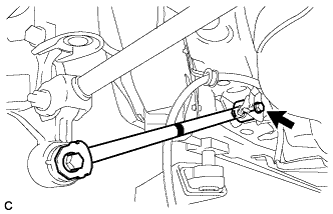
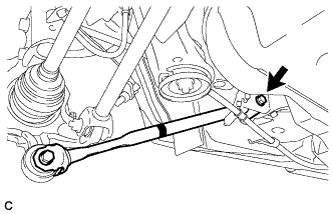
Temporarily install the rear strut rod assembly to the body with the bolt and the nut.
-

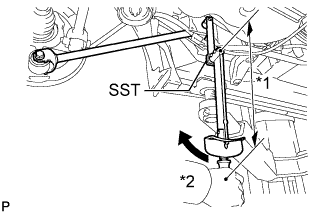
Text in Illustration *1 Fulcrum Length *2 Turn Using SST and a socket wrench (17 mm), fully tighten the bolt in the rebound position.
- SST
- 09961-00950
- Torque:
- without SST
- 80 N*m { 816 kgf*cm, 59 ft.*lbf }
- with SST
- 59 N*m { 603 kgf*cm, 44 ft.*lbf }
Note
-
Since the stopper nut is used, fully tighten the bolt.
-
Use a torque wrench with a fulcrum length of 425 mm (1.39 ft.).
-
This torque value is effective when SST is parallel to the torque wrench.
-
-
INSTALL REAR STRUT ROD ASSEMBLY (for AWD)
-

Text in Illustration *1 Identification Mark Temporarily install the rear strut rod assembly to the rear axle carrier sub-assembly with the bolt and the nut.
Note
-
Ensure that the identification mark faces the inside of the vehicle.
-
Since a stopper nut is used, temporarily tighten the bolt.
-
-
Set the rear strut rod assembly in the tightening position shown in the illustration.
Standard angle (A) 9°3' (9.04°) Standard length (B) 78.3 mm (3.08 in.) -
Fully tighten the bolt in the tightening position.
- Torque:
- 80 N*m { 816 kgf*cm, 59 ft.*lbf }
-
Temporarily install the rear strut rod assembly to the body with the bolt and the nut.
-
Text in Illustration *1 Fulcrum Length *2 Turn Using SST and a socket wrench (17 mm), fully tighten the bolt in the rebound position.
- SST
- 09961-00950
- Torque:
- without SST
- 80 N*m { 816 kgf*cm, 59 ft.*lbf }
- with SST
- 59 N*m { 603 kgf*cm, 44 ft.*lbf }
Note
-
Since a stopper nut is used, fully tighten the bolt.
-
Use a torque wrench with a fulcrum length of 425 mm (1.39 ft.).
-
This torque value is effective when SST is parallel to the torque wrench.
-
-
INSTALL NO. 3 PARKING BRAKE CABLE ASSEMBLY
-
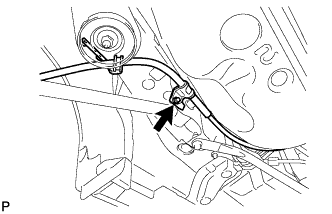
Install the No. 3 parking brake cable assembly with the bolt.
- Torque:
- 6.0 N*m { 61 kgf*cm, 53 in.*lbf }
Note
Do not twist the No. 3 parking brake cable assembly when installing it.
-
-
INSTALL REAR WHEEL
- Torque:
- 103 N*m { 1050 kgf*cm, 76 ft.*lbf }
-
STABILIZE SUSPENSION
-
Lower the vehicle to the ground.
-
Bounce the vehicle up and down at the corners to stabilize the rear suspension.
-