FRONT LOWER SUSPENSION ARM INSTALLATION

Tech Tips
-
Use the same procedure for the LH side and RH side.
-
The following procedure listed below is for the LH side.
-
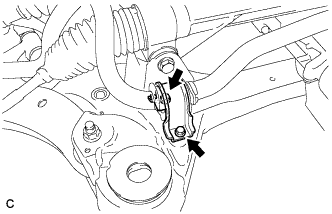
INSTALL FRONT LOWER SUSPENSION ARM
-
Install the front lower arm bushing stopper to the front lower suspension arm.
-
Temporarily tighten the front lower suspension arm to the front frame assembly with the 3 bolts and nut.
-
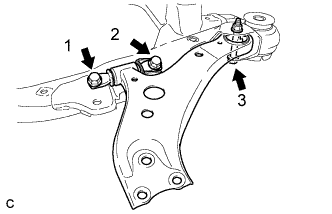
Tighten the 3 bolts in the order shown in the illustration.
- Torque:
- Bolt 1, 2
- 200 N*m { 2039 kgf*cm, 147 ft.*lbf }
- Bolt 3
- 135 N*m { 1377 kgf*cm, 100 ft.*lbf }
Tech Tips
Start installing the bolts from the front of the vehicle.
-
-
TEMPORARILY TIGHTEN ENGINE MOUNTING INSULATOR LH
-
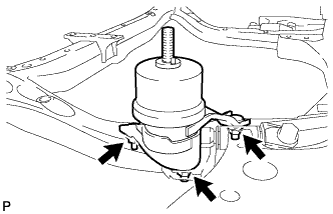
Temporarily install the engine mounting insulator LH with the 3 nuts.
Tech Tips
Perform this procedure only when replacement of the engine mounting insulator is necessary.
-
-
INSTALL FRONT FRAME ASSEMBLY
-
Set the engine assembly with transaxle to the front frame assembly.
-
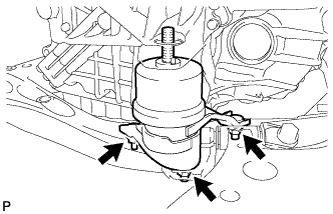
Install the engine mounting insulators RH and LH with the 2 nuts.
- Torque:
- 95 N*m { 968 kgf*cm, 70 ft.*lbf }
-
Install the front engine mounting insulator with the bolt.
- Torque:
- 87 N*m { 887 kgf*cm, 64 ft.*lbf }
-
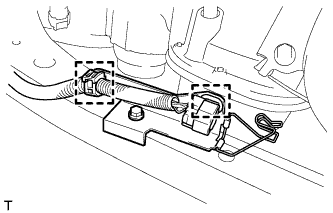
Connect the 2 clamps with the engine wire.
-
-
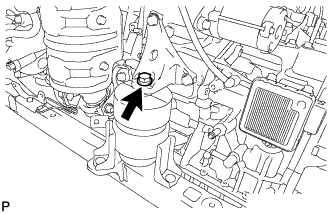
INSTALL REAR ENGINE MOUNTING INSULATOR ASSEMBLY (for AWD)
-
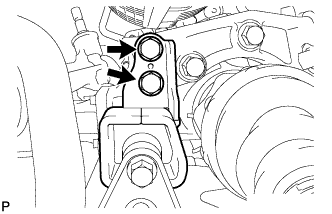
Install the rear engine mounting insulator assembly with the 2 bolts to the engine mounting bracket.
- Torque:
- 75 N*m { 764 kgf*cm, 55 ft.*lbf }
-
-
FULLY TIGHTEN ENGINE MOUNTING INSULATOR LH
-
Fully tighten the engine mounting insulator LH with the 3 nuts.
- Torque:
- 87 N*m { 887 kgf*cm, 64 ft.*lbf }
-
Install the 2 hole plugs.
Tech Tips
Perform this procedure only when replacement of the engine mounting insulator is necessary.
-
-
INSTALL STEERING LINK ASSEMBLY (for AWD)
-
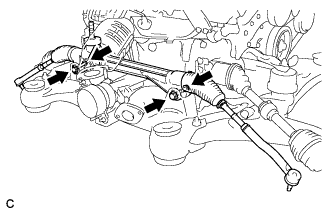
Install the steering link assembly with the 2 bolts and 2 nuts.
- Torque:
- 70 N*m { 713 kgf*cm, 51 ft.*lbf }
Note
-
Make sure to tighten the bolts starting from the left side of the vehicle.
-
Because the nut has its own stopper, do not turn the nut. Tighten the bolt with the nut secured.
-
-
INSTALL FRONT STABILIZER BAR WITH FRONT STABILIZER LINK ASSEMBLY (for AWD)
-
INSTALL FRONT NO. 1 STABILIZER BRACKET LH (for AWD)
-
Install the front No. 1 stabilizer bracket LH to the front frame assembly with the 2 bolts.
- Torque:
- 29 N*m { 296 kgf*cm, 21 ft.*lbf }
-
-
INSTALL FRONT NO. 1 STABILIZER BRACKET RH (for AWD)
Tech Tips
Perform the same procedure as the LH side.
-
INSTALL ENGINE ASSEMBLY WITH TRANSAXLE
Tech Tips
Refer to the procedure form Install Engine Assembly with Transaxle Click here.