LUMBAR SUPPORT ADJUSTER ASSEMBLY (for Power Seat) INSTALLATION

CAUTION:
Wear protective gloves. Sharp areas on the parts may injure your hands.
Tech Tips
-
Use the same procedure for RHD and LHD vehicles.
-
The procedure listed below is for LHD vehicles.
-
INSTALL REAR SEATBACK SPRING ASSEMBLY LH
-
Set the rear seatback cover with pad LH in place.
-
Attach the seatback cover bracket with the nut.
- Torque:
- 5.6 N*m { 57 kgf*cm, 50 in.*lbf }
-
Connect the connector and install the wire harness clamp.
-
Attach the 8 hooks.
-
Using hog ring pliers, install the rear seatback spring assembly LH (lumbar support adjuster assembly LH) to the rear seatback cover with pad LH with 19 new hog rings.
Note
-
Be careful not to damage the rear seatback cover with pad LH.
-
Be sure to securely install the hog rings as shown in the illustration while preventing wrinkles from forming on the rear seatback cover with pad LH.
Text in Illustration *1 Seatback Cover Bracket *2 Hook *3 Hog Ring Pliers - - -
-
-
INSTALL REAR SEAT LOCK BASE LH
-
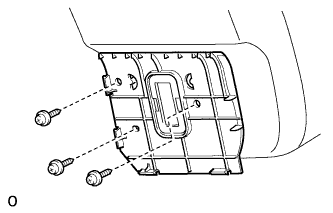
Install the rear seat lock base LH with the 3 screws.
-
-
INSTALL REAR SEAT COVER CAP LH
-
Attach the 5 claws to install the rear seat cover cap LH.
-
-
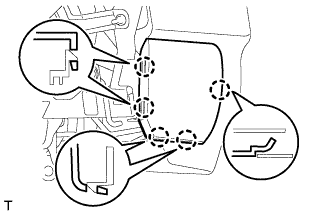
INSTALL SEAT HEATER CONTROL SUB-ASSEMBLY
-
Attach the guide to install the seat heater control sub-assembly.
-
Connect the connector.
Tech Tips
Use the same procedure to install the seat heater control sub-assembly on the other side.
-
-
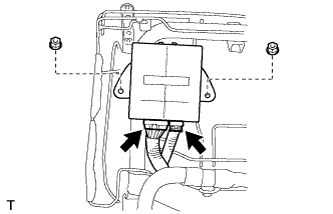
INSTALL REAR SEAT CLIMATE CONTROL ECU LH
-
Install the rear seat climate control ECU LH with the 2 nuts.
-
Connect the 2 connectors.
-
-
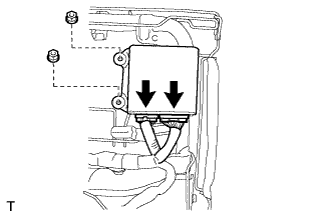
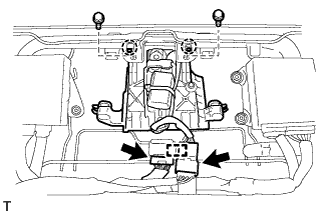
INSTALL POSITION CONTROL ECU ASSEMBLY
-
Install the position control ECU assembly with the 2 nuts.
-
Connect the 2 connectors.
Tech Tips
Use the same procedure to install the position control ECU assembly on the other side.
-
-
INSTALL REAR NO. 1 SEAT HEADREST ADJUSTER SUB-ASSEMBLY
-
Attach the 2 claws to install the rear No. 1 seat headrest adjuster sub-assembly with the 2 bolts.
-
Connect the 2 connectors and attach the wire harness clamp.
Tech Tips
Use the same procedure to install the rear No. 1 seat headrest adjuster sub-assembly on the other side.
-
-
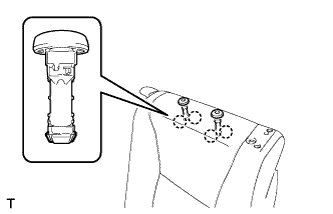
INSTALL REAR SEAT HEADREST SUPPORT
-
Attach the 4 claws to install the 2 rear seat headrest supports.
Tech Tips
Use the same procedure to install the rear seat headrest support on the other side.
-
-
INSTALL REAR SEAT HEADREST ASSEMBLY
-
Install the rear seat headrest assembly with the 2 pins.
Tech Tips
Use the same procedure to install the rear seat headrest assembly on the other side.
-
-
INSTALL REAR SEAT SHOULDER BELT GUIDE LH
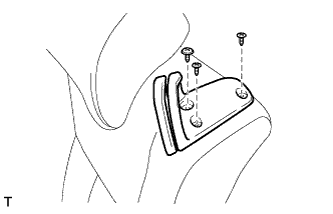
-
Install the rear seat shoulder belt guide LH with the 3 screws.
-
-
INSTALL REAR SEATBACK SPRING ASSEMBLY RH
Tech Tips
Use the same procedures described for the LH side.
-
INSTALL REAR SEAT LOCK BASE RH
Tech Tips
Use the same procedures described for the LH side.
-
INSTALL REAR SEAT COVER CAP RH
Tech Tips
Use the same procedures described for the LH side.
-
INSTALL REAR SEAT CLIMATE CONTROL ECU RH
Tech Tips
Use the same procedures described for the LH side.
-
INSTALL REAR SEAT SHOULDER BELT GUIDE RH
Tech Tips
Use the same procedures described for the LH side.
-
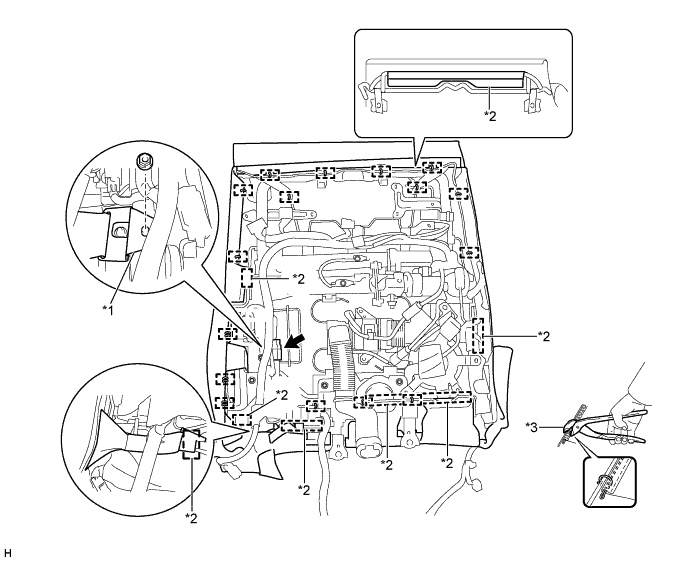
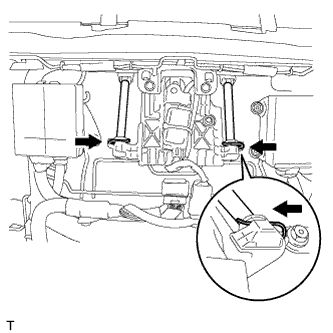
INSTALL REAR SEATBACK ASSEMBLY LH
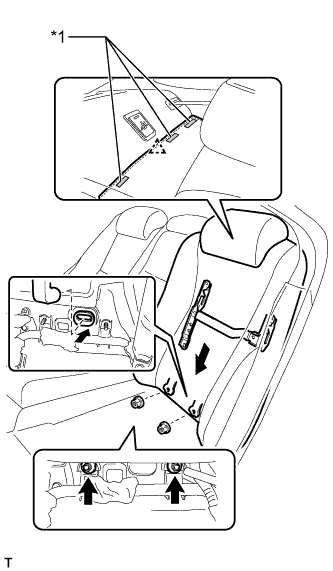
-
Connect the rear seatback assembly LH to the rear No. 2 seatback adjuster assembly, and press down on the rear seatback assembly LH to install it to the rear No. 2 seatback adjuster assembly. Then connect the air duct to the vehicle body.
Note
Be careful not to damage the vehicle body.
-
Install the 2 nuts.
- Torque:
- 20 N*m { 204 kgf*cm, 15 ft.*lbf }
-
Install the clip and attach the 3 pieces of fastening tape.
Text in Illustration *1 Fastening Tape -
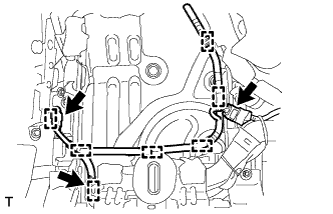
Connect the 3 connectors and attach the 7 wire harness clamps.
-
Connect the 2 connectors.
-
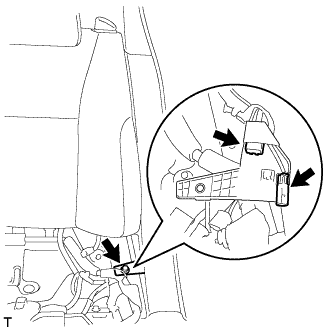
Install the junction block with the bolt.
- Torque:
- 30 N*m { 306 kgf*cm, 22 ft.*lbf }
-

Connect the seat belt to the shoulder belt guide.
-
Attach the 2 claws to close the 2 caps.
-
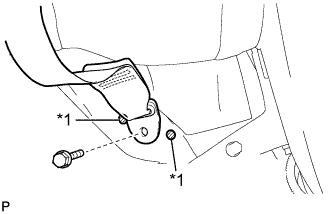
Text in Illustration *1 Protruding Part Connect the anchor part of the rear seat 3 point type belt assembly with the bolt.
- Torque:
- 42 N*m { 428 kgf*cm, 31 ft.*lbf }
Note
Do not allow the anchor part of the rear seat 3 point type belt assembly to overlap protruding parts of the floor panel.
-
-
INSTALL REAR SEATBACK ASSEMBLY RH
Tech Tips
Use the same procedures described for the LH side.
-
INSTALL REAR SEAT CUSHION ASSEMBLY LH
-
Connect the connector.
-
Attach the rear hook of the rear seat cushion assembly LH to the rear No. 2 seat adjuster assembly.
Note
Be careful not to damage the vehicle body.
-
Attach the 2 front hooks of the rear seat cushion assembly LH to the rear No. 2 seat adjuster assembly.
-
-
INSTALL REAR SEAT CUSHION ASSEMBLY RH
Tech Tips
Use the same procedures described for the LH side.
-
CONNECT CABLE TO AUXILIARY BATTERY NEGATIVE TERMINAL
Note
When disconnecting the cable, some systems need to be initialized after the cable is reconnected Click here.
-
INSTALL BATTERY SERVICE HOLE COVER LH
-

Text in Illustration *A for Standard *B for Ottoman Attach the battery service hole cover LH with the clip and fastening tape.
-
-
INSTALL DECK TRIM SIDE BOARD LH (w/o Spare Tire)
-

Attach the 2 clips to install the deck trim side board LH.
-
-
INSTALL DECK BOARD ASSEMBLY (w/o Spare Tire)

-
INSTALL LUGGAGE COMPARTMENT MAT SUB-ASSEMBLY (w/ Spare Tire)

-
CHECK SRS WARNING LIGHT
-
CHECK REAR SEAT ASSEMBLY
-
Check the power seat operation:
-
Check the climate control seat system:
-
Check the seat vibration system:
-