REAR SEAT ASSEMBLY (for Ottoman) REMOVAL

CAUTION:
Wear protective gloves. Sharp areas on the parts may injure your hands.
Tech Tips
-
Use the same procedure for RHD and LHD vehicles.
-
The procedure listed below is for LHD vehicles.
-
for Power Seat:
Before removing the rear seat, make sure to move the seat 37 mm (1.46 in.) from the rearmost position.
-
for Ottoman:
Before removing the rear seat, make sure to move the seat 17 mm (0.67 in.) from the rearmost position.
-
PRECAUTION
Note
After turning the power switch off, waiting time may be required before disconnecting the cable from the auxiliary battery terminal. Therefore, make sure to read the disconnecting the cable from the auxiliary battery terminal notice before proceeding with work Click here.
-
REMOVE LUGGAGE COMPARTMENT MAT SUB-ASSEMBLY (w/ Spare Tire)

-
REMOVE DECK BOARD ASSEMBLY (w/o Spare Tire)

-
REMOVE DECK TRIM SIDE BOARD LH (w/o Spare Tire)
-

Detach the 2 clips and remove the deck trim side board LH.
-
-
REMOVE BATTERY SERVICE HOLE COVER LH
-

Text in Illustration *A for Standard *B for Ottoman *1 Fastening Tape Detach the clip, fastening tape and remove the battery service hole cover LH.
-
-
DISCONNECT CABLE FROM AUXILIARY BATTERY NEGATIVE TERMINAL
CAUTION:
Wait at least 90 seconds after disconnecting the cable from the negative (-) auxiliary battery terminal to disable the SRS system.
Note
When disconnecting the cable, some systems need to be initialized after the cable is reconnected Click here.
-
REMOVE REAR SEAT CUSHION ASSEMBLY LH
-
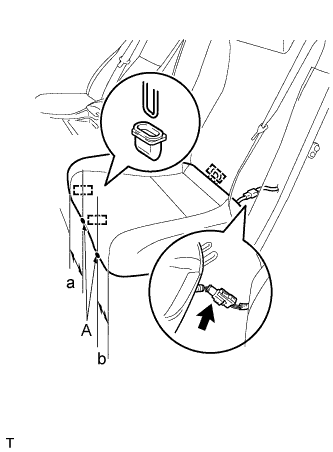
Detach the 2 front hooks of the rear seat cushion assembly LH from the rear No. 2 seat adjuster assembly.
Note
-
If the areas close to the insertion location of the rear seat cushion lock hooks (A) are not lifted straight up, the cushion spring may become deformed.
-
When lifting the rear seat cushion assembly, lift it quickly so that force is applied directly to the hooks. Do not lift it slowly.
Specification Area Measurement a 114 mm (4.49 in.) b 100 mm (3.94 in.) -
-
Detach the rear hook of the rear seat cushion assembly LH to remove the rear seat cushion assembly LH from the rear seatback spring assembly LH.
Note
Be careful not to damage the vehicle body.
-
Disconnect the connector.
-
-
REMOVE REAR SEAT CUSHION ASSEMBLY RH
-
Connect the cable to the negative (-) auxiliary battery terminal.
-
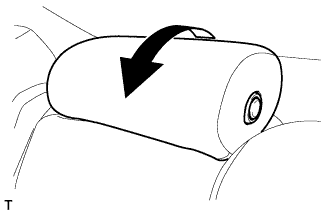
Operate the ottoman switch to move the ottoman to the return position.
-
Disconnect the cable from the negative (-) auxiliary battery terminal.
CAUTION:
Wait at least 90 seconds after disconnecting the cable from the negative (-) auxiliary battery terminal to disable the SRS system.
Note
When disconnecting the cable, some systems need to be initialized after the cable is reconnected Click here.
-
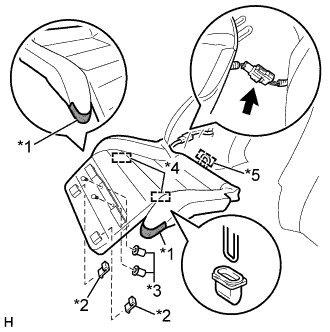
Text in Illustration *1 Protective Tape *2 Seat Cover Hook *3 Nut *4 Rear Seat Cushion Lock Hook *5 Rear Hook Put protective tape as shown in the illustration.
-
Remove the 2 seat cushion cover hooks.
-
Remove the 2 nuts and disconnect the seat cushion ottoman part.
-
Lift the corners of the rear seat cushion assembly RH to disconnect the 2 rear seat cushion lock hooks.
Note
-
If the areas close to the insertion location of the rear seat cushion lock hooks (cushion assembly corners) are not lifted straight up, the cushion spring may become deformed.
-
When lifting the rear seat cushion assembly, lift it quickly so that force is applied directly to the hooks. Do not lift it slowly.
-
-
Detach the rear hook of the rear seat cushion assembly RH to remove the rear seat cushion assembly RH from the rear seatback spring assembly RH.
Note
Be careful not to damage the vehicle body.
-
Disconnect the connector.
-
-
REMOVE REAR SEAT AIRBAG ASSEMBLY RH
-
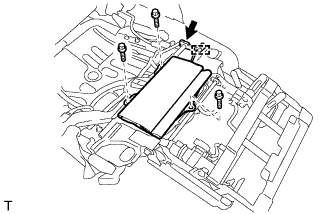
Detach the wire harness clamp and disconnect the connector.
-
Remove the 3 bolts and rear seat airbag assembly RH.
-
-
REMOVE REAR CENTER SEAT CUSHION ASSEMBLY (w/ Center Seat)
-
Detach the front hook of the rear center seat cushion assembly from the vehicle body.
Note
The cushion frame deforms easily. To avoid deforming the rear center seat cushion assembly, place your hands near the hook, and then pull up on the rear center seat cushion assembly.
-
Detach the rear hook of the rear center seat cushion assembly to remove the rear center seat cushion assembly from the center seatback frame sub-assembly.
Note
Be careful not to damage the vehicle body.
-
-
REMOVE REAR SEAT CONSOLE BOX (w/ Rear Console Box)
-
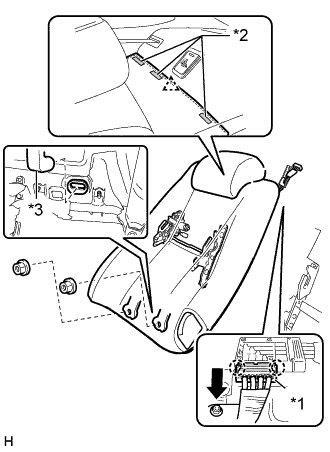
REMOVE REAR SEATBACK ASSEMBLY LH
-
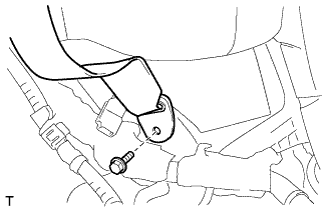
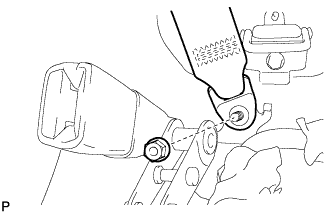
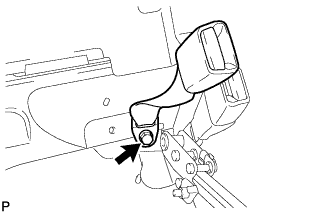
Remove the bolt and disconnect the anchor part of the rear seat 3 point type belt assembly LH.
-
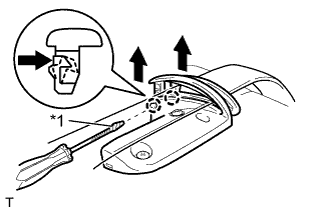
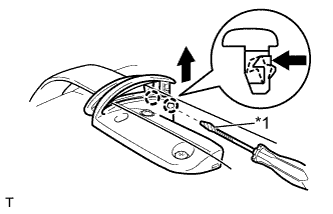
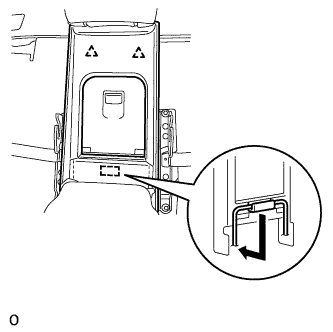
Using a screwdriver, detach the 2 claws and open the 2 caps of the rear seat shoulder belt guide.
Tech Tips
Tape the screwdriver tip before use.
Text in Illustration *1 Protective Tape -
Disconnect the rear seat 3 point type belt assembly from the shoulder belt guide.
-
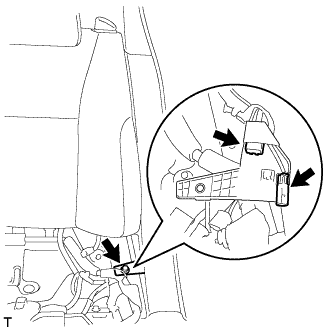
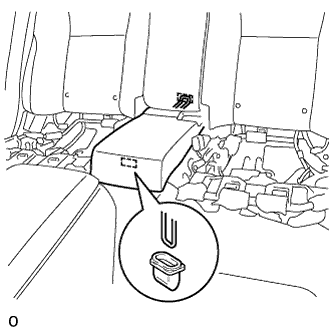
Remove the bolt and pull out the junction block.
-
Disconnect the 2 connectors.
-
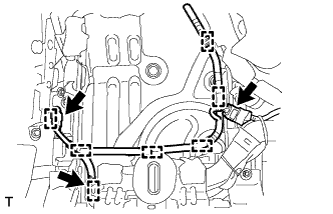
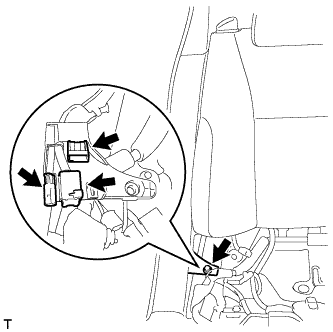
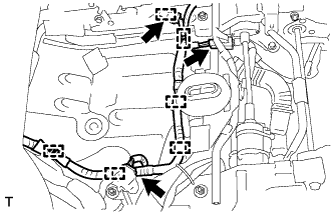
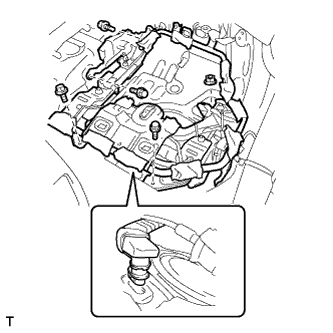
Detach the 7 wire harness clamps and disconnect the 3 connectors.
-
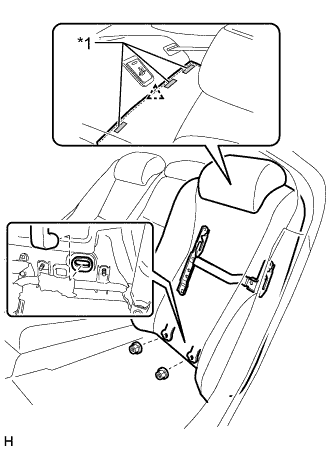
Text in Illustration *1 Fastening Tape Detach the 3 pieces of fastening tape and using a clip remover, detach the clip.
-
Remove the 2 nuts and disconnect the air duct from the vehicle.
-
Disconnect the rear seatback assembly LH from the rear No. 2 seat adjuster assembly and lift the rear seatback assembly LH upwards to remove it.
Note
Be careful not to damage the vehicle body.
-
-
REMOVE REAR SEATBACK ASSEMBLY RH
-

Remove the bolt and disconnect the anchor part of the rear seat 3 point type belt assembly RH.
-
Using a screwdriver, detach the 2 claws and open the 2 caps of the rear seat shoulder belt guide.
Tech Tips
Tape the screwdriver tip before use.
Text in Illustration *1 Protective Tape -
Remove the seat belt from the shoulder belt guide.
-
Remove the bolt and pull out the junction block.
-
Disconnect the 3 connectors.
-
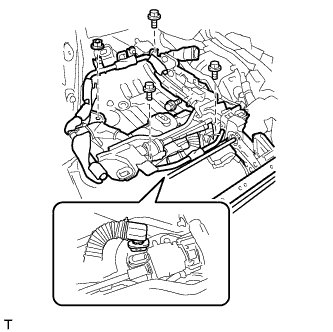
Detach the 6 wire harness clamps and disconnect the 3 connectors.
-
Remove the nut, detach the 2 claws and disconnect the air hose.
-
Detach the 3 pieces of fastening tape and using a clip remover, detach the clip.
-
Remove the 2 nuts and disconnect the air duct from the vehicle.
-
Disconnect the rear seatback assembly RH from the rear No. 2 seat adjuster assembly and lift the rear seatback assembly RH upwards to remove it.
Note
Be careful not to damage the vehicle body.
Text in Illustration *1 Air Hose *2 Fastening Tape *3 Air Duct
-
-
REMOVE REAR SEAT CENTER ARMREST ASSEMBLY (w/ Center Seat)
-
Lower the rear seat center armrest assembly.
-
Raise the rear center seat headrest assembly.
-
Detach the 2 clips.
-
Detach the hook by lowering the rear seat armrest hole board, and remove it.
-

Remove the 2 bolts, nut and rear seat center armrest assembly.
Note
Be careful not to damage the vehicle body.
-
Disconnect the 2 connectors.
-
-
REMOVE REAR NO. 2 SEAT ADJUSTER ASSEMBLY
-
w/ Center Seat:
Remove the nut and disconnect the anchor part of the rear center seat outer belt assembly.
-
Remove the 4 bolts, nut and rear No. 2 seat adjuster assembly.
Note
Be careful not to damage the vehicle body.
-
Disconnect the air duct from the vehicle body.
-
-
REMOVE REAR CENTER SEAT INNER BELT ASSEMBLY (w/ Center Seat)
-
Remove the bolt and rear center seat inner belt assembly.
-
-
REMOVE REAR NO. 1 SEAT ADJUSTER ASSEMBLY
-
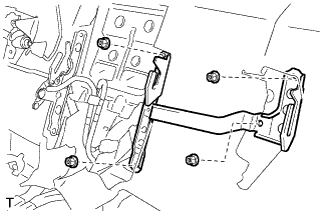
Remove the 4 bolts, nut and rear No. 1 seat adjuster assembly.
Note
Be careful not to damage the vehicle body.
-
Disconnect the air duct from the vehicle body.
-
-
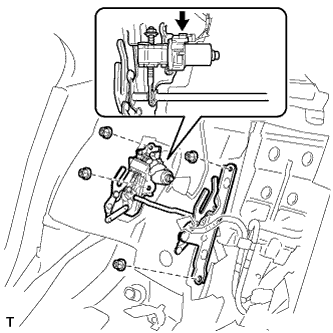
REMOVE REAR SEAT RECLINING ADJUSTER ASSEMBLY LH
-
Remove the 4 nuts and rear seat reclining adjuster assembly LH.
Note
Be careful not to damage the vehicle body.
-
-
REMOVE REAR SEAT RECLINING ADJUSTER ASSEMBLY RH
-
Disconnect the connector.
-
Remove the 4 nuts and rear seat reclining adjuster assembly RH.
Note
Be careful not to damage the vehicle body.
-