FRONT POWER SEAT MOTOR ASSEMBLY INSTALLATION

CAUTION:
Wear protective gloves. Sharp areas on the parts may injure your hands.
Tech Tips
-
Use the same procedure for RHD and LHD vehicles.
-
The procedure listed below is for LHD vehicles.
-
Use the same procedure for the RH and LH sides.
-
The procedure listed below is for the LH side.
-
A bolt without a torque specification is shown in the standard bolt chart Click here.
-
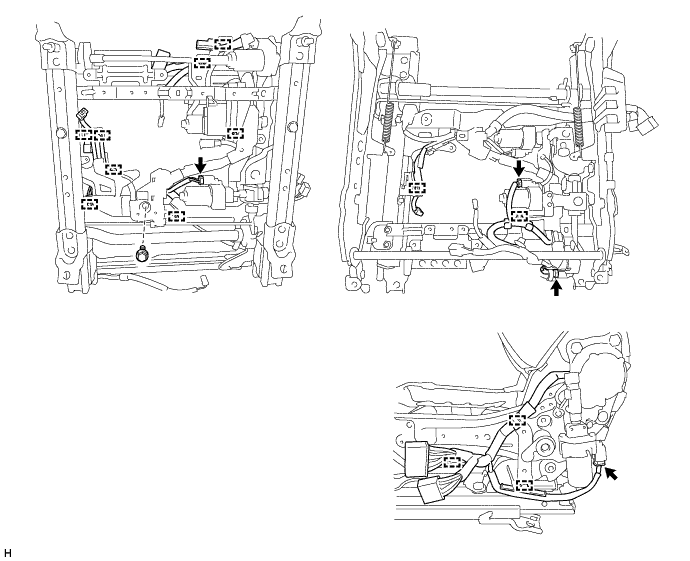
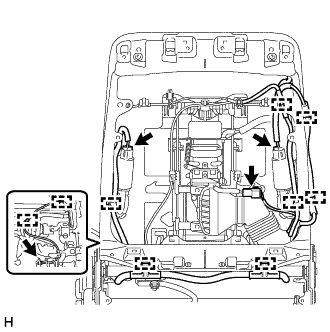
INSTALL FRONT SEAT WIRE LH
-
Attach the 13 wire harness clamps to install the front seat wire LH.
-
Connect the 4 connectors.
-
Install the bolt.
- Torque:
- 16 N*m { 163 kgf*cm, 12 ft.*lbf }
-
-
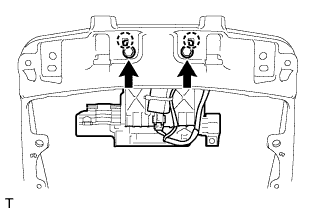
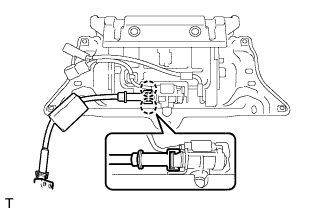
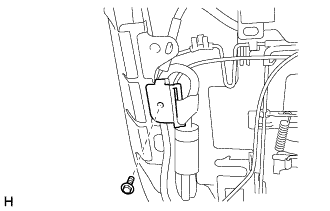
INSTALL SEAT POSITION AIRBAG SENSOR
-
Check that the power switch is off.
-
Check that the cable is disconnected from the battery negative (-) terminal.
CAUTION:
Wait at least 90 seconds after disconnecting the cable from the negative (-) battery terminal to prevent airbag and seat belt pretensioner activation.
-
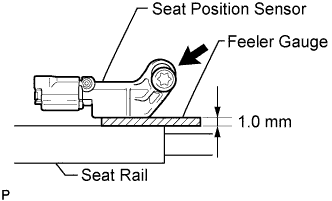
Using a feeler gauge 1.0 mm (0.0393 in.), install the seat position sensor.
Note
-
If the seat position sensor has been dropped, or there are any cracks, dents or other defects in the case or connector, replace the seat position sensor with a new one.
-
When installing the seat position sensor, be careful that the SRS wiring does not interfere with other parts and that it is not pinched between other parts.
Tech Tips
Be sure that the clearance between the seat position sensor and the seat rail is within 0.6 mm (0.0236 in.) to 1.4 mm (0.0551 in.).
-
-
Using a T30 "TORX" socket wrench, install the "TORX" screw to install the seat position sensor.
- Torque:
- 8.0 N*m { 82 kgf*cm, 71 in.*lbf }
-
Make sure that the clearance between the seat position sensor and the seat rail is within 0.6 mm (0.0236 in.) to 1.4 mm (0.0551 in.).
-
Check that there is no looseness in the installation parts of the seat position sensor.
-
Connect the connector.
-
Install the seat slide position sensor protector to the seat position sensor.
-
-
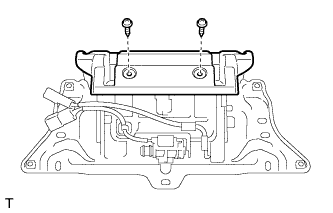
INSTALL SEAT CLIMATE CONTROL BLOWER LH
-
Install the climate control blower with the 2 bolts.
-
Connect the connector and attach the wire harness clamps.
-
Attach the 4 claws to connect the climate control duct.
-
-
INSTALL FRONT SEAT CLIMATE CONTROL ECU LH

-
Install the front seat climate control ECU LH with the 2 bolts.
-
Connect the 2 connectors.
-
-
INSTALL FRONT NO. 2 SEAT TRAVEL LINK
-
Install the front No. 2 seat travel link with the bolt.
- Torque:
- 21 N*m { 214 kgf*cm, 15 ft.*lbf }
-
-
INSTALL FRONT NO. 1 SEAT TRAVEL LINK
Tech Tips
Use the same procedures described for the front No. 2 seat travel link.
-
INSTALL NO. 1 SEAT CUSHION PLATE

-
Install the No. 1 seat cushion plate with the 2 bolts.
- Torque:
- 16 N*m { 163 kgf*cm, 12 ft.*lbf }
-
-
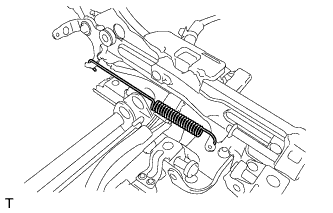
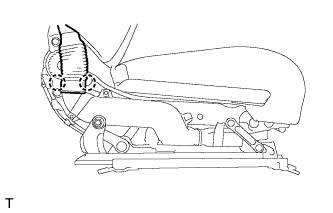
INSTALL FRONT SEAT CUSHION SPRING
-
Install the front seat cushion spring.
Tech Tips
Use the same procedure to install the front seat cushion spring on the other side.
-
-
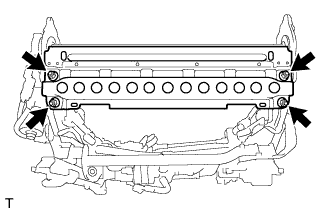
INSTALL FRONT SEAT LOWER CUSHION SHIELD
-
Install the front seat lower cushion shield with the 4 nuts.
-
-
INSTALL RECLINING ADJUSTER INSIDE COVER LH

-
Attach the wire harness clamp.
-
Install the reclining adjuster inside cover LH with the screw.
-
-
INSTALL RECLINING ADJUSTER INSIDE COVER RH
Tech Tips
Use the same procedure described for the LH side.
-
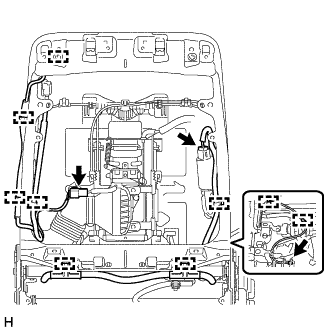
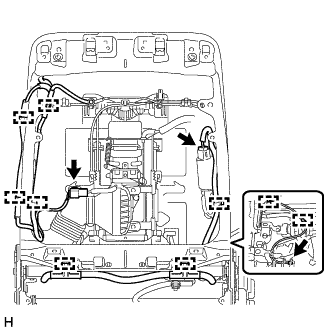
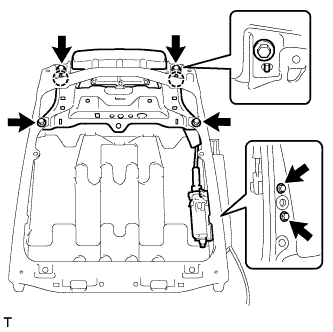
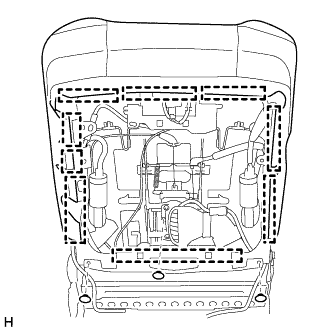
INSTALL FRONT SEATBACK FRAME ASSEMBLY LH
-
Temporarily install the front seatback frame assembly LH with the 4 bolts.
-
Push the front seatback frame assembly LH towards the rear, and tighten the 4 bolts.
- Torque:
- 43 N*m { 439 kgf*cm, 32 ft.*lbf }
-
for Driver Side:
-
w/ Active Headrest:
Attach the 9 clamps and connect the 4 connectors.
-
w/ Pre-crash Intelligent Headrest:
Attach the 9 clamps and connect the 4 connectors.
-
-
for Front Passenger Side:
-
w/ Active Headrest:
Attach the 9 clamps and connect the 3 connectors.
-
w/ Pre-crash Intelligent Headrest:
Attach the 9 clamps and connect the 3 connectors.
-
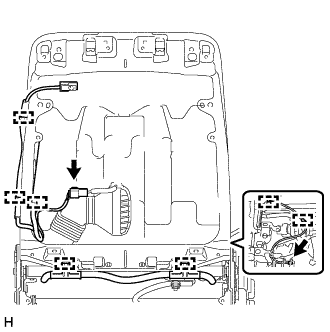
w/ Retractable Headrest:
Attach the 7 clamps and connect the 2 connectors.
-
-
-
INSTALL FRONT SEAT HEADREST ADJUSTER SUB-ASSEMBLY
-
w/ Active Headrest:
-
Attach the 2 claws.
-
Install the headrest adjuster with the 2 bolts.
- Torque:
- 5.5 N*m { 56 kgf*cm, 49 in.*lbf }
-

Connect the connector and attach the 2 wire harness clamps.
-
-
w/ Pre-crash Intelligent Headrest:
-
Attach the 2 claws to connect the connector to the connector holder.
-
Attach the guide to install the plate.
-
Install the screw.
-
Attach the 2 claws.
-
Install the headrest adjuster with the 2 bolts.
- Torque:
- 5.5 N*m { 56 kgf*cm, 49 in.*lbf }
-
Attach the 4 wire harness clamps.
-
Connect the connector and attach the 2 wire harness clamps.
-
-
w/ Retractable Headrest:
-
Install the headrest stay cover with the 2 screws.
-
Attach the 2 claws to install the cable.
-
Attach the 2 claws to install the motor.
-
Attach the 2 claws to install the headrest adjuster.
-
Install the 4 bolts and 2 screws.
- Torque:
- 21 N*m { 214 kgf*cm, 15 ft.*lbf }
-
-
-
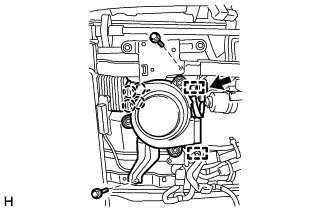
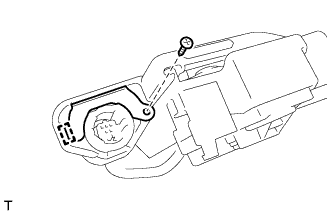
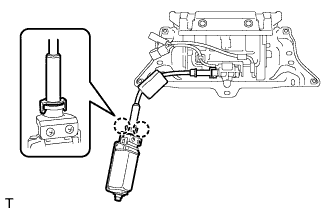
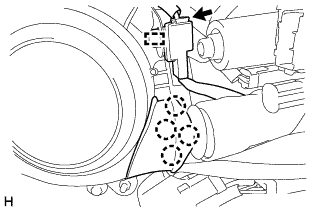
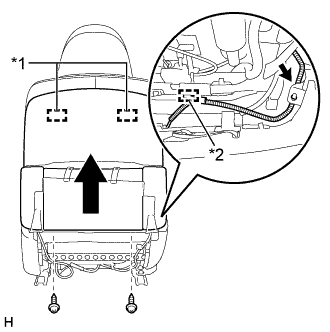
INSTALL ACTIVE HEADREST INFLATOR (w/ Active Headrest)
-
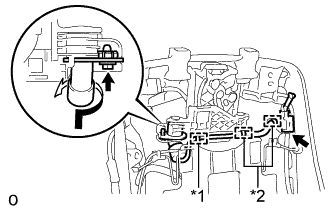
Text in Illustration *1 Guide *2 Clamp Turn the active headrest inflator in the direction indicated by the arrow and install it.
-
Attach the guide and 2 clamps.
-
Install the bolt and nut.
- Torque:
- 5.5 N*m { 56 kgf*cm, 49 in.*lbf }
-
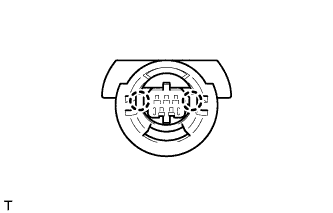
Connect the connector.
Note
When handling the airbag connector, take care not to damage the airbag wire harness.
-
-
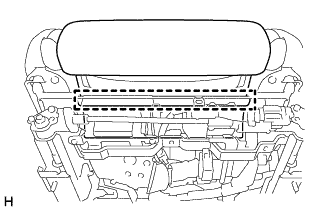
INSTALL FRONT SEATBACK COVER WITH PAD
-
Set the front seatback cover with pad in place.
-
Attach the 9 hooks to install the front seatback cover with pad.
-
Attach the 3 clips.
-
Attach the front seatback cover bracket with the bolt.
- Torque:
- 5.5 N*m { 56 kgf*cm, 49 in.*lbf }
-
-
INSTALL POWER SEAT SWITCH ASSEMBLY (w/ Shoulder Switch)
-
Connect the connector.
-

Attach the 2 claws to install the power seat switch assembly.
-
-
INSTALL FRONT SEAT HEADREST SUPPORT

-
Attach the 4 claws to install the 2 front seat headrest supports.
-
-
INSTALL FRONT SEAT HEADREST ASSEMBLY
-
w/ Active Headrest, w/ Pre-crash Intelligent Headrest:
-

Install the front seat headrest assembly with the 2 pins.
Note
w/ Active Headrest:
When replacing a deployed active headrest inflator, always replace it together with the front seat headrest assembly.
-
-
w/ Retractable Headrest:
Install the front seat headrest assembly.
-
-
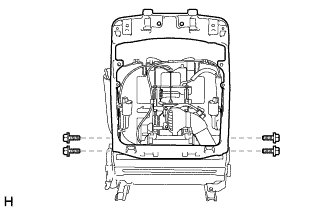
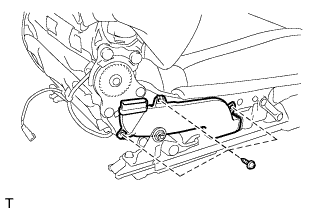
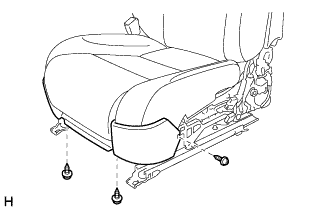
INSTALL FRONT SEAT CUSHION ASSEMBLY LH
-
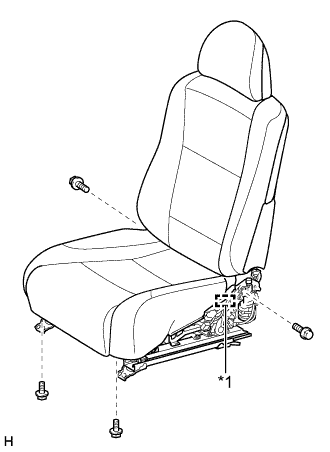
Install the front seat cushion assembly with the 4 bolts.
- Torque:
- 21 N*m { 214 kgf*cm, 15 ft.*lbf }
-
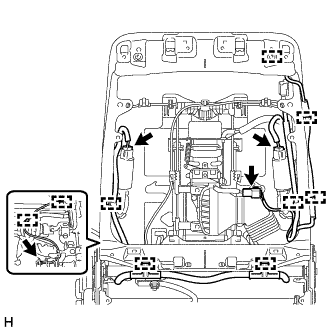
Attach the hook.
Text in Illustration *1 Hook -
Attach the hook.
-
Install the 2 clips.
-
Connect the connector and attach the 2 wire harness clamps.
-
Connect the connector and attach the wire harness clamp.
-
Connect the connector and attach the wire harness clamp.
-
Attach the 4 claws to connect duct of the seat climate control blower LH.
-
Connect the connector.
-
Connect the duct of the seat climate control blower LH with the 3 screws.
-
Attach the 2 claws to install the No. 6 air duct.
-
-
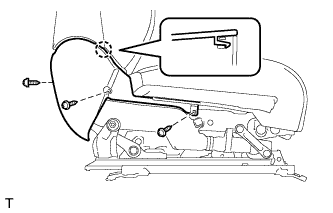
INSTALL FRONT SEATBACK BOARD SUB-ASSEMBLY LH
-
Text in Illustration *1 Hook *2 Wire Harness Clamp Connect the connector and attach the wire harness clamp.
-
Attach the 2 hooks to install the front seatback board sub-assembly LH.
-
Install the 2 screws.
-
-
INSTALL FRONT SEAT INNER CUSHION SHIELD LH
-
Attach the claw to install the front seat inner cushion shield LH.
-
Install the 3 screws.
-
-
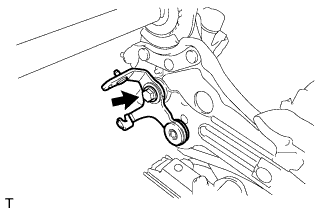
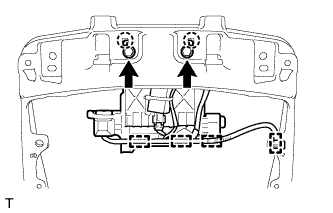
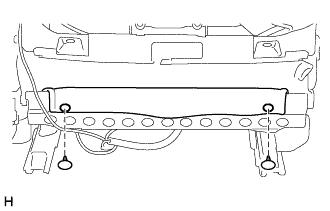
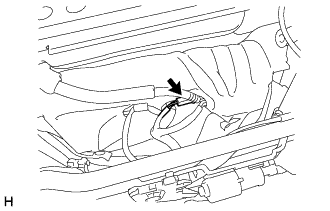
INSTALL FRONT SEAT INNER BELT ASSEMBLY LH
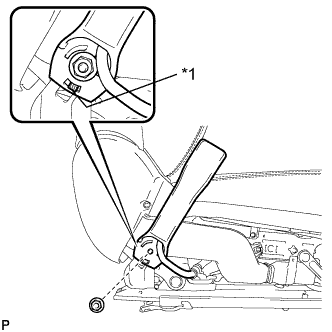
Text in Illustration *1 Protruding Part
-
Install the front seat inner belt assembly LH with the nut.
- Torque:
- 42 N*m { 428 kgf*cm, 31 ft.*lbf }
Note
Do not allow the anchor part of the front seat inner belt assembly to overlap the protruding parts of the front seat adjuster.
-
Attach the claw to connect the connector.
-
Attach the 6 wire harness clamps.
-
Connect the 2 connectors.
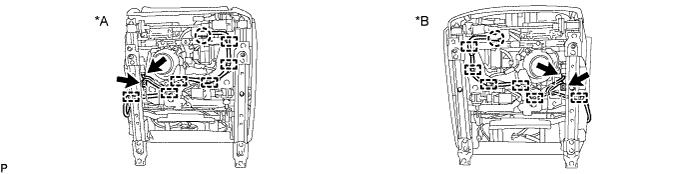
Text in Illustration *A for Driver Side *B for Front Passenger Side
-
-
INSTALL FRONT SEAT INNER NO. 1 CUSHION SHIELD LH (for Driver Side)
-
Install the front seat inner No. 1 cushion shield LH with the 3 screws.
-
-
INSTALL FRONT SEAT INNER NO. 1 CUSHION SHIELD RH (for Front Passenger Side)
-
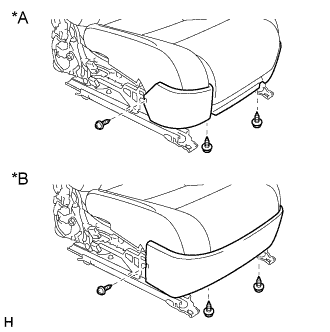
Text in Illustration *A for Ottoman *B except Ottoman Install the front seat inner No. 1 cushion shield RH with the 3 screws.
-
-
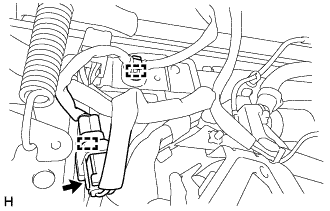
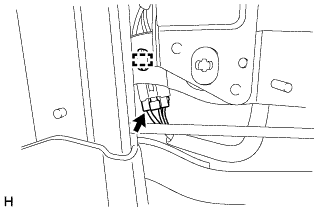
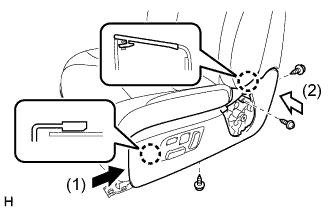
INSTALL FRONT SEAT CUSHION SHIELD LH
-
Connect the 2 connectors.
-
Attach the 2 claws to install the front seat cushion shield LH as indicated by the arrows in the order shown in the illustration.
-
Install the 3 screws.
-
Attach the rubber band of the front seatback board sub-assembly LH to the front seat adjuster assembly LH.
-
-
INSTALL FRONT SEAT ASSEMBLY LH
-
CONNECT CABLE TO AUXILIARY BATTERY NEGATIVE TERMINAL
Note
When disconnecting the cable, some systems need to be initialized after the cable is reconnected Click here.
-
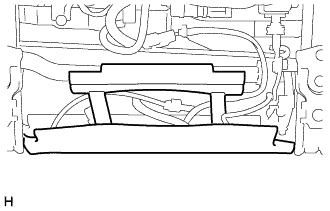
INSTALL BATTERY SERVICE HOLE COVER LH
-

Text in Illustration *A for Standard *B for Ottoman Attach the battery service hole cover LH with the clip and fastening tape.
-
-
INSTALL DECK TRIM SIDE BOARD LH (w/o Spare Tire)
-

Attach the 2 clips to install the deck trim side board LH.
-
-
INSTALL DECK BOARD ASSEMBLY (w/o Spare Tire)

-
INSTALL LUGGAGE COMPARTMENT MAT SUB-ASSEMBLY (w/ Spare Tire)

-
CHECK SRS WARNING LIGHT
-
CHECK FRONT SEAT ASSEMBLY
-
Check the power seat operation:
-
Check the climate control seat system:
-