FRONT SEAT ASSEMBLY REMOVAL

CAUTION:
Wear protective gloves. Sharp areas on the parts may injure your hands.
Note
If the seat is set down in another location after removing it from the vehicle, the seat may tilt and damage the front seat adjuster assembly LH due to the difference in shape between the left and right seat tracks.
Tech Tips
-
for Driver Side:
Operate the power seat switch to move the cushion length adjustment to the foremost position.
-
for Ottoman (Front Passenger Side):
Operate the power seat switch to move the ottoman to the foremost position.
-
Use the same procedure for RHD and LHD vehicles.
-
The procedure listed below is for LHD vehicles.
-
Use the same procedure for the RH and LH sides.
-
The procedure listed below is for the LH side.
-
PRECAUTION
Note
After turning the power switch off, waiting time may be required before disconnecting the cable from the auxiliary battery terminal. Therefore, make sure to read the disconnecting the cable from the auxiliary battery terminal notice before proceeding with work Click here.
-
REMOVE LUGGAGE COMPARTMENT MAT SUB-ASSEMBLY (w/ Spare Tire)

-
REMOVE DECK BOARD ASSEMBLY (w/o Spare Tire)

-
REMOVE DECK TRIM SIDE BOARD LH (w/o Spare Tire)
-

Detach the 2 clips and remove the deck trim side board LH.
-
-
REMOVE BATTERY SERVICE HOLE COVER LH
-

Text in Illustration *A for Standard *B for Ottoman *1 Fastening Tape Detach the clip, fastening tape and remove the battery service hole cover LH.
-
-
REMOVE SEAT BELT ANCHOR COVER CAP LH
-
Operate the power seat switch assembly (slide switch) to move the seat to the foremost position.
-
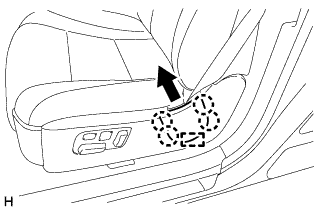
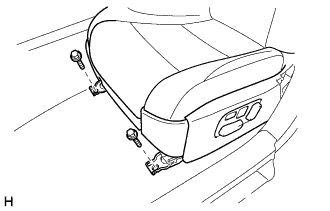
Detach the 4 claws and guide to remove the seat belt anchor cover cap LH by pulling it in the direction indicated by the arrow in the illustration.
-
-
DISCONNECT FRONT SEAT OUTER BELT ASSEMBLY LH
-
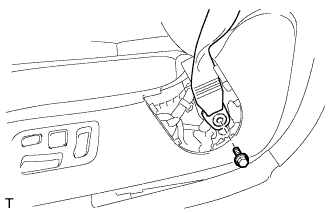
Remove the bolt and disconnect the anchor part of the front seat outer belt assembly LH.
-
-
REMOVE INNER SEAT TRACK BRACKET COVER LH
-

Detach the 2 claws to remove the inner seat track bracket cover LH.
-
-
REMOVE OUTER SEAT TRACK BRACKET COVER LH
Tech Tips
Use the same procedure described for the inner seat track bracket cover LH.
-
REMOVE INNER SEAT TRACK BRACKET COVER RH (for Front Passenger Side with Ottoman)
-
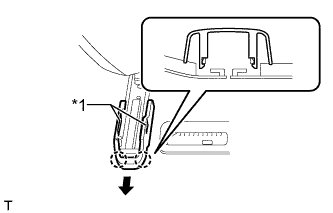
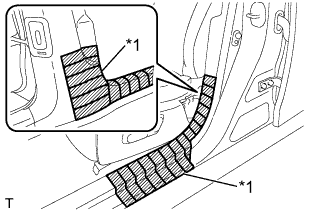
Text in Illustration *1 Fastening Tape Detach the 2 pieces of fastening tape.
-
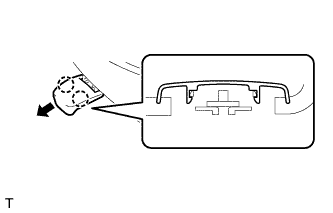
Detach the 2 claws to remove the inner seat track bracket cover RH.
-
-
REMOVE OUTER SEAT TRACK BRACKET COVER RH (for Front Passenger Side with Ottoman)
Tech Tips
Use the same procedure described for the inner seat track bracket cover RH.
-
REMOVE FRONT SEAT INNER TRACK BRACKET COVER LH
-
Detach the 2 claws to remove the front seat inner track bracket cover LH.
-
-
REMOVE FRONT SEAT OUTER TRACK BRACKET COVER LH
Tech Tips
Use the same procedure described for the front seat inner track bracket cover LH.
-
DISABLE AUTO TILT AWAY FUNCTION
-
Disable the autoaway/return function by changing the customize parameter Click here.
CAUTION:
Record the current customize parameter setting (whether the autoaway/return function is enabled or disabled) in order to restore the current setting after finishing the operation.
Tech Tips
Performing the above operation causes the autoaway/return function to be disabled when the engine switch is turned off.
-
Turn the engine switch on (IG). Operate the tilt and telescopic switch to fully extend and lower the steering column assembly.
-
Turn the engine switch off.
-
-
REMOVE FRONT SEAT ASSEMBLY LH
-
Remove the 2 bolts.
-
Operate the power seat switch (slide switch) to move the seat to the foremost position.
-
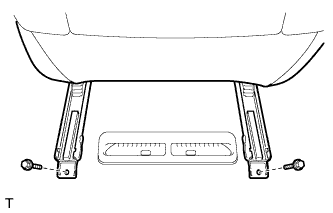
Remove the 2 bolts.
-
Operate the power seat switch (slide switch) and move the seat to the center position, and operate the power seat switch (reclining switch) and move the seatback to the upright position.
Tech Tips
If removing the front seat cushion shield of a seat with cushion sliding, the procedure becomes easier to perform if the seat cushion is moved forward 10 mm (0.394 in.) or more from the rearmost position.
-
Operate the power seat switch (reclining switch) to the reclining side for approximately 3 seconds.
-
Disconnect the cable from the negative (-) auxiliary battery terminal.
CAUTION:
Wait at least 90 seconds after disconnecting the cable from the negative (-) auxiliary battery terminal to disable the SRS system.
Note
When disconnecting the cable, some systems need to be initialized after the cable is reconnected Click here.
-
Text in Illustration *1 Protective Tape Put protective tape as shown in the illustration.
-
Detach the wire harness clamp.
-
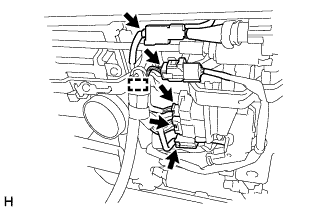
Disconnect the 5 connectors under the seat.
Note
Make sure the center pillar does not contact the power seat switch knob.
-
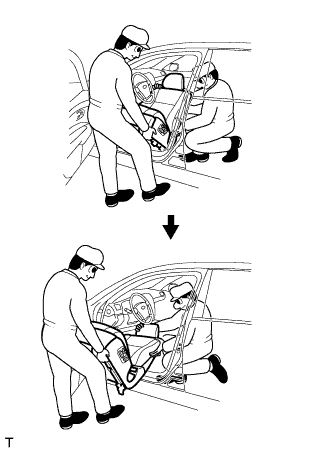
Remove the front seat assembly LH as shown in the illustration.
Note
-
Make sure the center pillar does not contact the power seat switch knob.
-
Make sure the seatback does not contact the shift lever knob.
-
Be careful not to damage the vehicle body.
Tech Tips
Remove the front seat assembly LH through the door frame so that it passes under the steering wheel.
-
-