STEREO JACK ADAPTER ASSEMBLY INSTALLATION

Tech Tips
-
Use the same procedure for RHD and LHD vehicles.
-
The procedure listed below is for LHD vehicles.
-
INSTALL HEADPHONE TERMINAL (for 4-Passenger with Ottoman)
-
Attach the 6 claws to install the 2 headphone terminals.
-
Attach the 2 clamps.
-
Connect the 2 connectors.
-
-
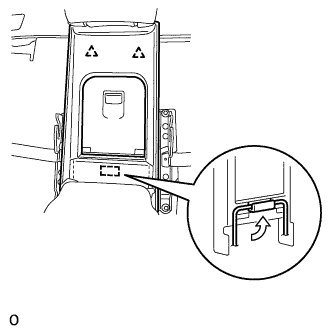
INSTALL REAR SEAT CONSOLE BOX PANEL (for 4-Passenger with Ottoman)
-
Attach the 4 clips to install the rear seat console box panel.
-
-
INSTALL REAR SEAT CONSOLE BOX ASSEMBLY (for 4-Passenger with Ottoman)
-
Connect the connector.
-
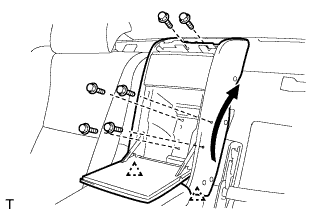
Move the rear seat console box assembly in the direction of the arrow shown in the illustration, and attach the 2 clips. Then install it with the 6 bolts.
-
Install the service plug cover with the 4 bolts.
- Torque:
- 7.5 N*m { 76 kgf*cm, 66 in.*lbf }
-
Attach the 4 clips to install the rear seat console box front panel.
-
-
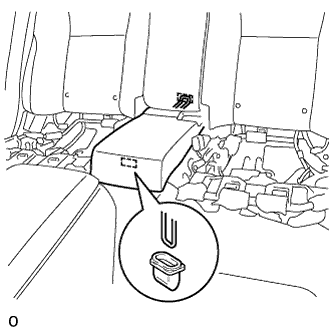
INSTALL REAR SEAT LOWER CONSOLE BOX COVER (for 4-Passenger with Ottoman)
-
Attach the 2 hooks and 4 claws to install the rear seat lower console box cover.
-
-
INSTALL HEADPHONE TERMINAL (for Power Seat, for 5-Passenger with Ottoman)
-
Attach the 6 claws to install the 2 headphone terminals.
-
Attach the 8 claws to install the bezel.
-
Connect each connector.
-
-
INSTALL REAR SEAT CENTER ARMREST ASSEMBLY (for Power Seat, for 5-Passenger with Ottoman)
-

Connect the 2 connectors.
-
Install the rear seat center armrest assembly with the 2 bolts and nut.
- Torque:
- 20 N*m { 204 kgf*cm, 15 ft.*lbf }
Note
Be careful not to damage the vehicle body.
-
Attach the hook to the center seatback frame wire.
-
Attach the 2 clips to install the rear seat armrest hole board.
-

While pressing the button, lower the rear center seat headrest assembly.
-
Raise the rear seat center armrest assembly.
-
-
INSTALL REAR CENTER SEAT CUSHION ASSEMBLY (for Power Seat, for 5-Passenger with Ottoman)
-
Attach the rear hook of the center seat cushion assembly to the center seatback frame sub-assembly.
Note
Be careful not to damage the vehicle body.
-
Attach the front hook of the rear center seat cushion assembly to the vehicle body.
-
-
INSTALL NO. 1 STEREO JACK ADAPTER ASSEMBLY
-
Attach the 2 claws to install the No. 1 stereo jack adapter assembly.
-
Connect the 2 connectors.
-
-
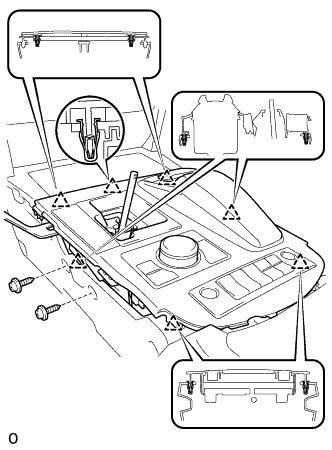
INSTALL UPPER REAR CONSOLE PANEL SUB-ASSEMBLY
-
Connect each connector and attach each wire harness clamp.
-
Attach the 6 clips to install the upper rear console panel sub-assembly.
-
Install the 2 screws.
-
-
INSTALL NO. 3 BOX PANEL
-
Attach the 4 claws to install the No. 3 box panel.
-
-
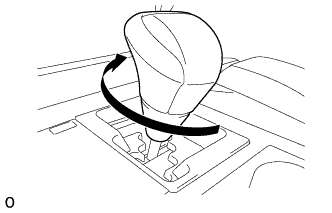
INSTALL SHIFT LEVER KNOB SUB-ASSEMBLY
-
Twist the shift lever knob sub-assembly in the direction indicated by the arrow to install it.
-
-
INSTALL INSTRUMENT PANEL FINISH PANEL END LH
-
Attach the rear part of the instrument panel finish panel end LH 3 clips.
-
Attach the front part of the instrument panel finish panel end LH 6 clips to install the instrument panel finish panel end LH.
-
-
INSTALL INSTRUMENT PANEL FINISH PANEL END RH
Tech Tips
Use the same procedure described for the LH side.