DIGITAL AUDIO BROADCASTING ANTENNA INSTALLATION

-
INSTALL AMPLIFIER ANTENNA ASSEMBLY NO.2
-
Use non-residue solvent to clean the area on the glass where the antenna will be installed.
Note
Do not use non-residue solvent to clean the antenna's contact points. Doing so may cause improper contact between the antenna and glass.
-
Install the amplifier antenna assembly with the 2 nuts.
- Torque:
- 14 N*m { 143 kgf*cm, 10 ft.*lbf }
Note
-
Just before installing the antenna to the glass, remove the protective cover of the antenna's contact points.
-
When removing the protective cover of the antenna's contact points, make sure the cover does not touch the contact points.
-
Never touch the contact points after removing the protective cover.
Tech Tips
-
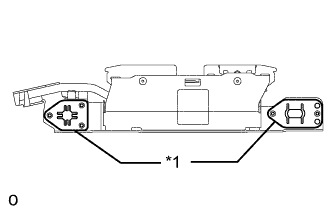
Do not reuse the plate if damaged heavily.
-
The plate is used when the vehicle is assembled at the factory. Therefore the antenna performance is not affected by not reusing it.
Text in Illustration *1 Plate
-
Attach the 2 clamps.
-
Connect the connector and install the amplifier antenna assembly.
-
-
INSTALL ROOF HEADLINING ASSEMBLY
-
for Standard Body:
-
for Long Body:
-
-
CONNECT CABLE TO AUXILIARY BATTERY NEGATIVE TERMINAL
Note
When disconnecting the cable, some systems need to be initialized after the cable is reconnected Click here.
-
INSTALL BATTERY SERVICE HOLE COVER LH
-

Text in Illustration *A for Standard *B for Ottoman Attach the battery service hole cover LH with the clip and fastening tape.
-
-
INSTALL DECK TRIM SIDE BOARD LH (w/o Spare Tire)
-

Attach the 2 clips to install the deck trim side board LH.
-
-
INSTALL DECK BOARD ASSEMBLY (w/o Spare Tire)

-
INSTALL LUGGAGE COMPARTMENT MAT SUB-ASSEMBLY (w/ Spare Tire)
