REAR PACKAGE TRAY SPEAKER INSTALLATION

Tech Tips
A bolt without a torque specification is shown in the standard bolt chart Click here.
-
INSTALL STEREO COMPONENT SPEAKER ASSEMBLY
Note
Do not touch the cone of the speaker.
-
Install the stereo component speaker assembly with the 4 bolts.
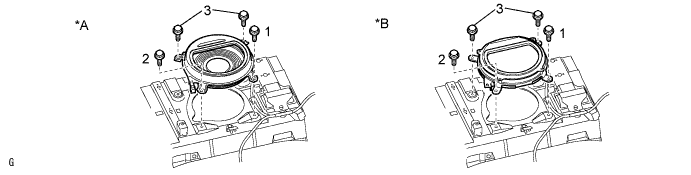
Text in Illustration *A for Standard *B for 19 Speakers Tech Tips
Install the bolts in the order shown in the illustration.
-
Connect the connector.
-
-
INSTALL PACKAGE TRAY TRIM PANEL ASSEMBLY
-
Connect the solar sensor connector.
-
except 4-Passenger with Ottoman:
Pass the 3 rear seat belt floor anchors through the package tray trim panel assembly.
-
for 4-Passenger with Ottoman:
Pass the 2 rear seat belt floor anchors through the package tray trim panel assembly.
-
Insert the rear part of the package tray trim panel assembly into the rear sunshade assembly.
-
Attach the 2 clips to install the package tray trim panel assembly.
-
except 4-Passenger with Ottoman:
Attach the 4 claws to install the 3 belt guides.
-
for 4-Passenger with Ottoman:
Attach the 4 claws to install the 2 belt guides.
-
-
INSTALL INNER ROOF SIDE GARNISH LH
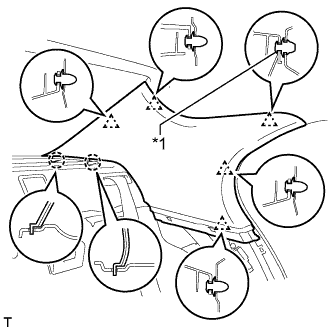
Text in Illustration *1 Clip A
-
Install a new clip A to the inner roof side garnish LH.
-
Attach the 2 claws and 5 clips to install the inner roof side garnish LH.
-
-
INSTALL INNER ROOF SIDE GARNISH RH
Tech Tips
Use the same procedure described for the LH side.
-
INSTALL REAR SEAT SIDE GARNISH LH
-
Attach the 6 claws to install the rear seat side garnish LH.
-
-
INSTALL REAR SEAT SIDE GARNISH RH
Tech Tips
Use the same procedure described for the LH side.
-
INSTALL REAR DOOR SCUFF PLATE LH
-
for Standard Body:
-
for Long Body:
-
-
INSTALL REAR DOOR SCUFF PLATE RH
-
for Standard Body:
-
for Long Body:
-
-
INSTALL REAR SEAT ASSEMBLY
-
for Power Seat:
-
for Ottoman:
-
for Fixed Seat Type:
-
-
CONNECT CABLE TO AUXILIARY BATTERY NEGATIVE TERMINAL
Note
When disconnecting the cable, some systems need to be initialized after the cable is reconnected Click here.
-
INSTALL BATTERY SERVICE HOLE COVER LH
-

Text in Illustration *A for Standard *B for Ottoman Attach the battery service hole cover LH with the clip and fastening tape.
-
-
INSTALL DECK TRIM SIDE BOARD LH (w/o Spare Tire)
-

Attach the 2 clips to install the deck trim side board LH.
-
-
INSTALL DECK BOARD ASSEMBLY (w/o Spare Tire)

-
INSTALL LUGGAGE COMPARTMENT MAT SUB-ASSEMBLY (w/ Spare Tire)

-
CHECK SRS WARNING LIGHT