ACTIVE HEADREST INFLATOR INSTALLATION

Tech Tips
-
Use the same procedure for the RH and LH sides.
-
The procedure listed below is for the LH side.
-
INSTALL FRONT SEAT HEADREST BRACKET
-
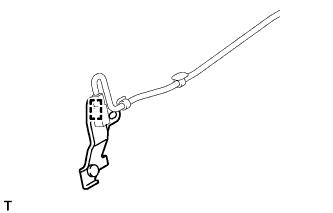
Attach the wire harness clamp to install the front seat headrest bracket to the active headrest inflator.
-
-
INSTALL ACTIVE HEADREST INFLATOR
-
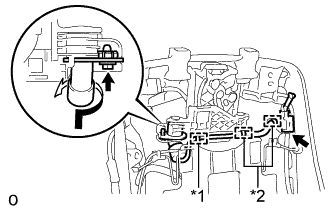
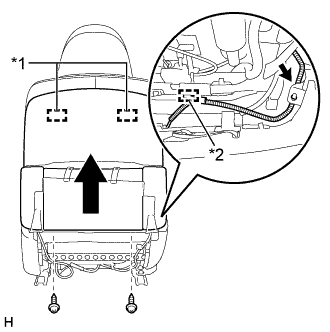
Text in Illustration *1 Guide *2 Clamp Turn the active headrest inflator in the direction indicated by the arrow and install it.
-
Attach the guide and 2 clamps.
-
Install the bolt and nut.
- Torque:
- 5.5 N*m { 56 kgf*cm, 49 in.*lbf }
-
Connect the connector.
Note
When handling the airbag connector, take care not to damage the airbag wire harness.
-
-
INSTALL SEATBACK COVER WITH PAD
-
Set the front seatback cover with pad in place.
-
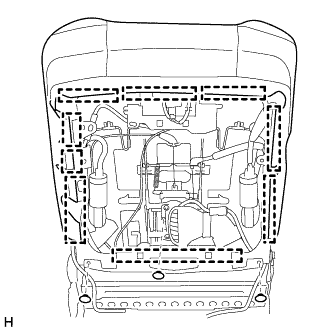
Attach the 9 hooks to install the front seatback cover with pad.
-
Attach the 3 clips.
-
Attach the front seatback cover bracket with the bolt.
- Torque:
- 5.5 N*m { 56 kgf*cm, 49 in.*lbf }
-
-
INSTALL FRONT SEAT HEADREST SUPPORT

-
Attach the 4 claws to install the 2 front seat headrest supports.
-
-
INSTALL FRONT SEAT HEADREST ASSEMBLY
-
w/ Active Headrest, w/ Pre-crash Intelligent Headrest:
-

Install the front seat headrest assembly with the 2 pins.
Note
w/ Active Headrest:
When replacing a deployed active headrest inflator, always replace it together with the front seat headrest assembly.
-
-
w/ Retractable Headrest:
Install the front seat headrest assembly.
-
-
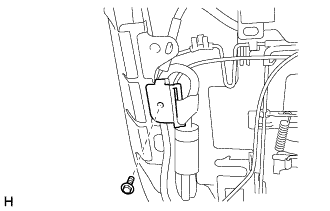
INSTALL FRONT SEATBACK BOARD SUB-ASSEMBLY LH
-
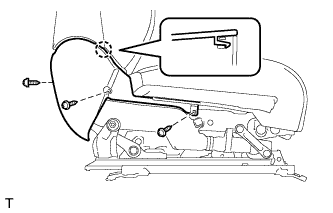
Text in Illustration *1 Hook *2 Wire Harness Clamp Connect the connector and attach the wire harness clamp.
-
Attach the 2 hooks to install the front seatback board sub-assembly LH.
-
Install the 2 screws.
-
-
INSTALL FRONT SEAT INNER CUSHION SHIELD LH
-
Attach the claw to install the front seat inner cushion shield LH.
-
Install the 3 screws.
-
-
INSTALL FRONT SEAT INNER BELT ASSEMBLY LH
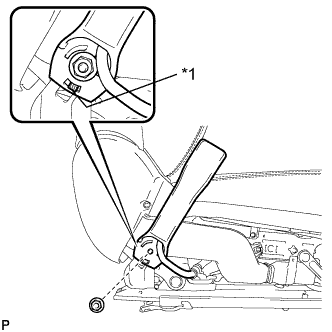
Text in Illustration *1 Protruding Part
-
Install the front seat inner belt assembly LH with the nut.
- Torque:
- 42 N*m { 428 kgf*cm, 31 ft.*lbf }
Note
Do not allow the anchor part of the front seat inner belt assembly to overlap the protruding parts of the front seat adjuster.
-
Attach the claw to connect the connector.
-
Attach the 6 wire harness clamps.
-
Connect the 2 connectors.
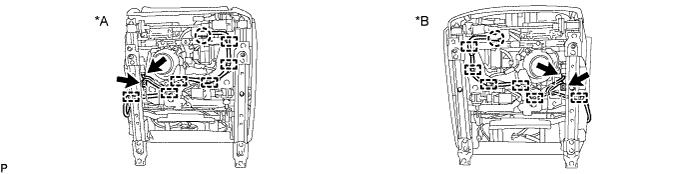
Text in Illustration *A for Driver Side *B for Front Passenger Side
-
-
INSTALL FRONT SEAT INNER NO. 1 CUSHION SHIELD LH (for Driver Side)
-
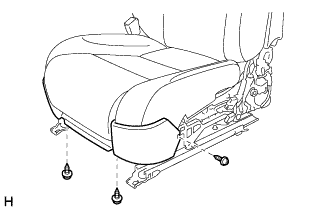
Install the front seat inner No. 1 cushion shield LH with the 3 screws.
-
-
INSTALL FRONT SEAT INNER NO. 1 CUSHION SHIELD LH (for Front Passenger Side)
-
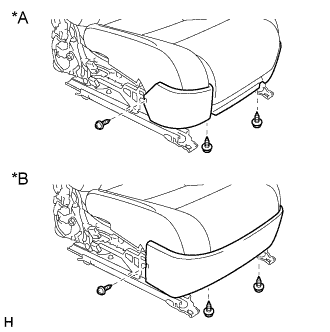
Text in Illustration *A for Ottoman *B except Ottoman Install the front seat inner No. 1 cushion shield RH with the 3 screws.
-
-
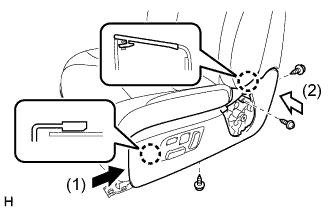
INSTALL FRONT SEAT CUSHION SHIELD LH
-
Connect the 2 connectors.
-
Attach the 2 claws to install the front seat cushion shield LH as indicated by the arrows in the order shown in the illustration.
-
Install the 3 screws.
-
Attach the rubber band of the front seatback board sub-assembly LH to the front seat adjuster assembly LH.
-
-
INSTALL FRONT SEAT ASSEMBLY LH
-
Install the front seat assembly LH Click here.
-
-
CHECK SRS WARNING LIGHT
-
Check the SRS warning light Click here.
-