HEIGHT CONTROL SENSOR (for Front LH) ADJUSTMENT

-
ADJUST STANDARD VEHICLE HEIGHT
-
Adjust the pressure of the tires Click here.
-
Stabilize the suspension by releasing the parking brake and bouncing the corners of the vehicle up and down.
-
Turn the power switch ON (READY).
-
Press the height control switch and adjust the vehicle height to "HEIGHT HIGH".
-
Press the height control switch and return the vehicle height to "NORMAL".
-
Connect the intelligent tester to the DLC3.
-
Turn the tester ON.
-
In the Data List, enter "Height Control".
-
Using the Data List, confirm that the vehicle height control operation is complete.
-
Turn the power switch OFF.
-
Move the shift lever to N and move the vehicle forward and rearward.
-
-
INSPECT VEHICLE HEIGHT
-
Inspect the vehicle height Click here.
-
Perform vehicle height offset calibration Click here.
Note
The possible vehicle height automatic adjustment value is 20 mm (0.787 in.). If the "Height Adjust value + (Standard value - Measurement value - After Height Adjust value)" is 20 mm (0.787 in.) or more, first perform the standard vehicle height adjustment (height control link adjustment).
-
-
ADJUST HEIGHT CONTROL SENSOR LINK SUB-ASSEMBLY (for Front)
Note
-
First adjust the height control sensor link that has the highest deviation from the standard value.
-
If the deviation of the front and rear link is the same, adjust the front link first.
-
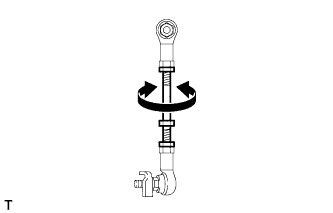
Loosen the 2 lock nuts on the height control sensor link.
-
Turn the bolt of the height control sensor link to adjust the length.
Tech Tips
-
If raising the vehicle height, lengthen the link.
-
If lowering the vehicle height, shorten the link.
-
Turning the bolt of the height control sensor link 1 revolution changes the vehicle height by about 6.9 mm (0.272 in.).
-
-

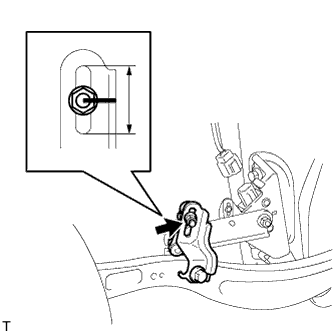
Check if the height control sensor link length shown in the illustration is less than the maximum value.
Maximum length 18 mm (0.709 in.) -
Tighten the lock nuts.
- Torque:
- 5.4 N*m { 55 kgf*cm, 48 in.*lbf }
Note
Make sure the ball joint and bracket are parallel when tightening the lock nuts.
-
-
ADJUST HEIGHT CONTROL SENSOR LINK SUB-ASSEMBLY (for Rear)
-
Loosen the nut.
-
Adjust the rear vehicle height by moving the installation position of the link on the lower arm.
Tech Tips
When the link is moved 1.0 mm (0.0393 in.), the vehicle height is adjusted by about 1.5 mm (0.059 in.).
-
Tighten the nut.
- Torque:
- 5.3 N*m { 54 kgf*cm, 47 in.*lbf }
-
Perform vehicle height offset calibration once again.
-
Inspect the vehicle height once again.
-
-
INSPECT WHEEL ALIGNMENT
-
Inspect the front wheel alignment Click here.
-
Inspect the rear wheel alignment Click here.
-