FRONT DIFFERENTIAL CARRIER ASSEMBLY REMOVAL

-
PLACE FRONT WHEELS FACING STRAIGHT AHEAD
-
DRAIN FRONT DIFFERENTIAL OIL
-
Stop the vehicle on a level place.
-
for Front Differential:
-
Using a 10 mm hexagon wrench, remove the filler plug and gasket.
-
Using a 10 mm hexagon wrench, remove the drain plug and gasket, and drain the oil.
-
Using a 10 mm hexagon wrench, install a new gasket and the drain plug.
- Torque:
- 39 N*m { 398 kgf*cm, 29 ft.*lbf }
-
-
for Rear Differential:
-
Using a 10 mm hexagon wrench, remove the filler plug and gasket.
-
Using a 10 mm hexagon wrench, remove the drain plug and gasket, and drain the oil.
-
Using a 10 mm hexagon wrench, install a new gasket and the drain plug.
- Torque:
- 49 N*m { 500 kgf*cm, 37 ft.*lbf }
-
-
-
REMOVE ENGINE ASSEMBLY
-
Remove the engine assembly Click here.
-
-
REMOVE ENGINE ON TO ENGINE STAND
-
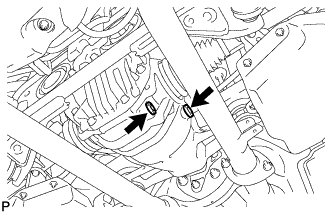
Install the engine onto an engine stand with the bolts.
Note
-
Pay attention to the angle of the sling device as the engine assembly or engine hangers may be damaged or deformed if the angle is incorrect.
-
With the exception of installing the engine assembly to an engine stand or removing the engine assembly from an engine stand, do not perform any work on the engine while it is suspended, as doing so is dangerous.
-
-
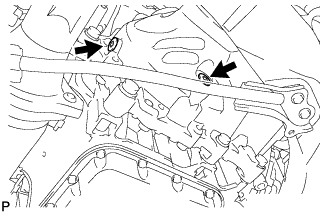
Remove the 2 bolts and 2 engine hangers.
-
-
REMOVE FRONT DIFFERENTIAL CARRIER ASSEMBLY
-
Support the front differential carrier assembly with a jack.
CAUTION:
As the front differential carrier assembly is very heavy, securely support it with the jack.
-

Remove the 4 bolts and front differential carrier assembly.
Note
-
Do not damage the installation surface when removing the front differential carrier assembly.
-
The remaining oil may leak out when removing the front differential carrier assembly.
-
-