DIFFERENTIAL CARRIER ASSEMBLY INSTALLATION

-
INSTALL REAR DIFFERENTIAL CARRIER ASSEMBLY
-
Place the rear differential carrier assembly on a transmission jack.
CAUTION:
-
As the rear differential carrier assembly is very heavy, securely support it with a transmission jack.
-
Perform this procedure with several people supporting the rear differential carrier assembly so that it does not tilt or fall.
-
-
Slowly raise the transmission jack so that the rear differential carrier is at its installation position.
Note
When installing the rear differential carrier assembly, do not damage the installation surface.
-

Temporarily install the rear differential mount stopper upper and lower with 2 new bolts (B).
-
Temporarily install 2 new bolts (A).
-
Temporarily install a new bolt (C).
-
Using SST and a 12 mm socket hexagon wrench, tighten the 2 bolts (A).
- SST
- 09961-00950
- Torque:
- without SST
- 103 N*m { 1050 kgf*cm, 76 ft.*lbf }
- with SST
- 75 N*m { 764 kgf*cm, 55 ft.*lbf }
Note
-
Use a torque wrench with a fulcrum length of 400 mm (15.7 in.)
-
The torque value for use with SST is effective when SST is parallel to the torque wrench.
-
Tighten the bolts so that they do not interfere with the bolt holes of the mount cushions.
-
Using SST and a 12 mm socket hexagon wrench, tighten the bolt (C).
- Torque:
- without SST
- 103 N*m { 1050 kgf*cm, 76 ft.*lbf }
- with SST
- 75 N*m { 764 kgf*cm, 55 ft.*lbf }
Note
-
Use a torque wrench with a fulcrum length of 400 mm (15.7 in.)
-
The torque value for use with SST is effective when SST is parallel to the torque wrench.
-
Tighten the bolts so that they do not interfere with the bolt holes of the mount cushions.
-
Tighten the 2 bolts (B).
- Torque:
- 105 N*m { 1071 kgf*cm, 77 ft.*lbf }
Note
Make sure that the rear differential mount stopper upper and lower are not shifted or tilted.
-
-
INSTALL DRIVE SHAFT ASSEMBLY
-
INSTALL PROPELLER WITH CENTER BEARING SHAFT ASSEMBLY
-
ADD REAR DIFFERENTIAL OIL
-
for Front Differential:
-
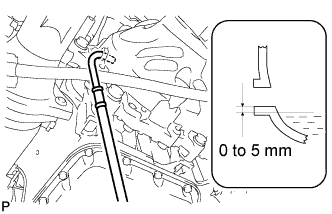
Add differential oil so that the oil level is between 0 to 5 mm (0 to 0.197 in.) from the bottom lip of the differential filler plug hole.
Note
-
Too much or too little oil will lead to differential problems.
-
After changing the oil, drive the vehicle and then check the oil level again.
Oil type Toyota Genuine Differential Gear Oil LT 75W-85 GL-5 or equivalent. Capacity 0.7 to 0.8 liters (0.74 to 0.84 US qts., 0.62 to 0.70 Imp. qts.) -
-
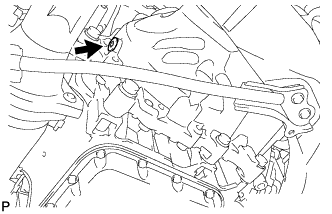
Using a 10 mm hexagon wrench, install a new gasket and the filler plug.
- Torque:
- 39 N*m { 398 kgf*cm, 29 ft.*lbf }
-
-
for Rear Differential:
-
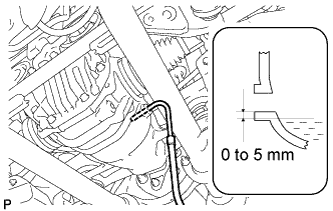
Add differential oil so that the oil level is between 0 to 5 mm (0 to 0.196 in.) from the bottom lip of the differential filler plug hole.
Note
-
Too much or too little oil will lead to differential problems.
-
After changing the oil, drive the vehicle and then check the oil level again.
Oil type Toyota Genuine Differential Gear Oil LX 75W-85 GL-5 or equivalent Capacity 1.3 to 1.4 liters (1.38 to 1.47 US qts., 1.15 to 1.23 Imp. qts.) -
-
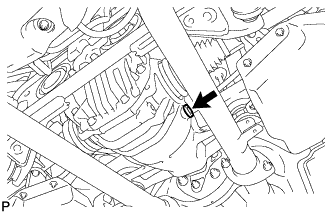
Using a 10 mm hexagon wrench, install a new gasket and the filler plug.
- Torque:
- 49 N*m { 500 kgf*cm, 36 ft.*lbf }
-
-
-
INSPECT FOR DIFFERENTIAL OIL LEAK
-
INSTALL REAR WHEELS
- Torque:
- 140 N*m { 1428 kgf*cm, 103 ft.*lbf }
-
INSPECT AND ADJUST REAR WHEEL ALIGNMENT
-
CHECK FOR SPEED SENSOR SIGNAL