FRONT DIFFERENTIAL CARRIER OIL SEAL REPLACEMENT

-
PLACE FRONT WHEELS FACING STRAIGHT AHEAD
-
DRAIN FRONT DIFFERENTIAL OIL
-
Stop the vehicle on a level place.
-
for Front Differential:
-
Using a 10 mm hexagon wrench, remove the filler plug and gasket.
-
Using a 10 mm hexagon wrench, remove the drain plug and gasket, and drain the oil.
-
Using a 10 mm hexagon wrench, install a new gasket and the drain plug.
- Torque:
- 39 N*m { 398 kgf*cm, 29 ft.*lbf }
-
-
for Rear Differential:
-
Using a 10 mm hexagon wrench, remove the filler plug and gasket.
-
Using a 10 mm hexagon wrench, remove the drain plug and gasket, and drain the oil.
-
Using a 10 mm hexagon wrench, install a new gasket and the drain plug.
- Torque:
- 49 N*m { 500 kgf*cm, 37 ft.*lbf }
-
-
-
REMOVE ENGINE ASSEMBLY
-
Remove the engine assembly Click here.
-
-
INSTALL ENGINE ON TO ENGINE STAND
-
Install the engine onto an engine stand with the bolts.
Note
-
Pay attention to the angle of the sling device as the engine assembly or engine hangers may be damaged or deformed if the angle is incorrect.
-
With the exception of installing the engine assembly to an engine stand or removing the engine assembly from an engine stand, do not perform any work on the engine while it is suspended, as doing so is dangerous.
-
-
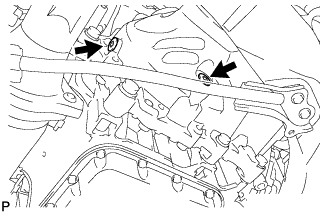
Remove the 2 bolts and 2 engine hangers.
-
-
REMOVE FRONT DIFFERENTIAL CARRIER ASSEMBLY
-
Support the front differential carrier assembly with a jack.
CAUTION:
As the front differential carrier assembly is very heavy, securely support it with the jack.
-

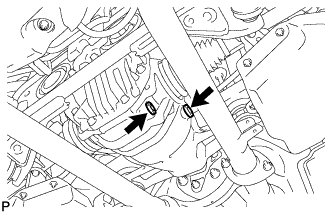
Remove the 4 bolts and front differential carrier assembly.
Note
-
Do not damage the installation surface when removing the front differential carrier assembly.
-
The remaining oil may leak out when removing the front differential carrier assembly.
-
-
-
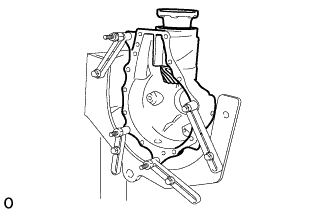
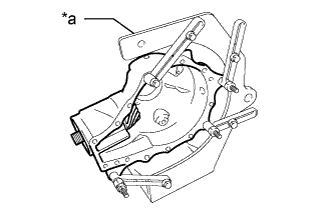
FIX FRONT DIFFERENTIAL CARRIER ASSEMBLY TO OVERHAUL STAND
-
Set the front differential carrier assembly to an overhaul stand as shown in the illustration.
-
-
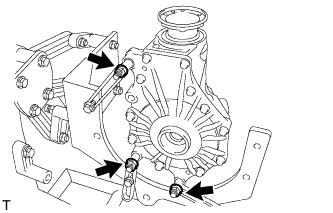
REMOVE FRONT DIFFERENTIAL CARRIER RETAINER SUB-ASSEMBLY
-
Loosen the 11 bolts.
-
Remove the front differential carrier assembly from the overhaul attachment.
-
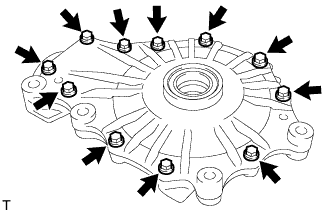
Remove the 11 bolts.
-
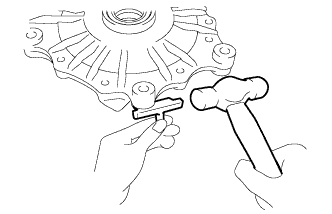
Insert the blade of an oil pan seal cutter between the differential carrier and front differential carrier retainer sub-assembly. Cut through the applied seal packing.
Note
Do not damage the installation surface of the differential carrier.
-
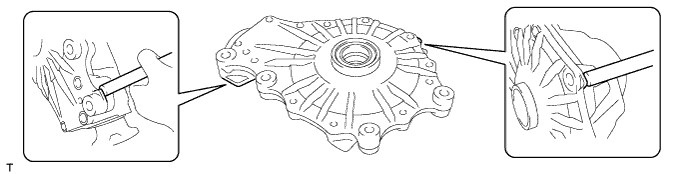
Using a brass bar and hammer, lightly tap the front differential carrier retainer sub-assembly to remove it from the differential carrier.
-
-
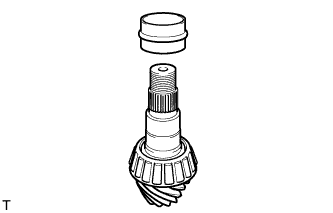
REMOVE NO. 1 FRONT DIFFERENTIAL CASE SUB-ASSEMBLY
-
Remove the No. 1 differential case assembly with ring gear from the differential carrier.
Note
Do not damage the 2 front differential case bearings and differential ring gear.
-
-
FIX DIFFERENTIAL CARRIER
-
Fix the differential carrier to the overhaul stand.
-
-
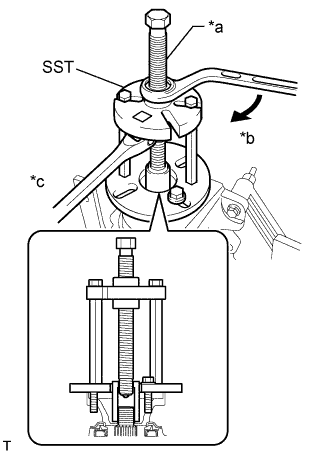
REMOVE FRONT DRIVE PINION COMPANION FLANGE FRONT NUT
-
Using SST and a hammer, unstake the staked part of the front drive pinion companion flange front nut.
- SST
- 09930-00010
Note
-
Be sure to use SST with the tapered surface facing the shaft.
-
Do not grind the tip of SST with a grinder etc.
-
Completely loosen the staked part of the nut when removing it.
-
Do not damage the threads of the drive pinion.
-

Text in Illustration *a Turn *b Hold Using SST to hold the flange, remove the front drive pinion companion flange front nut.
- SST
- 09213-58013
- 09229-55010
- 09330-00021
Note
Perform the removal while supporting the overhaul attachment.
-
-
REMOVE FRONT DRIVE PINION COMPANION FLANGE FRONT SUB-ASSEMBLY WITH DEFLECTOR
-
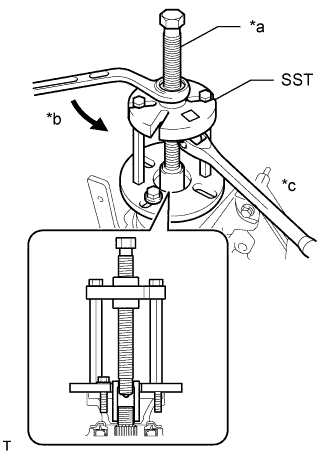
Text in Illustration *a Center Bolt *b Turn *c Hold Using SST, remove the front drive pinion companion flange front sub-assembly from the differential carrier.
- SST
- 09950-30012 ( 09951-03010, 09953-03010, 09954-03010, 09955-03030, 09956-03020 )
Tech Tips
Before using SST center bolt, apply hypoid gear oil to its threads and tip.
-
-
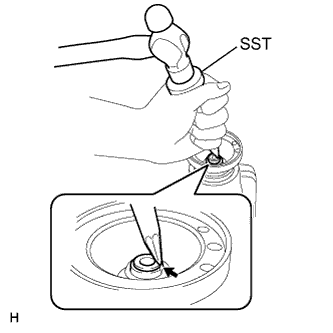
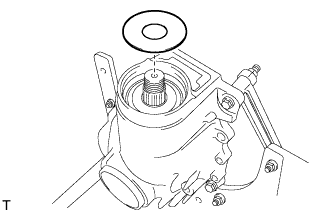
REMOVE FRONT DIFFERENTIAL CARRIER OIL SEAL
-
Using SST, remove the front differential carrier oil seal from the differential carrier.
- SST
- 09308-00010
-
-
REMOVE FRONT DIFFERENTIAL DRIVE PINION OIL SLINGER
-
Remove the front differential drive pinion oil slinger from the differential carrier.
-
-
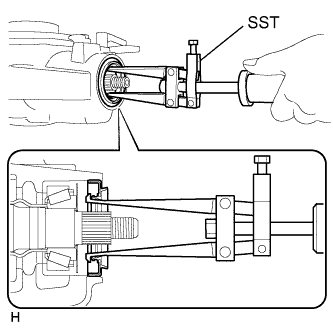
REMOVE DIFFERENTIAL DRIVE PINION WITH BEARING INNER RACE
-
Text in Illustration *a Overhaul Attachment Remove the differential carrier together with the overhaul attachment from the engine stand.
-
Install the differential carrier to the attachment as shown in the illustration.
-
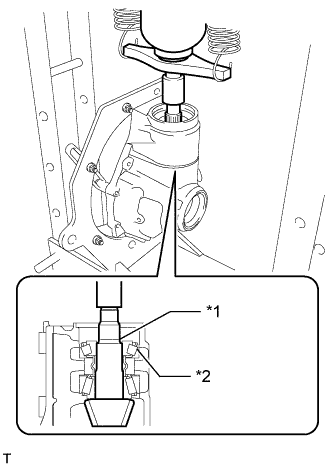
Text in Illustration *1 Differential Drive Pinion *2 Bearing Inner Race Using a press, remove the differential drive pinion with bearing inner race from the differential carrier.
Note
Do not drop the differential drive pinion or bearing inner race.
-
-
REPLACE FRONT DIFFERENTIAL DRIVE PINION BEARING SPACER
-
Replace the front differential drive pinion bearing spacer with a new one and install it to the differential drive pinion with bearing inner race.
-
-
INSTALL DIFFERENTIAL DRIVE PINION WITH BEARING INNER RACE
-
Text in Illustration *a Center Bolt *b Turn *c Hold Using SST and the companion flange, install the differential drive pinion with bearing inner race.
- SST
- 09950-30012 ( 09951-03010, 09953-03010, 09954-03010, 09955-03040, 09956-03060 )
Tech Tips
Before using SST center bolt, apply hypoid gear oil to its threads and tip.
-
Using SST, remove the companion flange.
-
-
INSTALL FRONT DIFFERENTIAL DRIVE PINION OIL SLINGER
-
Install the front differential drive pinion oil slinger to the differential carrier.
-
-
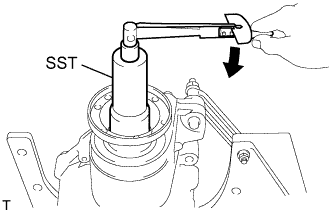
INSTALL FRONT DIFFERENTIAL CARRIER OIL SEAL
-
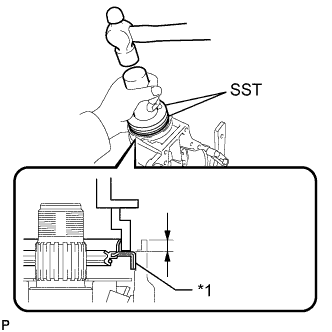
Text in Illustration *1 Front Differential Carrier Oil Seal Using SST and a hammer, tap in a new oil seal.
- SST
- 09309-36010
- 09502-24010
Standard depth 6.2 to 7.2 mm (0.244 to 0.283 in.) Note
-
Using a vernier caliper, measure the depth of the front differential carrier oil seal.
-
Measure at 3 or more areas around the circumference of the front differential carrier oil seal
-
Make sure the difference between the maximum and minimum measured values is less than 0.75 mm (0.0295 in.), as a greater difference may lead to oil leaks.
-
Tap the front differential carrier oil seal uniformly so that the front differential carrier oil seal is straight.
-
Do not excessively tap the front differential carrier oil seal.
Tech Tips
First, uniformly tap in the front differential carrier oil seal until it is flush with the edge of the carrier, and then tap it little by little until the depth is within the standard range.
-
-
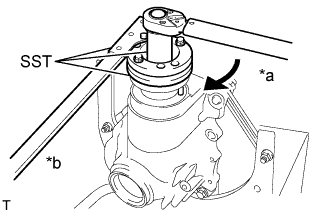
INSTALL FRONT DRIVE PINION COMPANION FLANGE FRONT SUB-ASSEMBLY WITH DEFLECTOR
-
Text in Illustration *a Center Bolt *b Turn *c Hold Using SST, install the front drive pinion companion flange front sub-assembly to the drive pinion.
- SST
- 09950-30012 ( 09951-03010, 09953-03010, 09954-03010, 09955-03040, 09956-03060 )
Note
Do not insert the front drive pinion companion flange front sub-assembly excessively as the preload will be adjusted in the following procedure.
Tech Tips
Before using SST center bolt, apply hypoid gear oil to its threads and tip.
-
-
INSPECT DRIVE PINION PRELOAD
-
Coat the threads of a new front drive pinion companion flange front nut with hypoid gear oil LSD.
-
Text in Illustration *a Turn *b Hold Using SST and a torque wrench, tighten the front drive pinion companion flange front nut while checking the preload.
- SST
- 09213-58013
- 09330-00021
- 09229-55010
Maximum torque 490 N*m (4996 kgf*cm, 361 ft.*lbf) Note
-
Tighten the front drive pinion companion flange front nut little by little to reach the specified preload, being careful not to exceed the maximum torque.
-
Do not overtighten the nut, as the threads will become damaged.
-
Measure the preload after rotating the front drive pinion companion flange front sub-assembly several times in the forward and backward directions to make sure the bearing is operating correctly.
-
Perform the installation while supporting the overhaul attachment.
-
Using SST and a torque wrench, measure the drive pinion preload.
- SST
- 09229-55010
Tech Tips
Record the drive pinion preload for the total preload inspection.
Standard drive pinion preload (at starting) New bearing 3.9 to 4.6 N*m (40 to 46 kgf*cm, 35 to 40 in.*lbf) Reused bearing 2.8 to 3.1 N*m (28 to 32 kgf*cm, 25 to 27 in.*lbf) Note
The front differential drive pinion bearing spacer is made of plastic and changes shape when used. If the starting torque of the differential drive pinion is exceeded by mistake, make sure to replace the front differential drive pinion bearing spacer with a new one.
Tech Tips
-
If the preload is insufficient, tighten the nut 5 to 10° at a time until the preload is in the standard range.
-
If the tightening torque of the flange nut exceeds the specified torque but the preload is still insufficient, loosen the flange nut. Then check if the flange nut and drive pinion threads are damaged.
-
If there are no problems, replace the bearing spacer, apply hypoid gear oil LSD to the threads of the front drive pinion companion flange front nut and repeat the procedure above.
-
-
INSTALL NO. 1 FRONT DIFFERENTIAL CASE SUB-ASSEMBLY
-
Remove the differential carrier from the overhaul attachment.
-
Install the No. 1 front differential case sub-assembly with ring gear to the differential carrier.
Note
Do not damage the front differential case bearing and differential ring gear.
-
-
INSTALL FRONT DIFFERENTIAL CARRIER RETAINER SUB-ASSEMBLY
-
Remove the seal packing attached on the differential carrier and front differential carrier retainer sub-assembly using a scraper and wire brush.
Note
Do not scratch the fitting surface.
-
Check that there is no foreign matter or damage on the installation surface of the front differential carrier retainer sub-assembly.
-
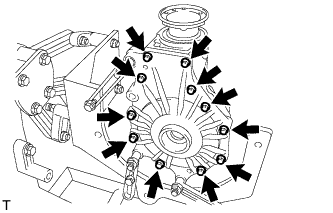
Apply seal packing to the front differential carrier retainer sub-assembly as shown in the illustration.
Seal packing Toyota Genuine Seal Packing 1281, Three bond 1281 or equivalent Note
-
Apply the seal packing in a continuous line, approximately 2 to 3 mm (0.0788 to 0.118 in.) in diameter.
-
Overlap the seal packing at least 10 mm (0.394 in.) at the beginning and the end of application.
-
Install the front differential carrier retainer sub-assembly within 3 minutes of application.
-
-
Install the front differential carrier retainer sub-assembly with the 11 bolts.
- Torque:
- 58 N*m { 591 kgf*cm, 43 ft.*lbf }
Note
Do not fill the oil or drive immediately after installing the front differential carrier retainer sub-assembly. Leave the vehicle for at least 1 hour. Also, avoid sudden acceleration and deceleration for at least 12 hours after application.
-
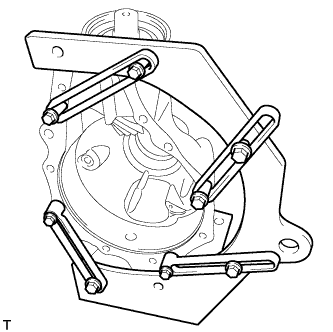
Set the differential carrier to an overhaul stand as shown in the illustration.
-
-
INSPECT TOTAL PRELOAD
-
Using SST and a torque wrench, measure the preload with the teeth of the differential drive pinion and differential ring gear in contact.
- SST
- 09229-55010
Standard total preload New bearing 4.7 to 5.6 N*m (48 to 57 kgf*cm, 42 to 50 in.*lbf) Reused bearing 3.3 to 3.8 N*m (34 to 38 kgf*cm, 29 to 33 in.*lbf)
-
-
STAKE FRONT DRIVE PINION COMPANION FLANGE FRONT NUT
-
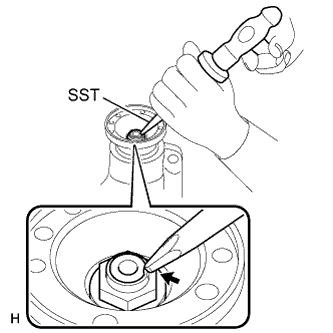
Using SST and a hammer, stake the front drive pinion companion flange front nut.
- SST
- 09930-00010
-
-
REMOVE FRONT DIFFERENTIAL CARRIER ASSEMBLY FROM OVERHAUL STAND
-
Remove the front differential carrier assembly from the overhaul attachment stand.
-
-
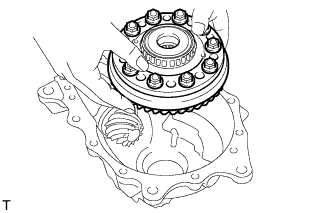
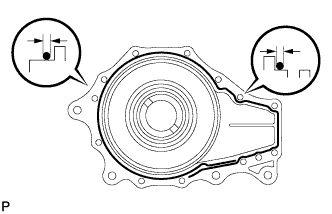
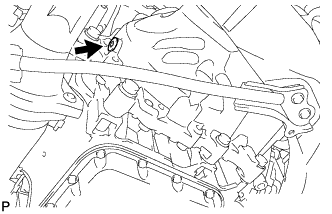
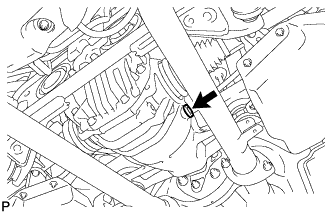
INSTALL FRONT DIFFERENTIAL CARRIER ASSEMBLY
-
Support the front differential carrier assembly with a jack and temporarily install it to the oil pan with the 4 bolts.
CAUTION:
As the front differential carrier assembly is very heavy, securely support it with the jack.
-
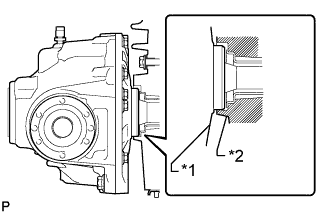
Text in Illustration *1 Front Differential Carrier Retainer Sub-assembly *2 Oil Pan Sub-assembly Align the front differential carrier retainer sub-assembly and oil pan so that their ends are aligned and tighten the 4 bolts to install the front differential carrier assembly.
- Torque:
- 81 N*m { 826 kgf*cm, 60 ft.*lbf }
-
-
INSTALL ENGINE TO VEHICLE
-
Remove the engine from the engine stand and then install it to the vehicle Click here.
-
-
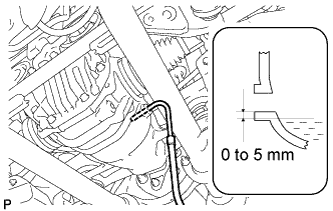
ADD FRONT DIFFERENTIAL OIL
-
for Front Differential:
-
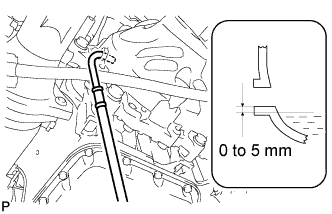
Add differential oil so that the oil level is between 0 to 5 mm (0 to 0.197 in.) from the bottom lip of the differential filler plug hole.
Note
-
Too much or too little oil will lead to differential problems.
-
After changing the oil, drive the vehicle and then check the oil level again.
Oil type Toyota Genuine Differential Gear Oil LT 75W-85 GL-5 or equivalent. Capacity 0.7 to 0.8 liters (0.74 to 0.84 US qts., 0.62 to 0.70 Imp. qts.) -
-
Using a 10 mm hexagon wrench, install a new gasket and the filler plug.
- Torque:
- 39 N*m { 398 kgf*cm, 29 ft.*lbf }
-
-
for Rear Differential:
-
Add differential oil so that the oil level is between 0 to 5 mm (0 to 0.196 in.) from the bottom lip of the differential filler plug hole.
Note
-
Too much or too little oil will lead to differential problems.
-
After changing the oil, drive the vehicle and then check the oil level again.
Oil type Toyota Genuine Differential Gear Oil LX 75W-85 GL-5 or equivalent Capacity 1.3 to 1.4 liters (1.38 to 1.47 US qts., 1.15 to 1.23 Imp. qts.) -
-
Using a 10 mm hexagon wrench, install a new gasket and the filler plug.
- Torque:
- 49 N*m { 500 kgf*cm, 36 ft.*lbf }
-
-