HYBRID VEHICLE CONVERTER INSTALLATION

-
INSTALL HV CONVERTER
CAUTION:
Be sure to wear insulated gloves.
-
Install the hybrid vehicle converter with the 4 nuts.
- Torque:
- 7.5 N*m { 76 kgf*cm, 66 in.*lbf }
-
Attach the 4 clamps.
Note
If a wire harness clamp is damaged, replace it with a new one.
-
Connect the 3 connectors.
-
-
INSTALL NO. 2 HYBRID VEHICLE CONVERTER SIGNAL WIRE
CAUTION:
Be sure to wear insulated gloves.
-
Connect the connector to install the No. 2 hybrid vehicle converter signal wire.
-
-
INSTALL CONVERTER COOLING BLOWER BRACKET
CAUTION:
Be sure to wear insulated gloves.
-
Attach the 2 clamps to install the converter cooling blower bracket.
-
-
INSTALL HV CONVERTER POWER SUPPLY WIRE
CAUTION:
Be sure to wear insulated gloves.
-
Attach the clamp.
-
Install the hybrid vehicle converter power supply wire with the nut.
- Torque:
- 9.0 N*m { 92 kgf*cm, 80 in.*lbf }
-
-
INSTALL CONVERTER COOLING BLOWER
CAUTION:
Be sure to wear insulated gloves.
-
Attach the 2 claws.
-
Install the converter cooling blower with the 2 nuts and bolt.
- Torque:
- 7.5 N*m { 76 kgf*cm, 66 in.*lbf }
-
Attach the clamp and connect the connector.
-
-
INSTALL CONVERTER WIRE BRACKET
CAUTION:
Be sure to wear insulated gloves.
-
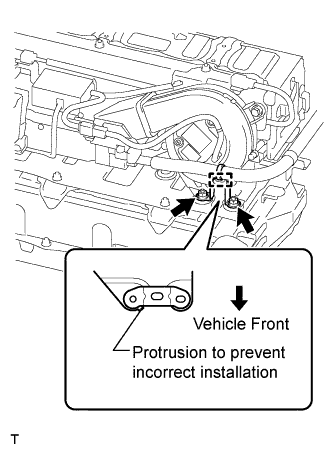
Install the converter wire bracket with the 2 nuts in the direction shown in the illustration.
- Torque:
- 7.5 N*m { 76 kgf*cm, 66 in.*lbf }
-
Attach the clamp.
-
-
INSTALL CONVERTER COOLING EXHAUST DUCT
CAUTION:
Be sure to wear insulated gloves.
-
Attach the clamp and 2 claws to install the converter cooling exhaust duct.
-
Install the clip.
-
-
INSTALL NO. 8 HYBRID VEHICLE BATTERY SHIELD SUB-ASSEMBLY
CAUTION:
Be sure to wear insulated gloves.
-
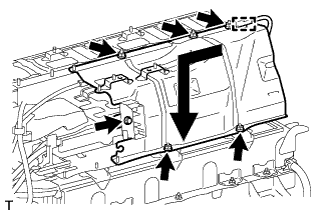
Install the No. 8 hybrid vehicle battery shield sub-assembly as shown in the illustration.
-
Install the 5 nuts and bolt.
- Torque:
- 7.5 N*m { 76 kgf*cm, 66 in.*lbf }
-
Attach the clamp.
-
-
INSTALL NO. 4 HYBRID BATTERY SHIELD PANEL
CAUTION:
Be sure to wear insulated gloves.
-
Install the No. 4 hybrid battery shield panel with the 6 nuts and bolt.
- Torque:
- 7.5 N*m { 76 kgf*cm, 66 in.*lbf }
-
-
INSTALL REAR HYBRID BATTERY WITH LABEL SHIELD
CAUTION:
Be sure to wear insulated gloves.
-
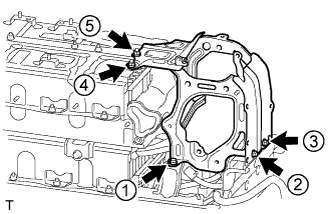
Install the rear hybrid battery with label shield with the 2 nuts and 3 bolts in the order shown in the illustration.
- Torque:
- 7.5 N*m { 76 kgf*cm, 66 in.*lbf }
-
-
INSTALL NO. 1 HYBRID BATTERY INTAKE DUCT
CAUTION:
Be sure to wear insulated gloves.
-
Install the No. 1 hybrid battery intake duct with the 3 clips.
-
-
INSTALL BATTERY COOLING BLOWER ASSEMBLY (for Lower Side)
CAUTION:
Be sure to wear insulated gloves.
-
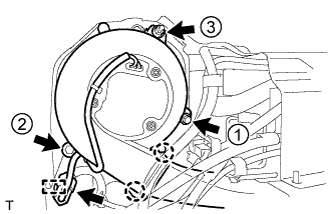
Attach the 2 claws to install the battery cooling blower assembly (for lower side).
-
Install the nut and 2 bolts in the order shown in the illustration.
- Torque:
- 7.5 N*m { 76 kgf*cm, 66 in.*lbf }
-
Connect the connector.
-
Attach the clamp.
-
-
INSTALL NO. 4 HYBRID VEHICLE BATTERY CARRIER BRACKET SUB-ASSEMBLY
CAUTION:
Be sure to wear insulated gloves.
-
Install the No. 4 hybrid vehicle battery carrier bracket sub-assembly with the 4 nuts and 3 bolts.
- Torque:
- 7.5 N*m { 76 kgf*cm, 66 in.*lbf }
-
Install the No. 1 hybrid battery packing as shown in the illustration.
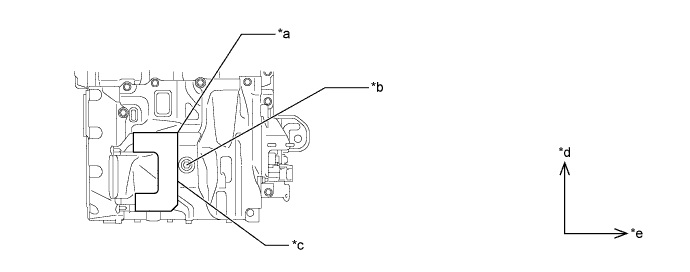
Text in Illustration *a Align with edge of metal plate (reference point) *b Make sure No. 1 hybrid battery packing does not cover bolt *c Align with edge of weld (reference point) *d LH *e FR - -
-
-
INSTALL NO. 1 HYBRID BATTERY SHIELD SUB-ASSEMBLY
CAUTION:
Be sure to wear insulated gloves.
-
Install the No. 1 hybrid battery shield sub-assembly with the 2 nuts.
- Torque:
- 7.5 N*m { 76 kgf*cm, 66 in.*lbf }
-
-
INSTALL NO. 4 HYBRID BATTERY INTAKE DUCT
-
Attach the 2 claws to install the No. 4 hybrid battery intake duct to the battery cooling blower assembly (for upper side).
-
-
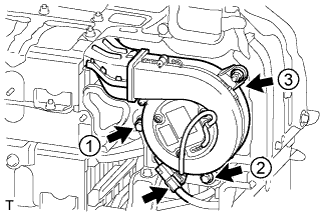
INSTALL BATTERY COOLING BLOWER ASSEMBLY (for Upper Side)
CAUTION:
Be sure to wear insulated gloves.
-
Install the battery cooling blower assembly (for upper side) with the nut and 2 bolts in the order shown in the illustration.
- Torque:
- 7.5 N*m { 76 kgf*cm, 66 in.*lbf }
-
Connect the connector.
-
-
INSTALL NO. 6 HYBRID VEHICLE BATTERY SHIELD SUB-ASSEMBLY

CAUTION:
Be sure to wear insulated gloves.
-
Install the No. 6 hybrid vehicle battery shield sub-assembly with the 3 nuts and 3 bolts in the order shown in the illustration.
- Torque:
- 7.5 N*m { 76 kgf*cm, 66 in.*lbf }
-
-
INSTALL HV BATTERY
-
Install the HV battery to the vehicle Click here.
-