HYBRID VEHICLE CONVERTER REMOVAL

-
REMOVE HV BATTERY
-
Remove the HV battery from the vehicle Click here.
-
-
REMOVE NO. 6 HYBRID VEHICLE BATTERY SHIELD SUB-ASSEMBLY
CAUTION:
Be sure to wear insulated gloves.
-
Remove the 3 nuts, 3 bolts and No. 6 hybrid vehicle battery shield sub-assembly.
-
-
REMOVE BATTERY COOLING BLOWER ASSEMBLY (for Upper Side)

CAUTION:
Be sure to wear insulating gloves.
-
Disconnect the connector.
-
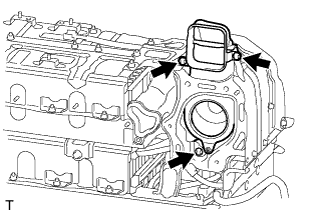
Remove the nut, 2 bolts and battery cooling blower assembly (for upper side).
-
-
REMOVE NO. 4 HYBRID BATTERY INTAKE DUCT
CAUTION:
Be sure to wear insulating gloves.
-
Detach the 2 claws and remove the No. 4 hybrid battery intake duct from the battery cooling blower assembly (for upper side).
-
-
REMOVE NO. 1 HYBRID BATTERY SHIELD SUB-ASSEMBLY
CAUTION:
Be sure to wear insulated gloves.
-
Remove the 2 nuts and No. 1 hybrid battery shield sub-assembly.
-
-
REMOVE NO. 4 HYBRID VEHICLE BATTERY CARRIER BRACKET SUB-ASSEMBLY
CAUTION:
Be sure to wear insulated gloves.
-
Remove the No. 1 hybrid battery packing.
-
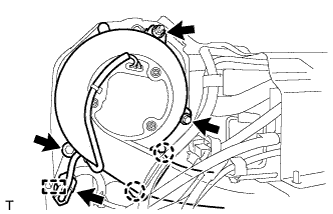
Remove the 4 nuts, 3 bolts and No. 4 hybrid vehicle battery carrier bracket sub-assembly.
-
-
REMOVE BATTERY COOLING BLOWER ASSEMBLY (for Lower Side)
CAUTION:
Be sure to wear insulating gloves.
-
Detach the clamp and disconnect the connector.
-
Remove the nut and 2 bolts.
-
Detach the 2 claws and remove the battery cooling blower assembly (for lower side).
-
-
REMOVE NO. 1 HYBRID BATTERY INTAKE DUCT
CAUTION:
Be sure to wear insulated gloves.
-
Remove the 3 clips and No. 1 hybrid battery intake duct.
-
-
REMOVE REAR HYBRID BATTERY WITH LABEL SHIELD
CAUTION:
Be sure to wear insulated gloves.
-
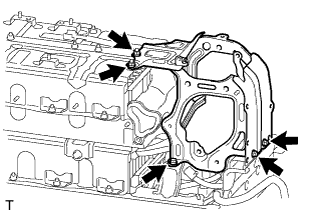
Remove the 2 nuts, 3 bolts and rear hybrid battery with label shield.
-
-
REMOVE NO. 4 HYBRID BATTERY SHIELD PANEL
CAUTION:
Be sure to wear insulated gloves.
-
Remove the 6 nuts, bolt and No. 4 hybrid battery shield panel.
-
-
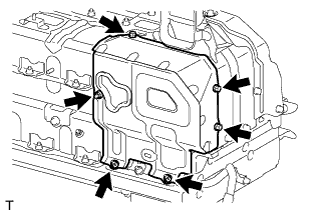
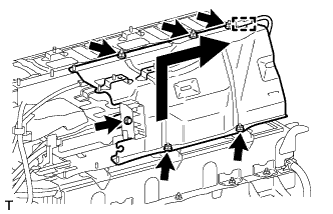
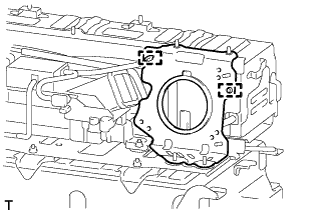
REMOVE NO. 8 HYBRID VEHICLE BATTERY SHIELD SUB-ASSEMBLY
CAUTION:
Be sure to wear insulated gloves.
-
Detach the clamp.
-
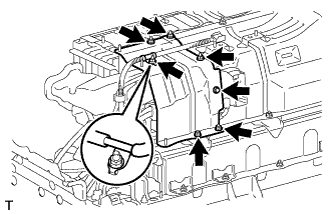
Remove the 5 nuts, bolt and No. 8 hybrid vehicle battery shield sub-assembly as shown in the illustration.
-
-
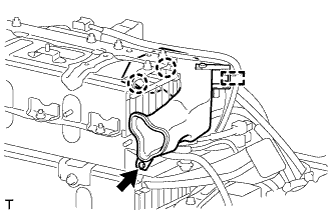
REMOVE CONVERTER COOLING EXHAUST DUCT
CAUTION:
Be sure to wear insulated gloves.
-
Remove the clip.
-
Detach the clamp and 2 claws and remove the converter cooling exhaust duct.
-
-
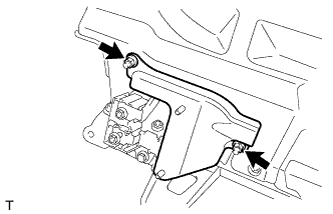
REMOVE CONVERTER WIRE BRACKET

CAUTION:
Be sure to wear insulated gloves.
-
Detach the clamp.
-
Remove the 2 nuts and converter wire bracket.
-
-
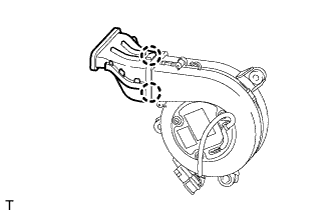
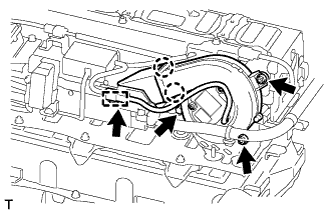
REMOVE CONVERTER COOLING BLOWER
CAUTION:
Be sure to wear insulated gloves.
-
Detach the clamp and disconnect the connector.
-
Remove the 2 nuts and bolt.
-
Detach the 2 claws and remove the converter cooling blower.
-
-
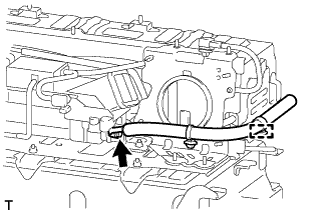
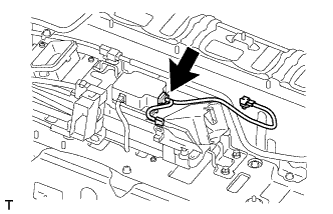
REMOVE HV CONVERTER POWER SUPPLY WIRE
CAUTION:
Be sure to wear insulated gloves.
-
Detach the clamp.
-
Remove the nut and hybrid vehicle converter power supply wire.
-
-
REMOVE CONVERTER COOLING BLOWER BRACKET
CAUTION:
Be sure to wear insulated gloves.
-
Detach the 2 clamps and remove the converter cooling blower bracket.
-
-
REMOVE NO. 2 HYBRID VEHICLE CONVERTER SIGNAL WIRE
CAUTION:
Be sure to wear insulated gloves.
-
Disconnect the connector and remove the No. 2 hybrid vehicle converter signal wire.
-
-
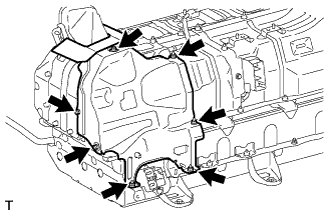
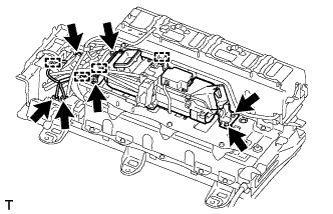
REMOVE HV CONVERTER
CAUTION:
Be sure to wear insulated gloves.
-
Disconnect the 3 connectors.
-
Detach the 4 clamps.
-
Remove the 4 nuts and hybrid vehicle converter.
-