RADIATOR REMOVAL

-
RECOVER REFRIGERANT FROM REFRIGERATION SYSTEM
-
Turn the power switch on (READY).
-
Turn the A/C switch on.
-
Operate the air conditioning with a set temperature of 25°C (77°F) and the blower at low for 10 minutes to circulate the refrigerant. This causes most of the compressor oil from the various components of the air conditioning system to collect in the air conditioning compressor.
-
Turn the power switch off.
-
Recover the refrigerant from the air conditioning system using a refrigerant recovery unit.
-
-
REMOVE FRONT BUMPER REINFORCEMENT
-
REMOVE V-BANK COVER SUB-ASSEMBLY
-
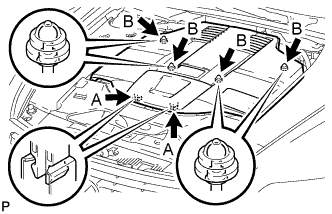
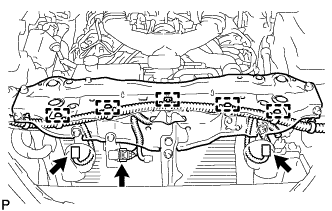
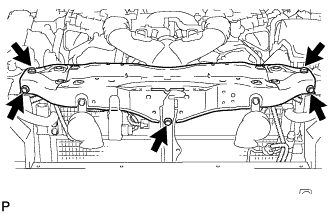
While using both hands, lift the rear side of the V-bank cover sub-assembly upwards to detach the 4 clips labeled B. Slide the V-bank cover sub-assembly towards the front of the vehicle to detach the 2 clips labeled A, and remove the V-bank cover sub-assembly.
Note
The V-bank cover sub-assembly may be damaged if its front and rear are lifted at the same time.
-
-
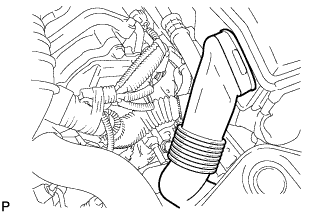
REMOVE NO. 1 AIR CLEANER INLET
-
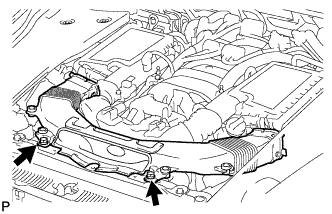
Remove the 2 bolts.
-
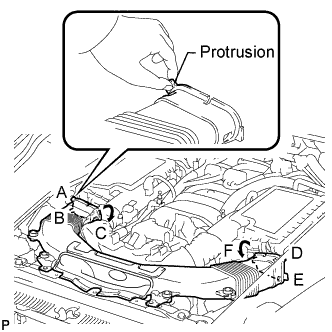
Hold the No. 1 air cleaner inlet by the protrusions labeled A and B, and detach the connections.
-
Rotate the No. 1 air cleaner inlet as shown in the illustration to detach the protrusion labeled C.
-
Hold the No. 1 air cleaner inlet by the protrusions labeled D and E, and detach the connections.
-
Rotate the No. 1 air cleaner inlet as shown in the illustration to detach the protrusion labeled F.
-
-
REMOVE NO. 1 ENGINE UNDER COVER
-
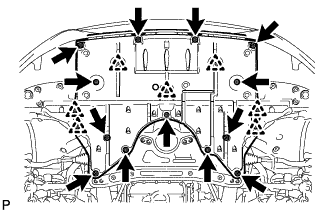
Remove the 13 screws, 7 clips and No. 1 engine under cover.
-
-
REMOVE FRONT CENTER FLOOR COVER (w/ Cover)
-
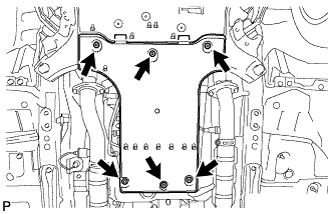
Remove the 3 screws, 2 bolts, clip and front center floor cover.
-
-
DRAIN ENGINE COOLANT
CAUTION:
Do not remove the radiator reservoir cap and vent plug while the engine and radiator are still hot. Pressurized, hot engine coolant and steam may be released and cause serious burns.
-
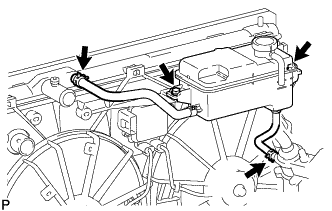
Loosen the radiator drain cock plug.
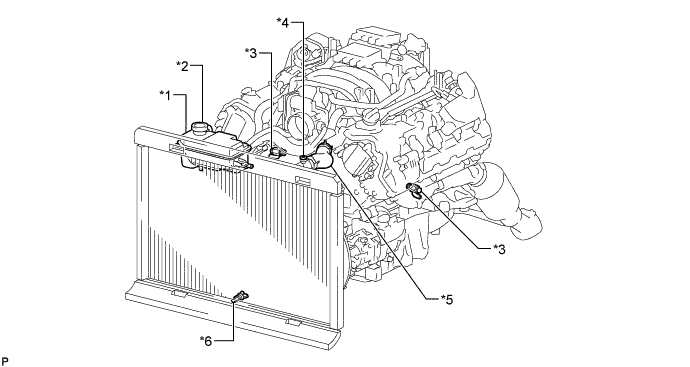
Text in Illustration *1 Radiator Reservoir *2 Radiator Reservoir Cap *3 Cylinder Block Drain Cock Plug *4 Vent Plug *5 No. 1 Radiator Hose *6 Radiator Drain Cock Plug Tech Tips
Collect the coolant in a container and dispose of it according to the regulations in your area.
-
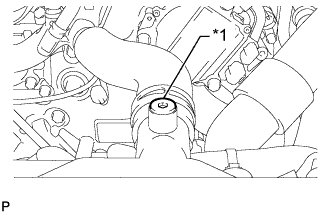
Text in Illustration *1 Vent Plug Remove the radiator reservoir cap, and using a 6 mm hexagon wrench, remove the vent plug.
-
Drain the coolant.
-
Loosen the 2 cylinder block drain cock plugs.
-
-
DRAIN COOLANT (for Inverter)
Note
-
Do not reuse the drained coolant because it may contain foreign objects.
-
Collect the drained coolant and measure its volume to establish a benchmark. When adding coolant, make sure to add more coolant than the measured amount.
-
Remove the inverter reserve tank cap.
CAUTION:
To avoid the danger of being burned, do not remove the inverter reserve tank cap while the coolant for the inverter is still hot.
Note
Do not remove the plug from the tube.
-
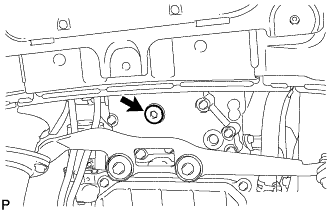
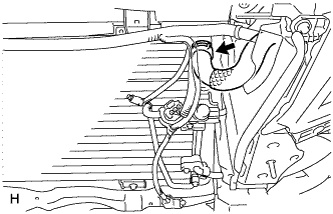
Using a hexagon wrench 10 mm, remove the drain plug indicated in the illustration and drain the coolant.
CAUTION:
Use caution when handling coolant immediately after driving or in summer because it may be hot.
-
Using a hexagon wrench 10 mm, install the drain plug with a new gasket.
- Torque:
- 39 N*m { 400 kgf*cm, 29 ft.*lbf }
-
Measure the volume of the drained coolant.
-
-
REMOVE RADIATOR RESERVOIR ASSEMBLY
-
Disconnect the 2 reservoir hoses.
-
Remove the 2 bolts and radiator reservoir assembly.
-
-
REMOVE NO. 1 RADIATOR HOSE
-
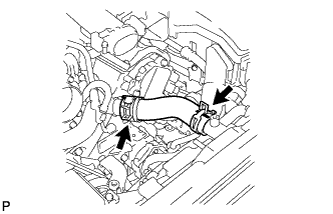
Remove the No. 1 radiator hose.
-
-
REMOVE NO. 2 RADIATOR HOSE
-
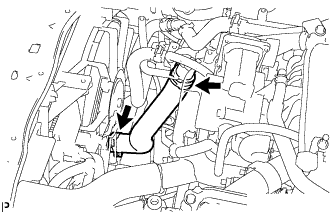
Remove the No. 2 radiator hose.
-
-
DISCONNECT NO. 2 OIL COOLER INLET HOSE
-
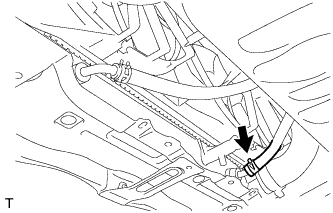
Disconnect the No. 2 oil cooler inlet hose from the radiator assembly.
Note
Place a container under the connection before disconnecting the oil cooler hose because oil in the hose may spill out.
-
-
DISCONNECT NO. 2 OIL COOLER OUTLET HOSE
-

Disconnect the No. 2 oil cooler outlet hose from the radiator assembly.
Note
Place a container under the connection before disconnecting the oil cooler hose because oil in the hose may spill out.
-
-
REMOVE OUTLET ENGINE ROOM ECU DUCT
-
Remove the outlet engine room ECM duct.
-
-
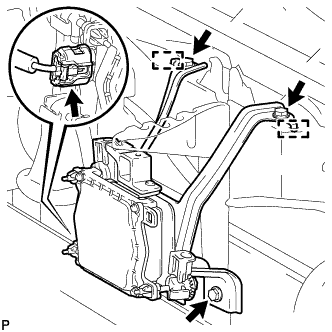
REMOVE MILLIMETER WAVE RADAR SENSOR ASSEMBLY (w/ Dynamic Radar Cruise Control System)
-
Disconnect the connector.
-
Remove the 3 bolts.
-
Detach the 2 guides and remove the millimeter wave radar sensor assembly.
-
-
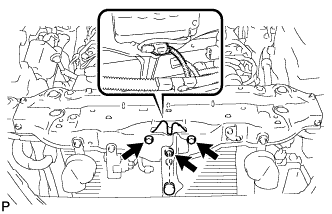
DISCONNECT HOOD LOCK CONTROL CABLE COVER
-

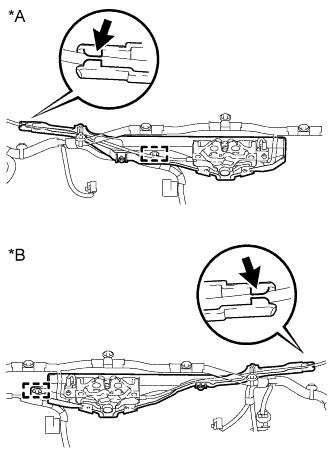
Text in Illustration *A for RHD *B for LHD Remove the 3 screws and detach the claw to disconnect the hood lock control cable cover.
-
-
DISCONNECT HOOD LOCK ASSEMBLY
-
Remove the lock nut cap and lock nut.
-
Remove the 2 bolts and disconnect the hood lock assembly.
-
Disconnect the connector.
-
-
DISCONNECT WIRE HARNESS
-
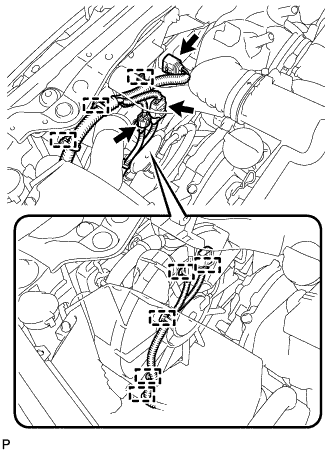
Disconnect the 3 connectors.
-
Detach the 8 wire harness clamps to disconnect the wire harness.
-
-
REMOVE RADIATOR UPPER SUPPORT SUB-ASSEMBLY
-
Disconnect the 3 connectors and detach the 5 wire harness clamps to disconnect the wire harness.
-
Remove the 5 bolts and radiator upper support sub-assembly.
-
-
REMOVE HOOD LOCK CONTROL CABLE COVER
-
Text in Illustration *A for RHD *B for LHD Disconnect the wire harness clamp from the hood lock control cable cover.
-
Disconnect the hood lock control cable and remove the hood lock control cable cover.
-
-
REMOVE HOOD LOCK ASSEMBLY
-
Remove the hood lock assembly from the hood lock control cable.
-
-
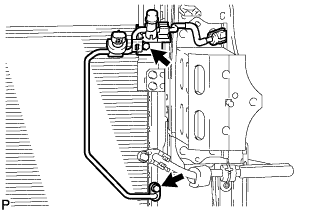
DISCONNECT NO. 1 INVERTER COOLING HOSE
-

Remove the clip and disconnect the cooling hose.
-
-
DISCONNECT NO. 2 INVERTER COOLING HOSE
-
Remove the clip and disconnect the cooling hose.
-
-
DISCONNECT DISCHARGE HOSE SUB-ASSEMBLY
-
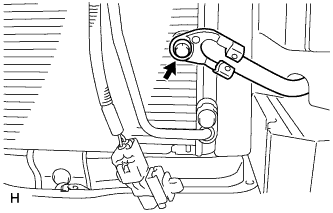
Remove the bolt and disconnect the discharge hose sub-assembly from the cooler condenser.
Note
-
When loosening the bolt, do not allow any tools to contact the pipe.
-
When loosening the bolt, hold a part of the pipe near the connector.
-
-
Remove the O-ring from the discharge hose sub-assembly.
Note
Seal the openings of the disconnected parts using vinyl tape to prevent moisture and foreign matter from entering them.
-
-
DISCONNECT LIQUID TUBE SUB-ASSEMBLY A
-
Remove the 2 bolts and disconnect the liquid tube from the cooler condenser.
Note
-
When loosening the bolt, do not allow any tools to contact the pipe.
-
When loosening the bolt, hold a part of the pipe near the connector.
-
-
Remove the O-ring from the liquid tube.
Note
Seal the openings of the disconnected parts using vinyl tape to prevent moisture and foreign matter from entering them.
-
-
REMOVE RADIATOR ASSEMBLY
-
Remove the radiator assembly from the crossmember.
Note
Do not allow the radiator assembly to interfere with other parts.
-
-
REMOVE COOLER CONDENSER ASSEMBLY
-
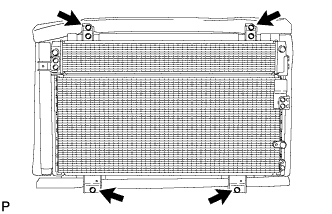
Remove the 4 bolts and cooler condenser assembly.
-
-
REMOVE FAN SHROUD WITH FAN AND MOTOR
-
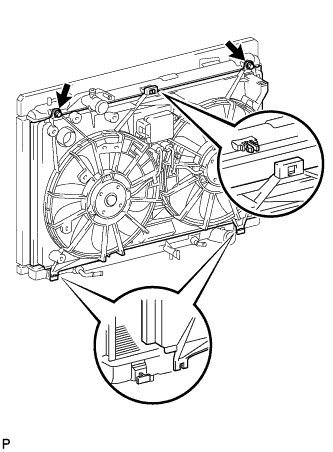
Remove the 2 bolts.
-
Detach the claw, and then remove the fan shroud with fan and motor.
-
-
REMOVE RADIATOR SUPPORT CUSHION
-
Remove the 2 radiator support cushions.
-
-
REMOVE LOWER RADIATOR SUPPORT
-
Remove the 2 lower radiator supports.
-