IGNITION SYSTEM ON-VEHICLE INSPECTION

-
SPARK TEST PREPARATION PROCEDURES
-
Check for DTCs.
Note
If any DTC is present, perform troubleshooting procedures for that DTC.
-
Remove the service plug grip Click here.
-
Remove the 8 spark plugs Click here.
-
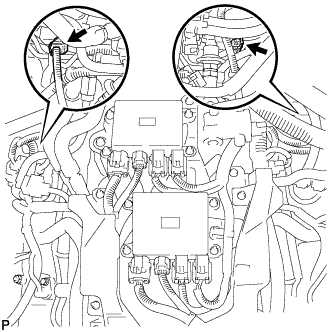
Disconnect the 2 fuel delivery pipe connectors.
-
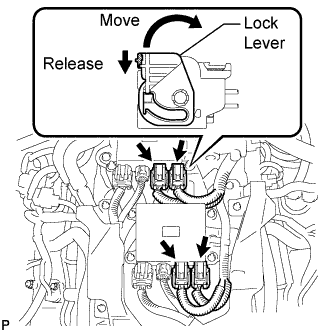
Disconnect the 4 injector driver connectors.
Tech Tips
To release each connector lock, push the claw downward ("Release" in the illustration) and move the lock lever ("Move" in the illustration).
-
Restore the engine to a state in which cranking is possible.
-
Install the skid control ECU and skid control ECU bracket.
Tech Tips
If a DTC for the hybrid control system is output, the Active Test cannot be performed. Therefore, it is necessary to install the skid control ECU.
-
Temporarily install the engine oil level dipstick guide with the bolt and insert the dipstick.
Note
Engine oil will overflow if the spark test is performed with the engine oil level dipstick guide not installed.
-
Connect the frame wire.
-
Restore the power supply by connecting the following cables and installing the service plug grip.
-
Cable to negative battery terminal.
-
Motor cable.
-
Generator cable.
CAUTION:
-
In order to safely crank the engine, follow the installation precautions for each part.
-
The hybrid system uses high voltage circuits. Make sure to perform the procedures properly, as making a mistake can lead to electric shock and/or electric leakage.
Note
-
When performing inspections on electrical systems, take care to prevent burnout due to a short circuit.
-
Make sure to securely install the wire harnesses, clamps, brackets, etc.
-
-
-
-
PERFORM SPARK TEST
-
Install the spark plug to the ignition coil and connect the ignition coil connector.
-
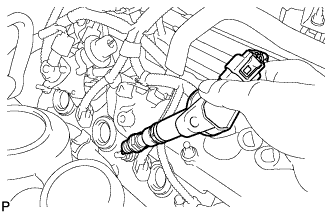
Ground the spark plug.
-
Connect the intelligent tester to the DLC3.
Note
Check the HV battery voltage in the Data List to ensure that the battery is fully charged.
-
Turn the power switch on (IG).
-
Push the intelligent tester main switch ON.
-
Enter the following menus: Powertrain / Hybrid Control / Active Test / Compress Test / On.
-
Depress and hold the brake pedal, and turn the power switch on (READY).
-
Visually check that sparks occur while the engine is being cranked.
Note
-
When performing the inspection, be sure to ground the hexagonal portion or the threaded portion of the spark plug.
-
Do not crank the engine for more than 2 seconds.
-
If an ignition coil assembly is struck or dropped, replace it with a new one.
-
If a spark plug is struck or dropped, replace it with a new one.
-
-
-
-
INSPECT IGNITION COIL AND SPARK PLUG
-
Spark test flowchart.
-
Check that the wire harness side connector of the ignition coil with igniter is securely connected.
Result Result Proceed to NG Connect securely OK Go to next step -
Perform a spark test on each ignition coil with igniter.
-
If there is a cylinder where sparks do not occur, replace its ignition coil with the ignition coil of a cylinder where sparks occur normally.
-
Crank the engine and visually check that sparks occur at the cylinder with the normally operating ignition coil.
Result Result Proceed to OK Replace ignition coil with igniter NG Go to next step -
-
Check the power supply to the ignition coil with igniter.
-
Turn the power switch on (IG).
-
Check that there is battery voltage at the ignition coil positive (+) terminal.
Result Result Proceed to NG Check wiring between power switch and ignition coil with igniter OK Go to next step -
-
Inspect the spark plug.
Result Result Proceed to NG Replace spark plug OK Inspect the ignition system Click here
Note
-
If an ignition coil assembly is struck or dropped, replace it with a new one.
-
If a spark plug is struck or dropped, replace it with a new one.
-
-
-
Disconnect the cable from the auxiliary negative (-) battery terminal.
-
Remove the service plug grip.
-
Remove the skid control ECU and skid control ECU bracket.
-
Disconnect the frame wire.
-
Disconnect the motor cable.
-
Disconnect the generator cable.
-
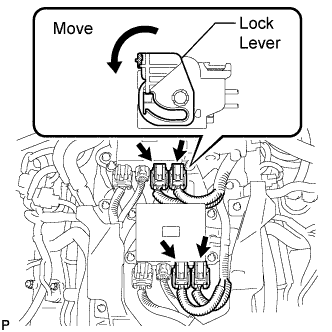
Connect the 4 injector driver connectors.
Tech Tips
Move the lock lever in the direction indicated by the arrow to lock the connector.
-
Connect the 2 fuel delivery pipe connectors.
-
Install the 8 spark plugs Click here.
-
Install the service plug grip Click here.
-
Clear the DTCs Click here.
-
-
INSPECT SPARK PLUG
Note
Do not use a wire brush for cleaning.
-
Check the electrode.
-
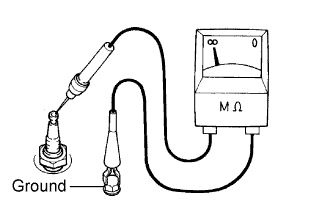
Using a megohmmeter, measure the insulation resistance.
Standard insulation resistance Tester Connection Condition Specified Condition Spark Plug (terminal part) - Body Ground Always 10 MΩ or higher If a megohmmeter is not available, perform the following simple inspection instead.
-
-

Alternative inspection method:
-
Set the vehicle to inspection mode Click here.
-
Quickly accelerate the engine to 2500 rpm 5 times.*
Note
*: Do not perform this step if P0300 (misfire detection) or a related DTC is stored.
-
Remove the spark plug.
-
Visually check the spark plug.
If the electrode is dry, the spark plug is functioning properly. If the electrode is damp, proceed to the next step.
-
-
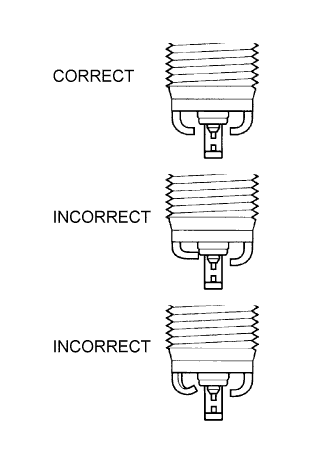
Check the spark plug for any damage to its threads and insulator.
If there is any damage, replace the spark plug. If not, reinstall the spark plug.
Recommended spark plug Manufacturer Product DENSO made FK20HBR11 Tech Tips

Maximum electrode gap for a used spark plug: 1.4 mm (0.0551 in.)
If the gap is greater than the maximum, replace the spark plug.
Electrode gap for a new spark plug: 1.0 to 1.1 mm (0.0394 to 0.0433 in.)
Note
Do not adjust the electrode gap of any spark plug, as the ground electrode tip will be damaged.
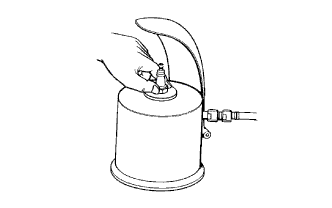
If the electrode has traces of wet carbon, allow it to dry and then clean it with a spark plug cleaner.
Standard air pressure 588 kPa (6.0 kgf/cm2, 85 psi) Standard duration 20 seconds or less Tech Tips
Only use the spark plug cleaner when the electrode is free of oil. If the electrode has traces of oil, use gasoline to clean off the oil before using the spark plug cleaner.
-