FUEL PRESSURE SENSOR INSTALLATION

-
INSTALL FUEL PRESSURE SENSOR
-
Install a new gasket to the sensor.
-
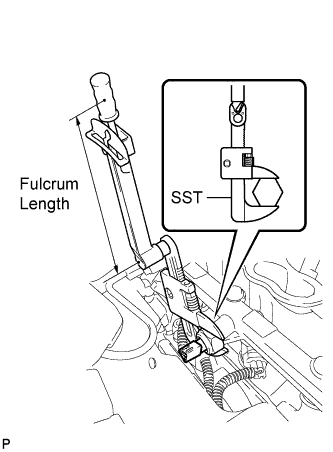
Using SST, install the sensor to the fuel delivery pipe.
- SST
- 09922-10010
- Torque:
- without SST
- 44 N*m { 449 kgf*cm, 32 ft.*lbf }
- with SST
- 30 N*m { 306 kgf*cm, 22 ft.*lbf }
Note
-
Do not apply oil to threads of the pressure sensor and delivery pipe.
-
Do not allow foreign matter to enter the pipe during the installation.
Tech Tips
-
Use a torque wrench with a fulcrum length of 300 mm (11.8 in.). When using a torque wrench with a fulcrum length that is not 300 mm (11.8 in.), calculate the torque specification for the torque wrench and SST based on the "without SST" torque specification Click here.
-
Make sure SST and the torque wrench are connected in a straight line.
-
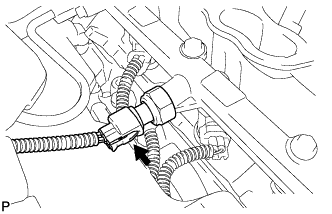
Connect the sensor connector.
-
-
INSTALL NO. 2 ENGINE COVER SUB-ASSEMBLY
-
INSTALL INTAKE MANIFOLD
-
INSPECT FOR FUEL LEAK
-
Connect the intelligent tester to the DLC3.
-
Turn the power switch on (IG).
Note
Do not start the engine.
-
Turn the intelligent tester on.
-
Select the following menus: Powertrain / Engine and ECT / Active Test / Control the Fuel Pump / Speed.
-
Check the fuel pump operation.
-
Check for pressure in the fuel inlet tube from the fuel line. Check that the sound of fuel flowing in the fuel tank can be heard.
If no sound can be heard, check the integration relay, fuel pump, ECM and wiring connector.
-
-
Check for fuel leaks.
-
Check that there are no fuel leaks anywhere on the system after performing maintenance.
If there is a fuel leak, repair or replace parts as necessary.
-
-