ENTRY AND START SYSTEM CUSTOMIZE PARAMETERS

-
CUSTOMIZE ENTRY AND START SYSTEM
Tech Tips
The following items can be customized.
Note
-
When the customer requests a change in a function, first make sure that the function can be customized.
-
Be sure to make a note of the current setting before customizing.
-
When troubleshooting a function, first make sure that the function is set to the default setting.
-
Connect the intelligent tester to the DLC3.
-
Turn the power switch ON (IG).
-
Turn the intelligent tester on.
-
Enter the following menus: Body / Utility / Customize.
-
Select the setting by referring to the table below.
Smart Key / Access Display (Item) Default Content Setting Relevant ECU Park Wait Time (Waiting time to permit unlocking door after locking) 2.5s Function that sets waiting time to permit unlocking door after door is locked with entry lock function 0.5s, 1.5s, 2.5s or 5s Certification ECU Ignition Available Area (Entry ignition available area.) All Function that sets the area that the key must be in before the power switch can be operated. Front or All Certification ECU Trunk Open Mode (Luggage compartment door open mode when vehicle is locked) ON Function to permit opening luggage compartment door ON or OFF Certification ECU Warning Display (Item) Default Content Setting Relevant ECU Key Low Battery Warning (Warn when key battery becomes weak) ON Function that warns driver that key's battery power is low ON or OFF Certification ECU -
Customizing with the Multi-display
-
Turn the power switch ON (IG).
-
Enter the following menus: SET UP/ Vehicle / Vehicle Customization / Door Lock Settings.
-
Select the setting by referring to the table below.
Door Lock Settings Display (Item) Default Content Setting Relevant ECU Select Doors to Unlock Driver's Door Function that sets which doors are unlocked by the entry unlock function. All, Each Door , Driver's Door or Side Doors Certification ECU Entry and start system On Function that enables or disables the entry and start system. On or Off Certification ECU
-
-
-
ENTRY UNLOCK MODE SWITCHING FUNCTION
-
To use the entry unlock mode switching function, make sure the power switch is OFF and simultaneously press and hold the key's LOCK switch and another key switch for 5 seconds.
When the switches are pressed and held for 5 seconds, the entry door unlock mode changes in the following order: driver door unlock mode, one door unlock mode, doors on one side unlock mode, all door unlock mode.
Note
After pressing and holding the switches for 5 seconds, wait 5 seconds before performing the same procedure again.
-
One door unlock mode:
When a touch sensor is touched, the touch sensor's door unlocks. For example, if the driver door's touch sensor is touched, the driver door unlocks.
-
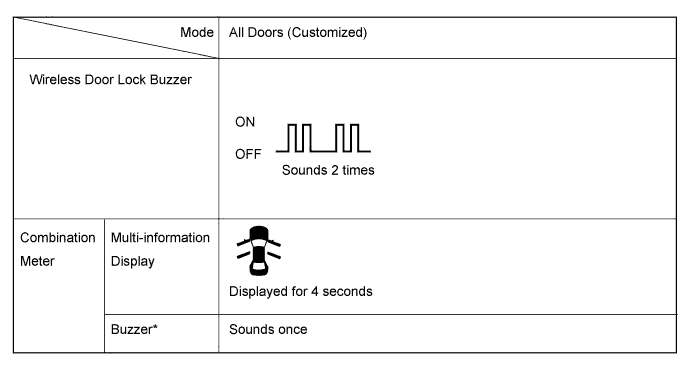
All door unlock mode:
When a touch sensor is touched, all doors unlock.
-
Driver door unlock mode (default):
When the driver door's touch sensor is touched, only the driver door unlocks. When another touch sensor is touched, all doors unlock.
-
Doors on one side unlock mode:
When a touch sensor is touched, the doors on the side of the touch sensor unlock. For example, when the driver door's touch sensor is touched, the driver door and driver side rear door unlock.
-
-
The certification ECU receives this signal from the entry door control receiver and changes the entry and start system to the entry unlock mode.
-
The certification ECU sounds the wireless door lock buzzer* and combination meter buzzer to inform the user that the mode has been switched.
Tech Tips
The function only changes the entry unlock mode of the entry and start system. It does not switch the unlocking of the wireless door lock control.
-
One door mode:
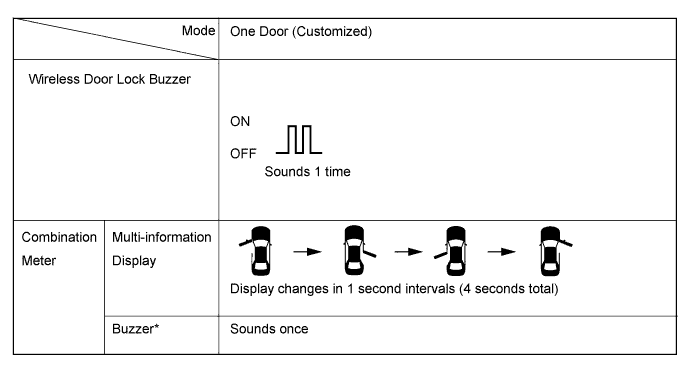
Tech Tips
The above illustration is for LHD vehicles. For RHD vehicles, the left side and right side are reversed.
-
All door unlock mode:
-
Driver door unlock mode:
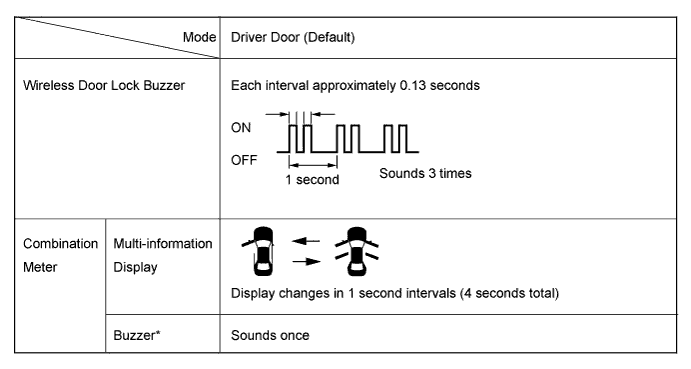
Tech Tips
The above illustration is for LHD vehicles. For RHD vehicles, the left side and right side are reversed.
-
Doors on one side mode:
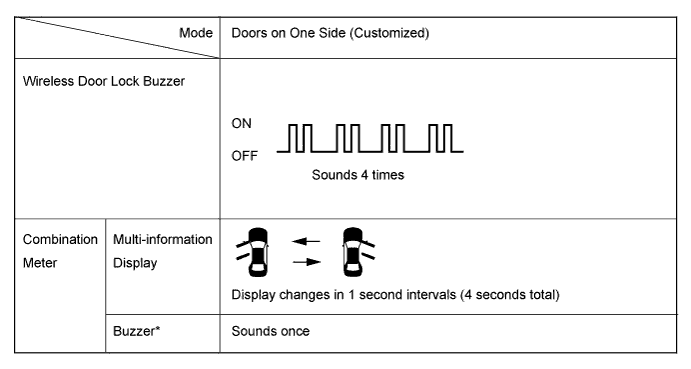
Tech Tips
The above illustration is for LHD vehicles. For RHD vehicles, the left side and right side are reversed.
Tech Tips
*: except Europe and China
-
-
-
KEY CANCEL
The key cancel operation disables the following functions:
-
Entry Ignition
-
Entry Unlock / Lock
-
Entry Luggage Compartment Open
-
Key Lock-in Prevention
-
Warning
-
Memory Call
-
The operation procedures are as follows:
Precondition:
Power switch OFF, driver side door closed and unlocked.
-
Unlock the driver side door once with the UNLOCK switch of the key.
-
Open the driver door within 5 seconds.
-
Unlock the driver side door twice with the UNLOCK switch of the key within 5 seconds.
-
Perform close → open twice for the driver door within 30 seconds.
(Driver door: Open condition → Close → Open → Close → Open)
-
Unlock the driver side door twice with the UNLOCK switch of the key within 5 seconds.
-
Perform close → open once for the driver door within 30 seconds.
(Driver door: Open condition → Close → Open)
-
Close the driver door within 5 seconds.
When key cancel is activated, the wireless door lock buzzer sounds twice.
To return to the original condition, perform the procedures again. When the original condition is returned, the wireless door lock buzzer sounds once.
-
-