FOG LIGHT ASSEMBLY (except Sport Package) REASSEMBLY

Tech Tips
-
Use the same procedure for the RH and LH sides.
-
The procedure listed below is for the LH side.
-
INSTALL FOG LIGHT COVER
-
Install the fog light cover to the fog light unit LH.
-
-
INSTALL FOG LIGHT CORD
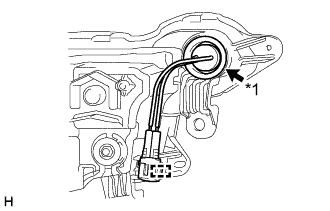
Text in Illustration *1 Grommet
-
Attach the clamp and connect the grommet to install the fog light cord.
Note
Make sure that the grommet is securely installed.
-
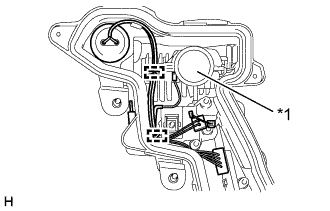
Text in Illustration *1 LED Unit Connect the connector and attach the 2 guides.
Note
-
Wear rubber gloves when installing the fog light cord in order to protect your hands, prevent fingerprints and to keep the lens free from foreign matter. Do not use cotton gloves.
-
Do not touch the aluminum surfaces of the LED unit, etc. with bare hands.
-
If there are fingerprints on the aluminum surfaces of the LED unit, etc., wipe them off with a soft cloth.
-
Do not allow dirt or foreign matter on the aluminum surfaces of the LED unit, etc.
-
-
-
INSTALL LIGHT CONTROL ECU
-
Connect the connector.
-
Install the light control ECU with the 2 screws.
-
-
INSTALL FOG LIGHT LENS GASKET
-
Completely remove the old fog light lens gasket.
-
Partially remove the peeling paper, and cut off a piece of it.
-
Fold the peeling paper over the tip of a screwdriver and fix it in place with tape.
Note
Use the peeling paper that is supplied with the fog light lens gasket.
-
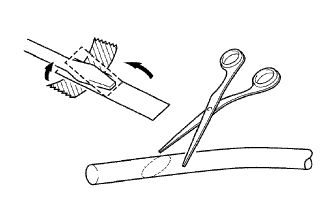
Using scissors, cut the end of the fog light lens gasket at a diagonal (45°).
-
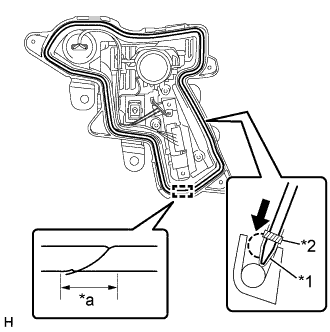
Set the fog light lens gasket into the groove so that the ends of the fog light lens gasket are aligned with the bottom of the fog light unit LH as shown in the illustration.
-
Using the screwdriver, completely press the fog light lens gasket into the fog light unit LH to install the fog light lens gasket.
-
After pressing the fog light lens gasket completely, cut the fog light lens gasket ends at a diagonal (45°) so that the ends overlap for 10 mm (0.394 in.) or more.
Text in Illustration *1 Peeling Paper *2 Tape *a 10 mm
-
-
INSTALL FOG LIGHT LENS LH
-
Install the extension with the screw.
Note
-
Wear rubber gloves when installing the extension in order to protect your hands, prevent fingerprints and to keep the lens free from foreign matter. Do not use cotton gloves.
-
Do not touch the rear side of the fog light lens LH or extension with bare hands.
-
If there are fingerprints on the extension, wipe them off with a soft cloth.
-
If there are fingerprints on the back of the fog light lens LH, replace the fog light lens LH.
-
Do not allow dirt or foreign matter on the rear side of the fog light lens LH or extension.
-
-
Install the fog light rim LH with the 3 screws.
Note
-
Wear rubber gloves when installing the fog light rim LH in order to protect your hands, prevent fingerprints and to keep the lens free from foreign matter. Do not use cotton gloves.
-
Do not touch the rear side of the fog light lens LH, extension or fog light rim LH with bare hands.
-
If there are fingerprints on the extension or fog light rim LH, wipe them off with a soft cloth.
-
If there are fingerprints on the back of the fog light lens LH, replace the fog light lens LH.
-
Do not allow dirt or foreign matter on the rear side of the fog light lens LH, extension or fog light rim LH.
-
-
Connect the connector.
-
Attach the 3 claws to install the fog light lens LH with the extension and fog light rim LH.
Note
-
Wear rubber gloves when installing the fog light lens LH in order to protect your hands, prevent fingerprints and to keep the lens free from foreign matter. Do not use cotton gloves.
-
Do not touch the rear side of the fog light lens LH, extension, fog light rim LH or the aluminum surfaces of the LED unit with bare hands.
-
If there are fingerprints on the extension, fog light rim LH or aluminum surfaces of the LED unit, etc., wipe them off with a soft cloth.
-
If there are fingerprints on the back of the fog light lens LH, replace the fog light lens LH.
-
Do not allow dirt or foreign matter on the rear side of the fog light lens LH, extension, fog light rim LH or the aluminum surfaces of the LED unit, etc.
-
-
Install the 4 screws.
-