BRAKE GENERAL MAINTENANCE
-
INSPECT BRAKE PEDAL
Type See procedures for LHD for RHD -
INSPECT PARKING BRAKE
-
Temporarily install the hub nuts.
-
With the power switch ON (IG), operate the electric parking brake switch to release the parking brake. Then turn the power switch OFF.
-
Remove the shoe adjusting hole plug, and rotate the rear disc so that the service hole is aligned with the adjusting screw.
-
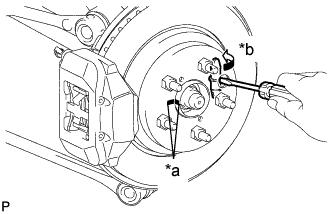
Text in Illustration *a Matchmark *b Contract Using a screwdriver, turn the adjusting screw of the parking brake shoe in the expansion direction until the disc locks.
-
With the power switch ON (IG), operate the electric parking brake switch to lock and release the parking brake. Repeat again. Then turn the power switch OFF.
Note
Make sure that the parking brake is released.
-
Turn the adjusting screw again in the expansion direction to lock the disc.
-
Loosen the adjusting screw so that the rear disc can rotate slightly.
Tech Tips
The standard number of return notches is 7.
-
Check that there is no brake drag.
-
Install the shoe adjusting hole plug and remove the hub nuts.
-
-
INSPECT BRAKE LININGS AND DRUMS
-
Check the brake linings and drums.
-
Inspect the parking brake linings Click here.
-
-
INSPECT BRAKE PADS AND DISCS
Type See procedures Front brake (for 6-Pot Caliper) Front brake (except 6-Pot Caliper) Rear brake -
INSPECT BRAKE FLUID
Note
If using a dropper to adjust the fluid amount, make sure that the dropper has not been used with mineral oils, water or deteriorated brake fluid. Sealed areas may deteriorate and lead to fluid leaks, or the fluid may deteriorate and lead to decreased efficiency.
-

Inspect the fluid level. If the brake fluid level is lower than the MIN line, inspect for brake fluid leaks and brake pad. After repair or replacement, adjust the brake fluid level in the reservoir as specified below.
-
Add the brake fluid to the MAX line with the power switch on (IG).
Brake fluid SAE J1703 or FMVSS No. 116 DOT 3 Note
The brake fluid level must always be adjusted to the MAX line.
-
-
-
REPLACE BRAKE FLUID
-
Replace the brake fluid Click here.
-
-
INSPECT BRAKE PIPES AND HOSES
Tech Tips
Work in a well-lighted area. Turn the front wheels fully to the right or left before beginning the inspection.
-
Using a mirror, check the entire circumference and length of the brake lines and hoses for:
-
Damage
-
Wear
-
Deformation
-
Cracks
-
Corrosion
-
Leaks
-
Bends
-
Twists
-
-
Check all the clamps for tightness and the connections for leakage.
-
Check that the hoses and lines are not near sharp edges, moving parts or the exhaust system.
-
Check that the lines are installed properly and pass through the center of the grommets.
-