FRONT BUMPER INSTALLATION

Tech Tips
A bolt without a torque specification is shown in the standard bolt chart Click here.
-
INSTALL FRONT BUMPER BRACKET SUB-ASSEMBLY LH
-
Install the front bumper bracket sub-assembly LH with the 2 bolts.
- Torque:
- 8.0 N*m { 82 kgf*cm, 71 in.*lbf }
-
-
INSTALL FRONT BUMPER BRACKET SUB-ASSEMBLY RH
Tech Tips
Use the same procedure described for the LH side.
-
INSTALL HEADLIGHT ASSEMBLY LH
-
for Halogen Headlight:
-
for LED Headlight:
-
-
INSTALL HEADLIGHT ASSEMBLY RH
Tech Tips
Use the same procedure described for the LH side.
-
INSTALL FRONT BUMPER CENTER UPPER RETAINER
-
Install the front bumper center upper retainer with the 3 bolts.
- Torque:
- 8.0 N*m { 82 kgf*cm, 71 in.*lbf }
-
-
INSTALL FRONT BUMPER SIDE SUPPORT LH
-
Attach the 2 claws to install the front bumper side support LH.
-
Install the screw and bolt.
- Torque:
- for screw
- 3.0 N*m { 31 kgf*cm, 27 in.*lbf }
-
-
INSTALL FRONT BUMPER SIDE SUPPORT RH
Tech Tips
Use the same procedure described for the LH side.
-
INSTALL FRONT BUMPER NO. 2 EXTENSION SUB-ASSEMBLY LH
-
Install the front bumper No. 2 extension sub-assembly LH with the 4 bolts.
- Torque:
- 65 N*m { 663 kgf*cm, 48 ft.*lbf }
-
-
INSTALL FRONT BUMPER NO. 2 EXTENSION SUB-ASSEMBLY RH
Tech Tips
Use the same procedure described for the LH side.
-
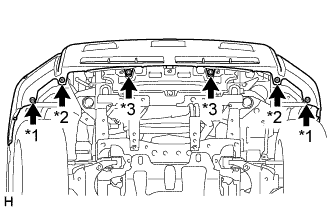
INSTALL FRONT BUMPER REINFORCEMENT SUB-ASSEMBLY
-
Install the front bumper reinforcement sub-assembly with the 6 nuts.
- Torque:
- 30 N*m { 306 kgf*cm, 22 ft.*lbf }
-
-
INSTALL FRONT BUMPER LOWER COVER
-
Install the front bumper lower cover with the 5 bolts.
- Torque:
- 8.0 N*m { 82 kgf*cm, 71 in.*lbf }
-
Install the clip.
-
-
INSTALL FRONT BUMPER ENERGY ABSORBER
-
Install the front bumper energy absorber.
-
-
INSTALL FRONT BUMPER COVER
-
w/ TOYOTA Parking Assist-sensor System, w/ Fog Light:
Connect the 3 connectors.
-
w/ TOYOTA Parking Assist-sensor System, w/o Fog Light:
Connect the connector.
-
w/o TOYOTA Parking Assist-sensor System, w/ Fog Light:
Connect the 2 connectors.
-
w/ Headlight Cleaner System:
Connect the No. 1 headlight cleaner hose.
-
Attach the 16 claws to install the front bumper cover.
Note
Do not hold the middle of the front bumper cover, as it may become reformed.
-
Install the 4 clips.
-
Text in Illustration *1 Screw *2 Bolt A *3 Bolt B Install the 2 bolts labeled A and 2 bolts labeled B.
- Torque:
- bolt B
- 8.0 N*m { 82 kgf*cm, 71 in.*lbf }
-
Install the 2 screws.
-
Install the 2 screws.
Tech Tips
Use the same procedure for the screws on the other side.
-
-
INSTALL RADIATOR GRILLE
-
Attach the 8 claws to install the radiator grille.
-
Install the 4 screws.
-
-
INSTALL UPPER RADIATOR SUPPORT SEAL
-
Install the upper radiator support seal with the 13 clips.
-
-
ADJUST FOG LIGHT AIMING (w/ Fog Light)
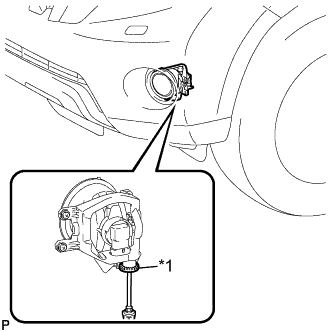
Text in Illustration *1 Aiming Screw
-
Adjust the aim vertically.
Adjust the aim of each fog light to the specified range by turning the aiming screw with a screwdriver.
Note
The final turn of the aiming screw should be made in the clockwise direction. If the screw is tightened excessively, loosen it, and then retighten it so that the final turn of the screw is in the clockwise direction.
Tech Tips
If it is not possible to correctly adjust fog light aim, check the bulb, fog light unit and fog light unit reflector installation.
-
-
CHECK TOYOTA PARKING ASSIST-SENSOR SYSTEM (w/ TOYOTA Parking Assist-sensor System)
-
w/ Multi-display:
-
w/o Multi-display:
-