FRONT CONSOLE BOX (w/ Refrigerated Cool Box) REMOVAL

-
RECOVER REFRIGERANT FROM REFRIGERATION SYSTEM
-
Start the engine.
-
Operate the cooler compressor under the conditions shown below:
Item Condition Engine Speed Idling Operating Time 3 minutes or more A/C Switch Status On Blower Switch Status HI Set Temperature MAX COOL This causes most of the compressor oil from the various components of the A/C system to collect in the A/C compressor.
Note
It is not necessary to operate the cooler compressor if the A/C does not operate because of compressor lock, etc.
-
Stop the engine.
-
Recover the refrigerant from the A/C system using a refrigerant recovery unit.
Tech Tips
Use the refrigerant recovery unit in accordance with the manufacturer's instruction manual.
-
-
REMOVE FRONT SEAT ASSEMBLY
-
for Manual Seat:
Remove the front seat assembly Click here.
-
for Power Seat:
Remove the front seat assembly Click here.
-
for Walk in Seat Type:
Remove the front seat assembly Click here.
-
-
REMOVE INTEGRATION CONTROL AND PANEL ASSEMBLY
-
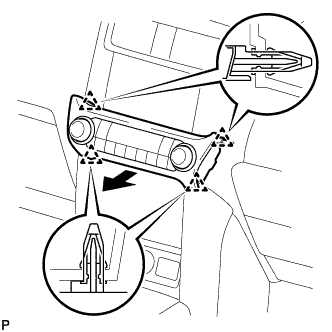
Detach the 4 clips.
-
Disconnect the connector and remove the integration control and panel assembly.
-
-
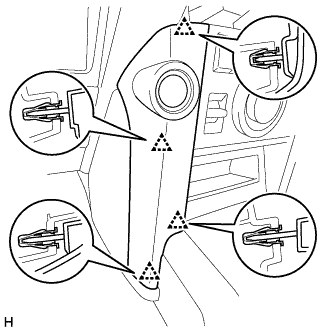
REMOVE INSTRUMENT PANEL FINISH PANEL END LH
-
Detach the 4 clips and remove the instrument panel finish panel end LH.
-
-
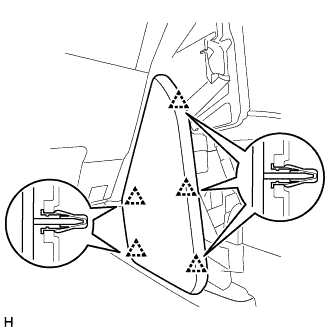
REMOVE NO. 2 INSTRUMENT PANEL FINISH PANEL CUSHION
-
Detach the 5 clips and remove the No. 2 instrument panel finish panel cushion.
-
-
REMOVE INSTRUMENT PANEL FINISH PANEL END RH
Tech Tips
Use the same procedure described for the No. 2 instrument panel finish panel cushion.
-
REMOVE NO. 1 INSTRUMENT PANEL FINISH PANEL CUSHION
Tech Tips
Use the same procedure described for the No. 2 instrument panel finish panel cushion.
-
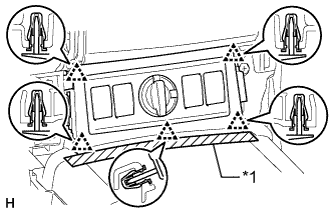
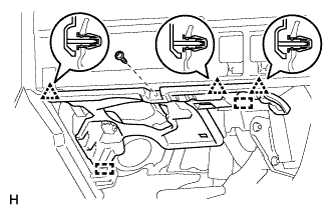
REMOVE FRONT CONSOLE UPPER PANEL GARNISH (for Manual Transmission)
-
w/o Seat Heater System:
-
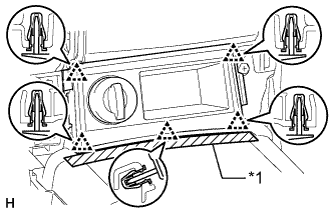
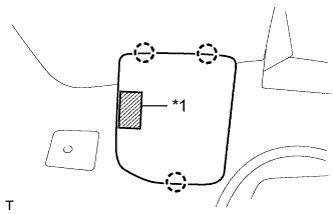
Text in Illustration *1 Protective Tape Put protective tape around the front console upper panel garnish.
-
Detach the 5 clips and remove the front console upper panel garnish.
-
Disconnect the connector.
-
-
w/o Seat Heater System:
-
Text in Illustration *1 Protective Tape Put protective tape around the front console upper panel garnish.
-
Detach the 5 clips and remove the front console upper panel garnish.
-
Disconnect each connector.
-
-
w/ Climate Control Seat System:
-
Text in Illustration *1 Protective Tape Put protective tape around the front console upper panel garnish.
-
Detach the 5 clips and remove the front console upper panel garnish.
-
Disconnect each connector.
-
-
-
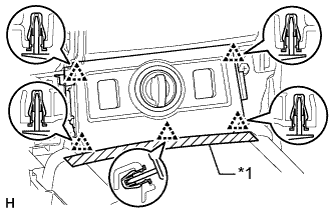
REMOVE FRONT CONSOLE UPPER PANEL GARNISH (for Automatic Transmission)
-
w/o Seat Heater System:
-
Text in Illustration *1 Protective Tape Put protective tape around the front console upper panel garnish.
-
Detach the 5 clips and remove the front console upper panel garnish.
-
Disconnect the connector.
-
-
w/o CRAWL:
-
Text in Illustration *1 Protective Tape Put protective tape around the front console upper panel garnish.
-
Detach the 5 clips and remove the front console upper panel garnish.
-
Disconnect each connector.
-
-
w/ CRAWL:
-
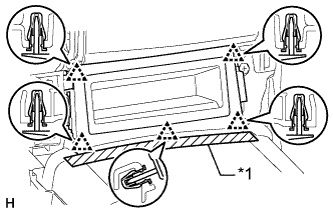
Text in Illustration *1 Protective Tape Put protective tape around the front console upper panel garnish.
-
Detach the 5 clips and remove the front console upper panel garnish.
-
-
-
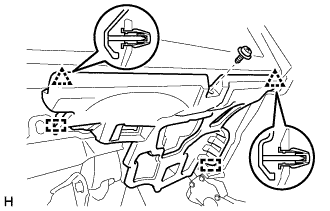
REMOVE NO. 1 INSTRUMENT PANEL UNDER COVER SUB-ASSEMBLY
-
for LHD:
-
Remove the screw.
-
Detach the 2 clips and 2 guides and remove the No. 1 instrument panel under cover.
-
Disconnect each connector.
-
-
for RHD:
-
Remove the screw.
-
Detach the 3 clips and 2 guides and remove the No. 1 instrument panel under cover.
-
Disconnect each connector.
-
-
-
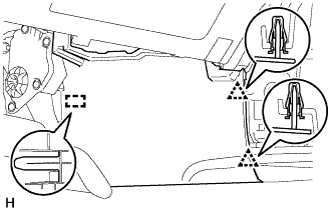
REMOVE FRONT NO. 1 CONSOLE BOX INSERT
-
Detach the 2 clips and guide and remove the front No. 1 console box insert.
-
-
REMOVE NO. 2 INSTRUMENT PANEL UNDER COVER SUB-ASSEMBLY
-
Remove the screw.
-
Detach the 3 clips and 2 guides and remove the No. 2 instrument panel under cover.
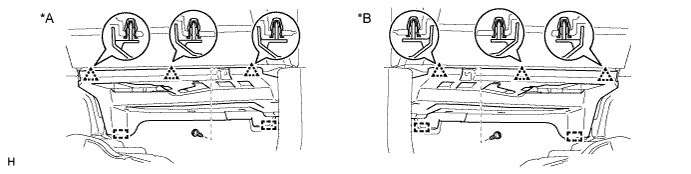
Text in Illustration *A for LHD *B for RHD
-
-
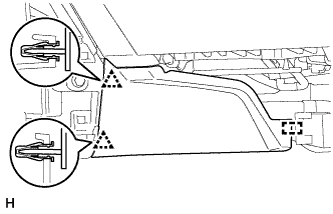
REMOVE FRONT NO. 2 CONSOLE BOX INSERT
-
Detach the 2 clips and guide and remove the front No. 2 console box insert.
-
-
REMOVE SHIFT LEVER KNOB SUB-ASSEMBLY
-
for Automatic Transmission:
Remove the shift lever knob sub-assembly Click here.
-
for Manual Transmission:
Remove the shift lever knob sub-assembly Click here.
-
-
REMOVE CONSOLE PANEL SUB-ASSEMBLY
-
for Automatic Transmission:
Remove the console panel sub-assembly Click here.
-
for Manual Transmission:
Remove the console panel sub-assembly Click here.
-
-
REMOVE NO. 1 CONSOLE BOX DUCT (for Single Air Conditioning System)
-
Remove the clip and No. 1 console box duct.
-
-
REMOVE COOLING BOX TRAY
-
Remove the cooling box tray.
-
-
REMOVE REAR CONSOLE END PANEL SUB-ASSEMBLY
-

Detach the 8 claws.
-
Disconnect the connector and remove the rear console end panel sub-assembly.
-
-
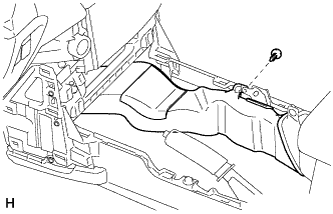
REMOVE CENTER FLOOR CARPET COVER RH
-
Text in Illustration *1 Fastener Detach the 3 claws and remove the center floor carpet cover RH.
-
-
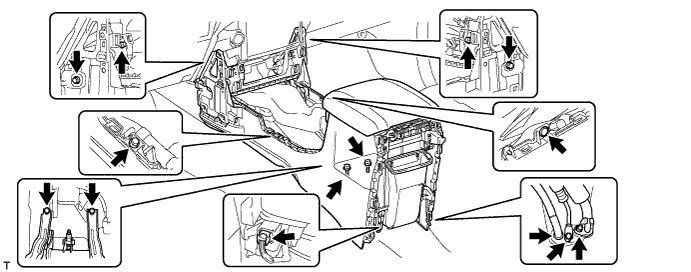
REMOVE CONSOLE BOX ASSEMBLY
-
Remove the clip.
-
Remove the 7 bolts and 2 screws.
-
Remove the 2 bolts and disconnect the 2 cooler pipes.
-
Disconnect the drain cooler hose.
-
Disconnect the connector and remove the console box assembly.
-