POWER OUTLET SOCKET (for Bench Seat Type) REMOVAL

Tech Tips
-
Use the same procedure for RHD and LHD vehicles.
-
The procedure listed below is for LHD vehicles.
-
REMOVE INTEGRATION CONTROL AND PANEL ASSEMBLY
-
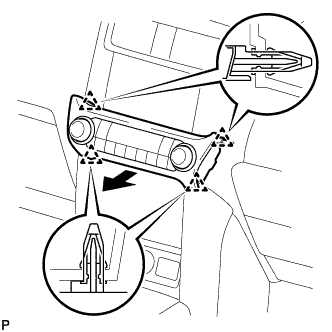
Detach the 4 clips.
-
Disconnect the connector and remove the integration control and panel assembly.
-
-
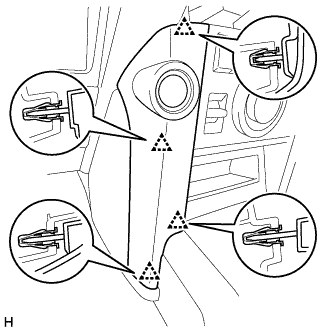
REMOVE INSTRUMENT PANEL FINISH PANEL END LH
-
Detach the 4 clips and remove the instrument panel finish panel end LH.
-
-
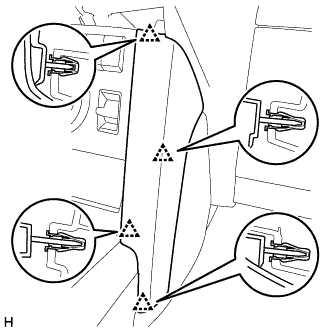
REMOVE INSTRUMENT PANEL FINISH PANEL END RH
-
Detach the 4 clips and remove the instrument panel finish panel end RH.
-
-
REMOVE FRONT CONSOLE UPPER PANEL GARNISH
-
w/o Seat Heater System:
-
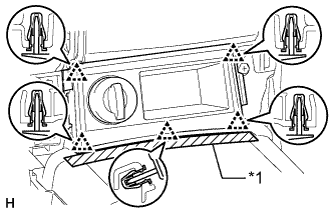
Text in Illustration *1 Protective Tape Put protective tape around the front console upper panel garnish.
-
Detach the 5 clips and remove the front console upper panel garnish.
-
Disconnect the connector.
-
-
w/o CRAWL:
-
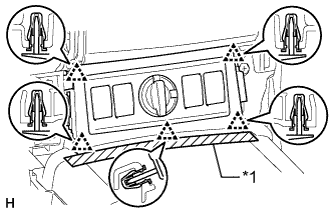
Text in Illustration *1 Protective Tape Put protective tape around the front console upper panel garnish.
-
Detach the 5 clips and remove the front console upper panel garnish.
-
Disconnect each connector.
-
-
w/ CRAWL:
-
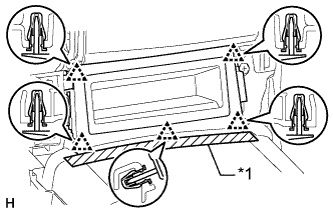
Text in Illustration *1 Protective Tape Put protective tape around the front console upper panel garnish.
-
Detach the 5 clips and remove the front console upper panel garnish.
-
-
-
REMOVE UPPER CONSOLE PANEL
-
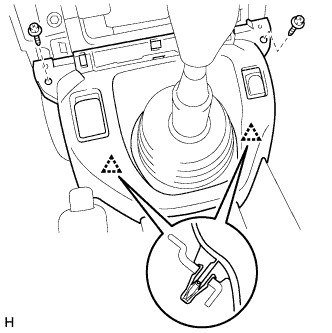
Remove the 2 screws.
-
Detach the 2 clips and remove the upper console panel.
-

Disconnect the connector and detach the clamp.
-
-
REMOVE POWER OUTLET SOCKET ASSEMBLY
-
Using a screwdriver, depress the claw labeled A from the front of the upper console panel.
Tech Tips
Tape the screwdriver tip before use.
-
While depressing the claw labeled A, detach the claw labeled B from the back of the upper console panel, and then push out the power outlet socket in the direction of the arrow in the illustration to remove it.
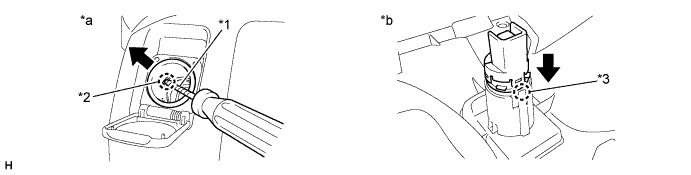
Text in Illustration *1 Protective Tape *2 Claw A *3 Claw B - - *a Front of Upper Console Panel *b Back of Upper Console Panel
-
-
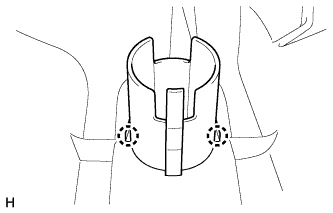
REMOVE POWER OUTLET SOCKET COVER NO.2
-
Detach the 2 claws and remove the power outlet socket cover.
-