REAR CENTER SEAT OUTER BELT ASSEMBLY (for 60/40 Split Double-folding Seat Type RH Side) INSTALLATION

CAUTION:
Wear protective gloves. Sharp areas on the parts may injure your hands.
-
INSTALL NO. 1 SEAT 3 POINT TYPE BELT ASSEMBLY RH
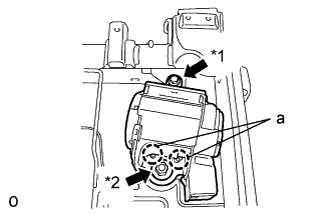
Text in Illustration *1 Bolt *2 Nut Note
When installing the retractor, make sure the claws of the vehicle (labeled "a" in the illustration) only contact the installation areas of the retractor.
-
Align the claws with the seat belt positioning holes and install the retractor of the seat belt with the nut and bolt as shown in the illustration.
Tech Tips
First install the bolt, and then install the nut.
- Torque:
- for bolt
- 7.5 N*m { 76 kgf*cm, 66 in.*lbf }
- for nut
- 42 N*m { 428 kgf*cm, 31 ft.*lbf }
-
-
INSTALL REAR SEAT SHOULDER BELT GUIDE
-
Attach the guide and claw to install the belt guide.
-
-
INSTALL REAR SEATBACK EDGE PROTECTOR
-
Install the protector to the seatback frame.
-
-
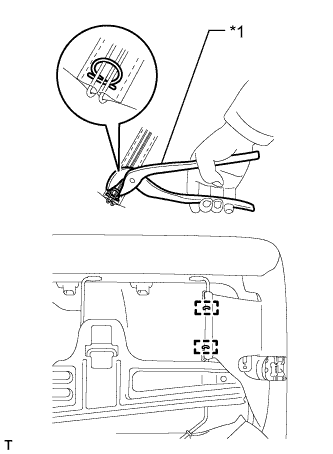
INSTALL SEATBACK COVER WITH PAD
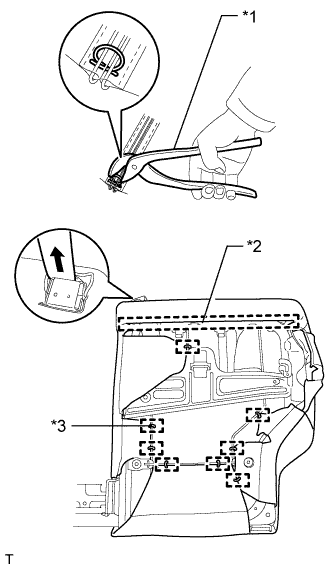
Text in Illustration *1 Hog Ring Pliers *2 Hook *3 Hog Ring
-
Connect the outer belt to the seatback cover with pad.
-
Attach the hook.
-
Using hog ring pliers, install the seatback cover with pad with new hog rings.
-
-
INSTALL REAR SEAT LOCK STRIKER
-
Using a T45 "TORX" socket wrench, install the striker.
- Torque:
- 21 N*m { 214 kgf*cm, 15 ft.*lbf }
-
-
INSTALL REAR SEATBACK LOCK STRIKER PROTECTOR
-
Install the protector to the striker.
-
-
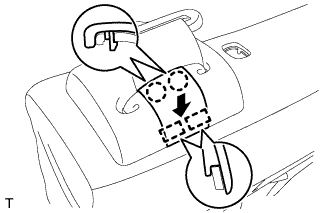
INSTALL REAR SEAT SHOULDER BELT COVER
-
Connect the outer belt to the cover.
-
Attach the 3 claws to install the cover.
-
Install the screw.
-
-
INSTALL SEAT BELT ANCHOR COVER CAP
-
Attach the 2 guides and 2 claws to install the cap.
-
-
INSTALL REAR NO. 1 SEAT HEADREST SUPPORT ASSEMBLY
-
Attach the 4 claws to install the 2 supports.
-
-
INSTALL REAR SEATBACK STOP BUTTON GROMMET
-
Attach the 3 claws to install the grommet.
-
-
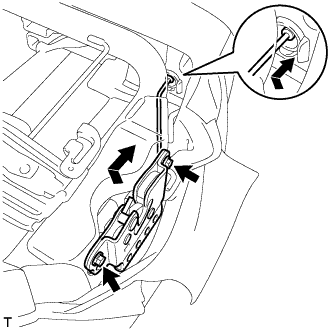
INSTALL REAR SEATBACK LOCK ASSEMBLY RH
-
While moving the release button in the direction of the arrow in the illustration, attach it to the grommet.
-
Install the seatback lock with the 2 bolts.
- Torque:
- 21 N*m { 214 kgf*cm, 15 ft.*lbf }
-
Text in Illustration *1 Hog Ring Pliers Using hog ring pliers, install 2 new hog rings.
-
-
INSTALL REAR SEATBACK LOCK COVER RH
-
Attach the 2 hooks to install the cover.
-
Install the 2 screws.
-
-
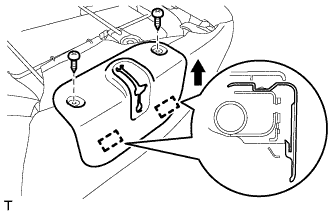
INSTALL CENTER NO. 2 SEATBACK COVER
-
Attach the 2 claws to install the cover.
-
Install the screw.
-
-
INSTALL CENTER SEATBACK ASSEMBLY
-
Temporarily install the center seatback with the 2 bolts, bush and "TORX" bolt.
-
Tighten the 2 bolts.
- Torque:
- 21 N*m { 214 kgf*cm, 15 ft.*lbf }
-
Using a T45 "TORX" socket wrench, tighten the "TORX" bolt.
- Torque:
- 21 N*m { 214 kgf*cm, 15 ft.*lbf }
-
-
INSTALL CENTER SEATBACK COVER SUB-ASSEMBLY
-
Attach the 2 guides and install the cover with the screw.
-
-
INSTALL REAR SEAT CENTER INNER BELT ASSEMBLY
-
Install the inner belt with bolt.
- Torque:
- 42 N*m { 428 kgf*cm, 31 ft.*lbf }
-
Install the band.
-
-
INSTALL REAR SEAT INNER RECLINING COVER RH
-
Attach the 2 guides and install the cover with the screw.
-
-
INSTALL NO. 1 SEATBACK BOARD SUB-ASSEMBLY
-
Attach the guide and 3 clips to install the board.
-
-
INSTALL REAR SEAT ASSEMBLY RH
-
Install the rear No. 1 seat assembly RH Click here.
-