REAR NO. 2 SEAT ASSEMBLY (for Power Seat Type LH Side) REASSEMBLY

CAUTION:
Wear protective gloves. Sharp areas on the parts may injure your hands.
Note
-
Under either of the following conditions, perform initialization (initial position memorization) of the fold seat control ECU Click here.
-
The fold seat control ECU is replaced with a new one.
-
Initialization (initial position reset) of the fold seat control ECU is performed.
-
Under any of the following conditions, perform initialization (initial position reset and initial position memorization) of the fold seat control ECU Click here.
-
The fold seat control ECU is exchanged with one from another vehicle.
-
The seatback frame and seat leg are inspected.
-
The seat is disassembled and the positions of the seatback and seat cushion change with respect to one another.
-
The seatback frame or seat leg is replaced.
-
The cable is disconnected from the battery while the seatback or seat cushion is operating.
Tech Tips
-
Use the same procedure for the RH and LH sides.
-
The procedure listed below is for the LH side.
-
INSTALL NO. 3 SEAT LEG ASSEMBLY LH
-
Attach the 4 clips to install the seat cushion under carpet LH to the No. 3 seat leg.
-
-
INSTALL NO. 2 SEAT LEG ASSEMBLY (for RH Side)
-
Attach the 4 clips to install the seat cushion under carpet RH to the No. 2 seat leg.
-
-
INSTALL REAR NO. 2 SEAT WIRE LH
-
Attach the wire harness clamps to install the seat wire.
-
Connect the connector.
-
-
INSTALL NO. 3 SEATBACK FRAME SUB-ASSEMBLY LH
-
Using a T45 "TORX" socket wrench, install the seatback frame with the 4 "TORX" bolts.
- Torque:
- 42 N*m { 428 kgf*cm, 31 ft.*lbf }
-
-
INSTALL REAR SEAT LOCK CONTROL CABLE LH
-
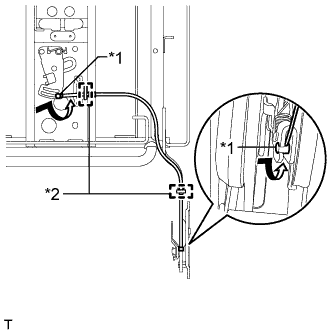
Text in Illustration *1 Cable End *2 Clamp Twist the 2 cable ends in the direction indicated by the arrow to connect them.
-
Attach the 2 clamps to install the cable.
-
-
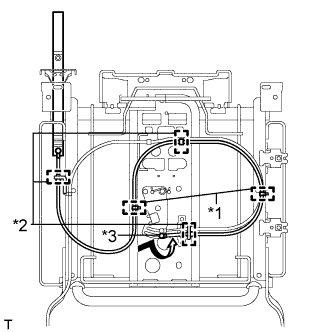
INSTALL REAR SEAT LOCK CONTROL CABLE RH (for RH Side)
-

Text in Illustration *1 Cable Tie *2 Clamp *3 Cable End Twist the 2 cable ends in the direction indicated by the arrow to connect them.
-
Attach the 3 clamps to install the cable.
-
Install 2 new cable ties.
-
-
INSTALL REAR SEAT LOCK RELEASE STRAP ASSEMBLY LH
-
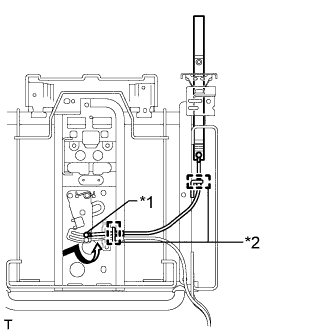
Text in Illustration *1 Cable End *2 Clamp Twist the cable end in the direction indicated by the arrow to connect it.
-
Attach the 2 clamps to install the cable.
-
-
INSTALL REAR SEAT LOCK RELEASE STRAP ASSEMBLY RH (for RH Side)
-
Text in Illustration *1 Cable Tie *2 Clamp *3 Cable End Twist the cable end in the direction indicated by the arrow to connect it.
-
Attach the 3 clamps to install the cable.
-
Install the 2 new cable ties.
-
-
INSTALL REAR NO. 2 SEAT OUTER RECLINING COVER LH
-
Attach the 2 claws and guide to install the cover.
-
Install the screw.
-
-
INSTALL REAR NO. 2 SEAT INNER RECLINING COVER LH
-
Attach the 5 claws to install the cover.
-
-
INSTALL 3RD SEAT LINK SUB-ASSEMBLY LH
-
Attach the 4 guides and 2 claws to install the seat leg link.
-
Install the 3 clips.
-
-
INSTALL REAR SEAT LEG COVER LH
-
Attach the 5 clips and 3 hooks, to install the cover.
-
Install the clip.
-
-
INSTALL NO. 2 SEAT CUSHION FRAME SUB-ASSEMBLY LH
-
Using a T40 "TORX" socket wrench, install the seat cushion frame with the 4 "TORX" bolts.
- Torque:
- 25 N*m { 255 kgf*cm, 18 ft.*lbf }
-
Pull out the seat cushion frame.
-
Connect the wire harness with the bolt.
- Torque:
- 8.5 N*m { 87 kgf*cm, 75 in.*lbf }
-
-
INSTALL REAR NO. 3 SEAT OUTER RECLINING COVER LH
-
Attach the 2 claws and guide to install the cover.
-
Install the screw.
-
-
INSTALL REAR NO. 3 SEAT INNER RECLINING COVER LH
-
Attach the 4 claws to install the cover.
-
-
INSTALL REAR SEATBACK EDGE PROTECTOR
-
Attach the 4 claws to install the 2 protectors.
-
-
INSTALL REAR SEAT HEADREST ASSEMBLY
-
Install the headrest with the 3 nuts.
- Torque:
- 14 N*m { 143 kgf*cm, 10 ft.*lbf }
-
-
INSTALL REAR SEAT HEADREST CABLE
-

Text in Illustration *1 Cable End *2 Clamp Twist the 2 cable ends in the direction indicated by the arrow to install them.
-
Attach the 2 clamps to install the cable.
-
-
INSTALL REAR SEAT HEADREST COVER
-
Attach the 2 claws and guide, to install the cover.
-
Install the 2 screws.
-
-
INSTALL NO. 2 SEATBACK COVER
-
Attach the 2 claws to install the cover.
-
-
INSTALL REAR NO. 2 SEATBACK EDGE PROTECTOR
-
Install the protector to the seatback pad with new tack pins.
-
-
INSTALL NO. 3 SEATBACK COVER SUB-ASSEMBLY LH
-
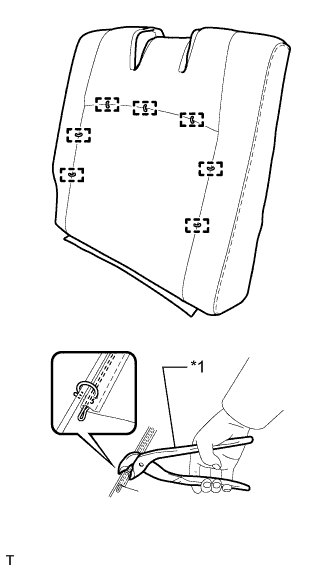
Text in Illustration *1 Hog Ring Pliers Using hog ring pliers, install the seatback cover to the seatback pad with new hog rings.
Note
-
Be careful not to damage the cover.
-
When installing the hog rings, avoid wrinkling the cover.
-
-
-
INSTALL SEATBACK COVER WITH PAD
-
Attach the 8 clips.
-
Attach the hooks to install the seatback cover with pad.
-
-
INSTALL REAR SEAT NO. 1 COVER BEZEL
-
Pass the strap through the bezel hole.
-
Attach the guide to install the bezel.
-
Install the 2 screws.
-
-
INSTALL REAR SEATBACK LOCK HOOK
-
Install the lock hook.
-
-
INSTALL REAR SEATBACK BOARD SUB-ASSEMBLY LH
-
Attach the 7 clips to install the board.
-
-
INSTALL LOWER SEAT TRACK RAIL LH
-
Install the track rail with the 2 bolts.
- Torque:
- 41 N*m { 418 kgf*cm, 30 ft.*lbf }
-
-
INSTALL REAR SEAT CUSHION INNER HINGE COVER RH
-
Attach the guide to install the cover.
-
Install the clip and screw.
-
-
INSTALL REAR SEAT CUSHION INNER HINGE COVER LH
-
Attach the guide to install the cover.
-
Install the clip and screw.
-
-
INSTALL REAR NO. 3 SEAT LEG COVER LH
-
Attach the 2 claws to install the cover.
-
-
INSTALL REAR SEAT NO. 2 CUSHION MOULDING
-
Attach the 2 claws to install the moulding.
-
Install the 2 screws.
-
-
INSTALL REAR SEAT CUSHION INNER EDGE PROTECTOR LH
-
Install the protector to the seat cushion pad with new tack pins.
-
-
INSTALL NO. 3 SEAT CUSHION COVER SUB-ASSEMBLY LH
-

Text in Illustration *1 Fastener *2 Hog Ring Pliers Using hog ring pliers, install the seat cushion cover to the seat cushion pad with new hog rings.
Note
-
Be careful not to damage the cover.
-
When installing the hog rings, avoid wrinkling the cover.
-
-
Attach the fastener.
-
-
INSTALL SEAT CUSHION COVER WITH PAD
-
Attach the 2 hooks to install the seat cushion cover with pad.
-
Attach the 2 hooks.
-
Attach the 2 hooks to close the cover.
-
Close the 2 fasteners.
-
Attach the 2 fasteners.
-
-
INSTALL REAR SEAT NO. 1 CUSHION MOULDING
-
Attach the 4 guides and 2 claws to install the moulding.
-
Install the 2 clips.
-
-
INSTALL FOLD SEAT CONTROL ECU
-
Install the ECU with the 2 nuts.
- Torque:
- 8.0 N*m { 82 kgf*cm, 71 in.*lbf }
-
Connect the 2 connectors.
-
-
INSTALL REAR NO. 2 SEAT INNER BELT ASSEMBLY LH
-
Using a T45 "TORX" socket wrench, install the inner belt assembly with the bolt.
- Torque:
- 42 N*m { 428 kgf*cm, 31 ft.*lbf }
-
-
INSTALL REAR SEAT CUSHION LOWER HINGE COVER RH
-
Attach the 2 claws to install the cover.
-
Install the 2 screws.
-
-
INSTALL REAR SEAT CUSHION LOWER HINGE COVER LH
-
Attach the guide and 2 claws to install the cover.
-
Install the 2 screws.
-
-
INSTALL CAP
-
Install the 2 caps.
-