DOOR CONTROL RECEIVER (for 5 Door) INSTALLATION

-
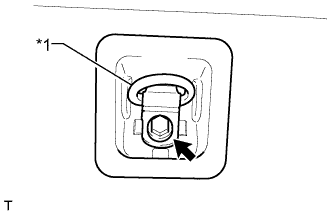
INSTALL DOOR CONTROL RECEIVER
-
Install the receiver with the bolt.
- Torque:
- 5.5 N*m { 56 kgf*cm, 49 in.*lbf }
-
Connect the connector.
-
-
INSTALL REAR QUARTER TRIM PANEL ASSEMBLY LH
-
w/ Rear No. 2 Seat:
-
Attach the 4 clips and 2 guides and pass the rear No. 2 seat outer belt floor anchor through the rear quarter trim panel.
-
-
Attach the 7 clips and 2 guides to install the rear quarter trim panel.
-
-
INSTALL DECK TRIM SIDE PANEL ASSEMBLY LH
-
w/o Rear No. 2 Seat:
-
Pass the rear seatback lock control lever base through the deck trim side panel.
-
Attach the 5 clips and 8 claws to install the deck trim side panel.
-
Install the 4 bolts and 2 screws.
-
Attach the 6 claws and 2 guides to install the rear seatback lock control lever base to the deck trim side panel.
-
Install the rear No. 1 seat outer belt floor anchor with the bolt.
- Torque:
- 42 N*m { 428 kgf*cm, 31 ft.*lbf }
-
-
w/ Rear No. 2 Seat:
-
Attach the 4 clips and 8 claws to install the deck trim side panel.
-
Install the 2 bolts and 2 screws.
-
Install the rear No. 2 seat outer belt floor anchor with the bolt.
- Torque:
- 42 N*m { 428 kgf*cm, 31 ft.*lbf }
-
Install the rear No. 1 seat outer belt floor anchor with the bolt.
- Torque:
- 42 N*m { 428 kgf*cm, 31 ft.*lbf }
-
-
-
INSTALL ASSIST GRIP SUB-ASSEMBLY (w/ Rear No. 2 Seat)
Tech Tips
Use the same procedure for the other assist grip.
-
Install the assist grip with the 2 bolts.
-
-
INSTALL ASSIST GRIP PLUG (w/ Rear No. 2 Seat)
Tech Tips
Use the same procedure for all assist grip plugs.
-
Attach the 2 claws to install the assist grip plug.
-
-
INSTALL FRONT DECK SIDE TRIM COVER (w/ Tonneau Cover)
Tech Tips
Use the same procedure for the other front deck side trim cover.
-
Attach the 2 claws to install the front deck side trim cover
-
-
INSTALL NO. 1 TONNEAU COVER HOLDER CAP (w/o Tonneau Cover)
Tech Tips
Use the same procedure for the other No. 1 tonneau cover holder cap.
-
Attach the 2 claws to install the No. 1 tonneau cover holder cap.
-
-
INSTALL NO. 1 LUGGAGE COMPARTMENT TRIM HOOK
Tech Tips
Use the same procedure for the other No. 1 luggage compartment trim hook.
-
Install the No. 1 luggage compartment trim hook by turning it clockwise.
-
-
INSTALL REAR NO. 1 SEAT OUTER LAP BELT ANCHOR COVER
Tech Tips
Use the same procedure for the other rear No. 1 seat outer lap belt anchor cover.
-
Attach the 3 claws to install the rear No. 1 seat outer lap belt anchor cover.
-
-
INSTALL REAR FLOOR CARPET ASSEMBLY (w/o Rear No. 2 Seat)
-
Attach the 4 claws to install the rear floor carpet.

Text in Illustration *A w/o Deck Rail *B w/ Deck Rail *C for Face to Face Seat Type - -
-
-
INSTALL FLOOR SIDE RAIL LH (w/ Deck Rail)
-
Install the floor side rail with the 3 bolts.
-
-
INSTALL FLOOR SIDE RAIL RH (w/ Deck Rail)
Tech Tips
Use the same procedure described for the LH side.
-
INSTALL REAR FLOOR MAT REAR SUPPORT PLATE (w/o Rear No. 2 Seat)
-
Attach the 5 clips and 4 claws to install the rear floor mat rear support plate.
-
-
INSTALL NO. 1 DECK BOARD SUB-ASSEMBLY (w/o Rear No. 2 Seat)
-
Attach the clip to install the No. 1 deck board.
-
-
INSTALL FRONT LUGGAGE COMPARTMENT TRIM COVER (w/o Rear No. 2 Seat)
Text in Illustration *1 Luggage Hold Belt Striker Tech Tips
Use the same procedure for the other front luggage compartment trim cover.
-
Install the luggage hold belt striker and front luggage compartment trim cover with the bolt.
-
Attach the 4 claws to install the cap.
-
-
INSTALL TONNEAU COVER ASSEMBLY (w/ Tonneau Cover)
-
Install the tonneau cover.
-
-
INSTALL REAR DOOR OPENING TRIM WEATHERSTRIP LH
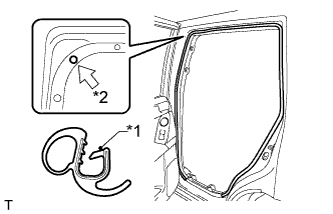
Text in Illustration *1 Paint Mark *2 Mark Position
-
Align the paint mark on the rear door opening trim weatherstrip with the mark position on the vehicle and install the rear door opening trim weatherstrip as shown in the illustration.
-
-
INSTALL REAR DOOR SCUFF PLATE LH
-
Attach the 3 clips, 6 claws and 2 guides to install the rear door scuff plate.
-
-
INSTALL QUARTER SCUFF PLATE LH (w/ Rear No. 2 Seat)
-
Install the quarter scuff plate with the 2 bolts.
-
-
INSTALL REAR NO. 1 FLOOR STEP COVER (w/ Rear No. 2 Seat)
Tech Tips
Use the same procedure for all rear No. 1 floor step covers.
-
Attach the 2 claws to install the rear No. 1 floor step cover.
-
-
INSTALL REAR NO. 1 SEATBACK ASSEMBLY (w/ Rear No. 1 Seat)
-
for 60/40 Split Double-folding Seat Type LH Side:
Install the rear No. 1 seatback assembly Click here.
-
for 60/40 Split Double-folding Seat Type RH Side:
Install the rear No. 1 seatback assembly Click here.
-
-
INSTALL REAR NO. 1 SEAT ASSEMBLY (w/ Rear No. 1 Seat)
-
for 60/40 Split Slide Walk-in Seat Type LH Side:
Install the rear No. 1 seat assembly Click here.
-
for 60/40 Split Slide Walk-in Seat Type RH Side:
Install the rear No. 1 seat assembly Click here.
-
-
INSTALL REAR NO. 2 SEAT ASSEMBLY (w/ Rear No. 2 Seat)
-
for Manual Seat Type:
Install the rear No. 2 seat assembly Click here.
-
for Power Seat Type:
Install the rear No. 2 seat assembly Click here.
-
for Face to Face Seat Type:
Install the rear No. 2 seat assembly Click here.
-
-
CONNECT CABLE TO NEGATIVE BATTERY TERMINAL
Note
When disconnecting the cable, some systems need to be initialized after the cable is reconnected Click here.