LUGGAGE SPEAKER (for 3 Door) INSTALLATION

Tech Tips
-
Use the same procedure for the RH and LH sides.
-
The procedure listed below is for the LH side.
-
INSTALL NO. 1 SPEAKER WITH BOX ASSEMBLY
-
Install the No. 1 speaker with box assembly with the 4 bolts.
- Torque:
- 7.5 N*m { 76 kgf*cm, 66 in.*lbf }
-
Connect the connector.
-
-
INSTALL DECK TRIM SIDE PANEL ASSEMBLY RH
-
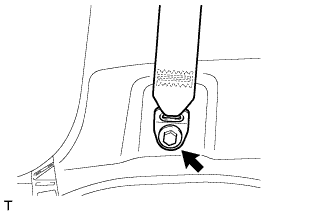
Remove the bolt and disconnect the front seat outer belt floor anchor.
-
Remove the bolt and disconnect the rear No. 1 seat outer belt floor anchor.
-
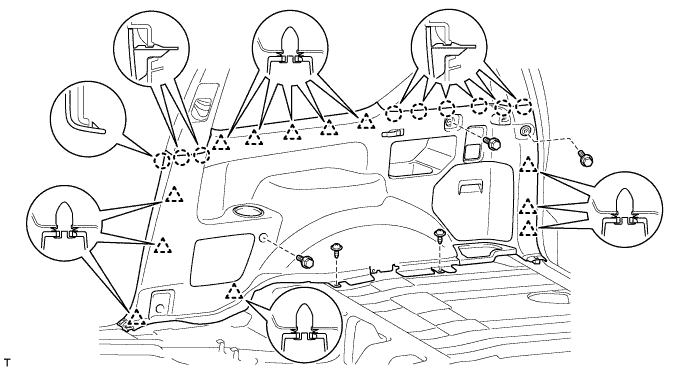
Remove the 3 bolts and 2 screws.
-
Detach the 9 claws and 12 clips.
-
Disconnect the connector and remove the deck trim side panel.
-
-
INSTALL OUTER LAP BELT ANCHOR COVER
Tech Tips
Use the same procedure for the other outer lap belt anchor cover.
-
Attach the 3 claws to install the outer lap belt anchor cover.
-
-
INSTALL QUARTER TRIM COVER HOLE RH
Tech Tips
Use the same procedure described for the LH side.
-
INSTALL FRONT DOOR OPENING TRIM WEATHERSTRIP RH
Tech Tips
Use the same procedure described for the LH side.
-
INSTALL DOOR SCUFF PLATE ASSEMBLY RH
Tech Tips
Use the same procedure described for the LH side.
-
INSTALL REAR HEADER SPEAKER ASSEMBLY
-
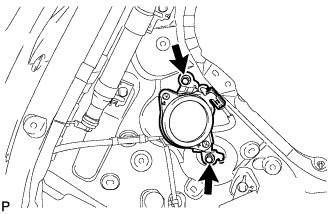
Install the rear header speaker assembly with the 2 bolts.
- Torque:
- 7.5 N*m { 76 kgf*cm, 66 in.*lbf }
-
Connect the connector.
-
-
INSTALL REAR QUARTER TRIM PANEL ASSEMBLY LH
-
Attach the 4 claws and 2 guides and pass the rear No. 1 seat outer belt floor anchor through the rear quarter trim panel.
-
Attach the 7 clips to install the rear quarter trim panel.
-
-
INSTALL DECK TRIM SIDE PANEL ASSEMBLY LH
-
Attach the 9 claws and 11 clips to install the deck trim side panel.
-
Install the 3 bolts and 2 screws.
-
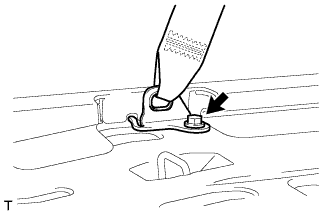
Install the rear No. 1 seat outer belt floor anchor with the bolt.
- Torque:
- 42 N*m { 428 kgf*cm, 31 ft.*lbf }
-
Install the front seat outer belt floor anchor with the bolt.
- Torque:
- 42 N*m { 428 kgf*cm, 31 ft.*lbf }
-
-
INSTALL OUTER LAP BELT ANCHOR COVER
Tech Tips
Use the same procedure for the other outer lap belt anchor cover.
-
Attach the 3 claws to install the outer lap belt anchor cover.
-
-
INSTALL QUARTER TRIM POCKET TRAY
-
Attach the 6 claws and 2 guides to install the quarter trim pocket tray.
-
-
INSTALL FRONT DECK SIDE TRIM COVER (w/ Tonneau Cover)
Tech Tips
Use the same procedure for the other front deck side trim cover.
-
Attach the 2 claws to install the front deck side trim cover.
-
-
INSTALL NO. 1 TONNEAU COVER HOLDER CAP (w/o Tonneau Cover)
Tech Tips
Use the same procedure for the other tonneau cover holder cap.
-
Attach the 2 claws to install the tonneau cover holder cap.
-
-
INSTALL NO. 1 LUGGAGE COMPARTMENT TRIM HOOK
Tech Tips
Use the same procedure for the other No. 1 luggage compartment trim hook.
-
Install the No. 1 luggage compartment trim hook so that it is positioned horizontally.
-
-
INSTALL REAR FLOOR CARPET ASSEMBLY
-
Install the rear floor carpet.
-
-
INSTALL QUARTER TRIM COVER HOLE
-
Attach the 2 claws and 2 guides to install the quarter trim cover hole.
-
-
INSTALL REAR FLOOR MAT REAR SUPPORT PLATE
-
Attach the 6 claws to install the rear floor mat rear support plate.
-
Install the 5 screws.
-
-
INSTALL MAT SET PLATE COVER
Tech Tips
Use the same procedure for all mat set plate covers.
-
Attach the 2 claws to install the mat set plate cover.
-
-
INSTALL TONNEAU COVER ASSEMBLY (w/ Tonneau Cover)
-
Install the tonneau cover.
-
-
INSTALL FRONT DOOR OPENING TRIM WEATHERSTRIP LH
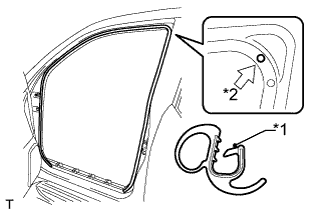
Text in Illustration *1 Paint Mark *2 Mark Position
-
Align the paint mark on the front door opening trim weatherstrip with the mark position on the vehicle and install the front door opening trim weatherstrip as shown in the illustration.
-
-
INSTALL DOOR SCUFF PLATE ASSEMBLY LH
-
Attach the 4 clips, 10 claws and 2 guides to install the door scuff plate.
-
-
INSTALL REAR NO. 1 SEAT ASSEMBLY
-
for 60/40 Split Tumble Seat Type LH Side:
-
for 60/40 Split Tumble Seat Type RH Side:
-