REAR COIL SPRING (w/o Air Suspension) INSTALLATION

Tech Tips
-
Use the same procedure for the RH and LH sides.
-
The procedure listed below is for the LH side.
-
A bolt without a torque specification is shown in the standard bolt chart Click here.
-
INSTALL HOLLOW SPRING SUB-ASSEMBLY (for 5 Door)
-
Install the hollow spring to the frame.
-
-
INSTALL REAR COIL SPRING LH
-
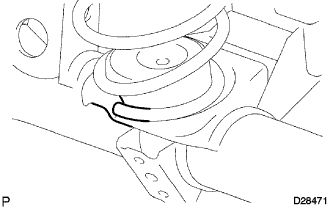
Install the rear coil spring to the rear axle housing.
Tech Tips
Before installing the coil spring, check that the coil spring end is in the correct position. If not, reinstall the coil spring.
-
-
TEMPORARILY INSTALL REAR SHOCK ABSORBER ASSEMBLY LH
-
Temporarily install the lower side of the shock absorber with the bolt.
-
-
INSTALL REAR STABILIZER LOWER BRACKET (w/ KDSS)
-
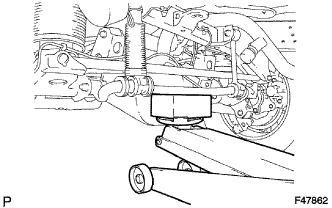
Support the rear stabilizer bar with a jack.
Note
Place a wooden block between the jack and rear stabilizer bar to prevent damage.
-
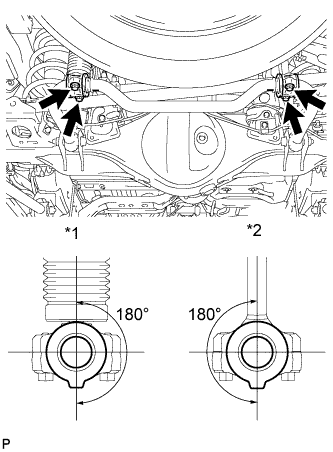
Text in Illustration *1 Rear Stabilizer Control Cylinder *2 Rear Stabilizer Link Install the rear stabilizer bar and 2 rear stabilizer lower brackets with the 4 bolts.
- Torque:
- 45 N*m { 459 kgf*cm, 33 ft.*lbf }
Tech Tips
Check that the protrusions on the rear stabilizer bush are positioned within 180° of the rear stabilizer control cylinder and rear stabilizer link.
-
-
STABILIZE SUSPENSION
-
Lower the vehicle.
-
Bounce the vehicle up and down several times to stabilize the suspension.
-
-
TIGHTEN REAR SHOCK ABSORBER ASSEMBLY LH
-
Tighten the bolt.
- Torque:
- 98 N*m { 999 kgf*cm, 72 ft.*lbf }
-
-
CONNECT REAR FLEXIBLE HOSE
-
Connect the rear flexible hose to the connecting point with each brake tube, and then install 2 new clips.
-
Using a union nut wrench, connect each brake tube to the rear flexible hose while holding the rear flexible hose with a wrench.
- Torque:
- 15 N*m { 155 kgf*cm, 11 ft.*lbf }
Note
-
Do not bend or damage the brake tube.
-
Do not allow any foreign matter such as dirt and dust to enter the brake tube from the connecting point.
-
Use the formula to calculate special torque values for situations where a union nut wrench is combined with a torque wrench Click here.
-
-
BLEED BRAKE LINE
-
for Hydraulic Brake Booster:
Bleed the brake line Click here.
-
for Vacuum Brake Booster:
Bleed the brake line Click here.
-
-
INSTALL REAR WHEEL
- Torque:
- 112 N*m { 1142 kgf*cm, 83 ft.*lbf }