FRONT DRIVE SHAFT ASSEMBLY INSTALLATION

-
INSTALL FRONT DRIVE SHAFT ASSEMBLY
-
Coat the spline of the inboard joint shaft assembly with ATF.
-
Align the shaft splines and install the drive shaft with a brass bar and hammer.
Note
-
Set the snap ring with the opening side facing downward.
-
Be careful not to damage the oil seal, boot and dust cover.
Tech Tips
Whether the inboard joint shaft is in contact with the pinion shaft or not can be confirmed from the sound or feeling when driving it.
-
-
-
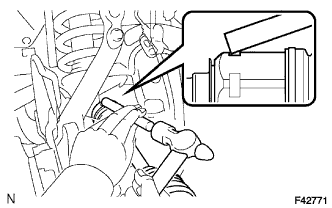
INSTALL FRONT SPEED SENSOR
-
Install the speed sensor with the bolt.
- Torque:
- 8.5 N*m { 87 kgf*cm, 75 in.*lbf }
Note
-
Make sure there are no pieces of iron or other foreign matter attached to the sensor tip.
-
While inserting the speed sensor into the knuckle hole, do not strike or damage the sensor tip.
-
After installing the speed sensor, make sure there is no clearance or foreign matter between the sensor stay part and the knuckle.
-
Make sure there is no foreign matter attached to the speed sensor rotor.
-
-
INSTALL LOWER BALL JOINT ATTACHMENT LH
-
Install the lower ball joint attachment with the 2 bolts.
- Torque:
- 160 N*m { 1632 kgf*cm, 118 ft.*lbf }
-
-
CONNECT TIE ROD END SUB-ASSEMBLY LH
-
Connect the tie rod end to the steering knuckle with the nut.
- Torque:
- 91 N*m { 928 kgf*cm, 67 ft.*lbf }
Note
Tighten the nut up to an additional 60° if the holes for the cotter pin are not aligned.
-
Install a new cotter pin.
-
-
INSTALL FRONT AXLE SHAFT NUT
-
Clean the threaded parts on the drive shaft and axle shaft nut using a non-residue solvent.
Note
-
Be sure to perform this work for a new drive shaft.
-
Keep the threaded parts free of oil and foreign objects.
-
-
Install the front axle shaft nut.
- Torque:
- 235 N*m { 2396 kgf*cm, 173 ft.*lbf }
-
Install the adjusting cap and cotter pin.
-
-
INSTALL FRONT GREASE HUB CAP
-
Install a new axle hub grease cap.
Note
Make sure the grease cap is securely installed to the axle hub.
-
-
FILL UP DIFFERENTIAL OIL
-
Remove the differential filler plug and gasket.
-
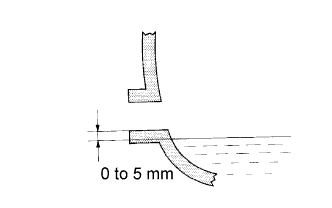
Pour oil into the rear differential carrier assembly so that the oil level is within 0 to 5 mm (0 to 0.197 in.) of the bottom of the filler plug opening.
Note
Excessively large or small quantities of oil may cause problems.
Standard Front Differential Capacity Differential Type Oil Type and Viscosity Specified Condition Standard Toyota Genuine Differential gear oil LT 75W-85 GL-5 or equivalent 1.35 to 1.45 liters (1.43 to 1.53 US qts, 1.18 to 1.27 Imp. qts.) Standard Rear Differential Capacity Differential Type Oil Type and Viscosity Body Type Specified Condition Standard Toyota Genuine Differential gear oil LT 75W-85 GL-5 or equivalent 5 Door 2.65 to 2.75 liters (2.80 to 2.91 US qts, 2.33 to 2.42 Imp. qts.) 3 Door 2.15 to 2.25 liters (2.27 to 2.38 US qts, 1.89 to 1.98 Imp. qts.) w/ Differential Lock Toyota Genuine Differential gear oil LT 75W-85 GL-5 or equivalent 5 Door 2.60 to 2.70 liters (2.75 to 2.85 US qts, 2.29 to 2.38 Imp. qts.) 3 Door 2.15 to 2.25 liters (2.27 to 2.38 US qts, 1.89 to 1.98 Imp. qts.) -
Install a new gasket and the differential filler plug.
- Torque:
- Front differential carrier
- 39 N*m { 398 kgf*cm, 29 ft.*lbf }
- Rear differential carrier
- 49 N*m { 500 kgf*cm, 36 ft.*lbf }
-
Drive the vehicle and check the oil level again.
If necessary, add differential oil.
-
-
INSPECT DIFFERENTIAL OIL
-
Stop the vehicle on a level surface.
-
Remove the differential filler plug and gasket.
-
Check that the oil level is within 0 to 5 mm (0 to 0.197 in.) of the bottom of the filler plug opening.
Note
Excessively large or small quantities of oil may cause problems.
If the oil level is low, add differential oil to adjust the oil level.
If the oil level is still low, check for oil leakage. If leakage is found, repair or replace the part necessary to stop the leakage.
-
Install a new gasket and differential filler plug.
- Torque:
- Front differential carrier
- 39 N*m { 398 kgf*cm, 29 ft.*lbf }
- Rear differential carrier
- 49 N*m { 500 kgf*cm, 36 ft.*lbf }
-
-
INSTALL FRONT WHEEL
- Torque:
- 112 N*m { 1137 kgf*cm, 82 ft.*lbf }
-
STABILIZE SUSPENSION
-
INSPECT AND ADJUST FRONT WHEEL ALIGNMENT
-
CHECK FRONT SPEED SENSOR SIGNAL
w/o VSC:
w/ VSC (for Hydraulic Brake Booster):
w/ VSC (for Vacuum Brake Booster):