BACK WINDOW GLASS REMOVAL

-
REMOVE REAR SEAT HEADREST ASSEMBLY LH
-
REMOVE REAR SEAT HEADREST ASSEMBLY RH
-
REMOVE REAR SEAT CUSHION ASSEMBLY
-
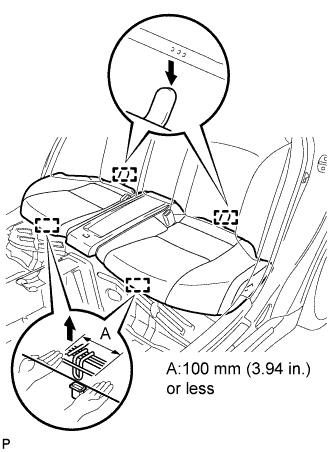
Disengage the 2 front hooks of the rear seat cushion assembly from the vehicle body.
Note
Follow the instructions below carefully as the cushion frame deforms easily.
-
Choose a hook to detach first. Place your hands near the hook as shown in the illustration. Then lift the seat cushion to detach the hook.
-
Repeat for the other hook.
-
-
Disengage the 2 rear hooks of the seat cushion from the child restraint seat anchor bracket.
-
Remove the rear seat cushion assembly.
-
-
REMOVE REAR SEATBACK ASSEMBLY
-
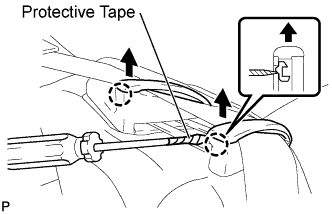
Using a screwdriver with the tip tapes, disengage the 2 claws to open the 2 cap of the rear seat shoulder belt guide LH.
-
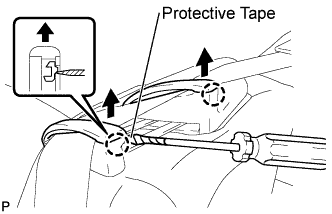
Using a screwdriver with the tip tapes, disengage the 2 claws to open the 2 caps of the rear seat shoulder belt guide RH.
-

Remove the 4 bolts.
-
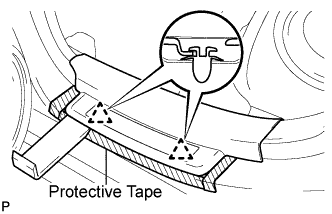
Disengage the 3 hooks and remove the rear seatback assembly
-
-
REMOVE REAR DOOR SCUFF PLATE LH
-
Put protective tape around the rear door scuff plate.
-
Using a moulding remover, disengage the 2 clips.
-
Disengage the 5 claws and remove the the rear door scuff plate LH.
-
-
REMOVE REAR DOOR SCUFF PLATE RH
Tech Tips
Use the same procedure for the RH side and the LH side.
-
REMOVE REAR SEAT SIDE GARNISH LH
-
Disengage the 5 claws and remove the rear seat side garnish LH.
-
-
REMOVE REAR SEAT SIDE GARNISH RH
Tech Tips
Use the same procedure for the RH side and the LH side.
-
REMOVE ROOF SIDE INNER GARNISH LH
-
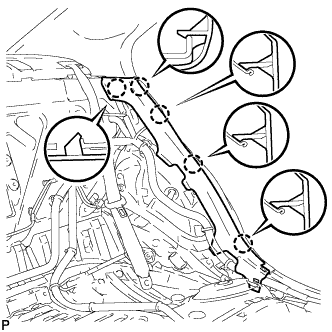
Disengage the 4 clips and claw, and remove the roof side inner garnish LH.
-
-
REMOVE ROOF SIDE INNER GARNISH RH
Tech Tips
Use the same procedure for the RH side and the LH side.
-
REMOVE CENTER STOP LIGHT SET
-
Disengage the 2 claws.
-
Disengage the 2 guides and disconnect the center stop light set.
-
Disconnect the connector and remove the center stop light set.
-
-
REMOVE PACKAGE TRAY TRIM PANEL ASSEMBLY
-
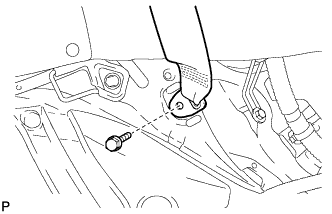
Remove the bolt and disconnect the floor end of the rear seat 3 point type belt assembly LH.
Tech Tips
Use the same procedures for the RH side and the LH side.
-
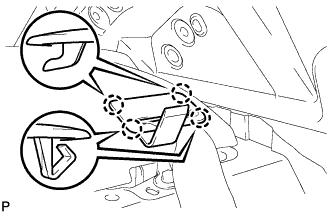
Using a moulding remover, disengage the 4 claws and remove the rear seat shoulder belt cover LH.
Tech Tips
Use the same procedures for the RH side and LH side.
-
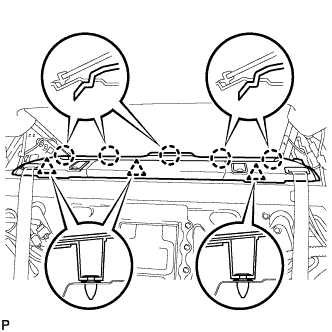
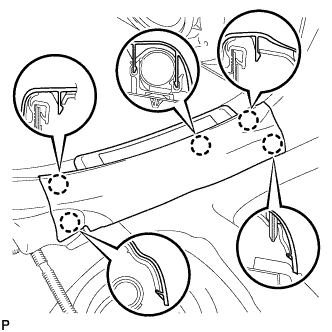
Disengage the 3 clips.
-
Pass the 2 rear seat belt floor anchors through the package tray trim panel assembly.
-
Disengage the 5 claws and remove the package tray trim panel assembly.
-
-
REMOVE SPOT LIGHT ASSEMBLY
-
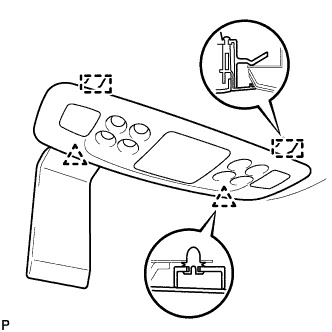
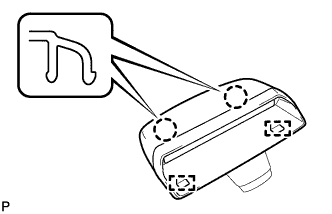
Using a moulding remover, disengage the 2 clips.
-
Disengage the 2 guides.
-
Disconnect the connector and remove the spot light assembly.
-
-
REMOVE COAT HOOK
-
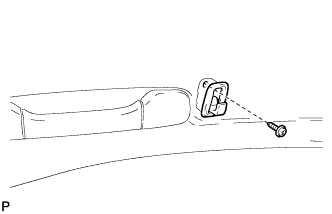
Remove the screw and coat hook.
Tech Tips
Use the same procedure to remove the hook on the other side.
-
-
REMOVE ASSIST GRIP SUB-ASSEMBLY
-
Using a screwdriver, disengage the 4 claws and remove the 2 assist grip covers.
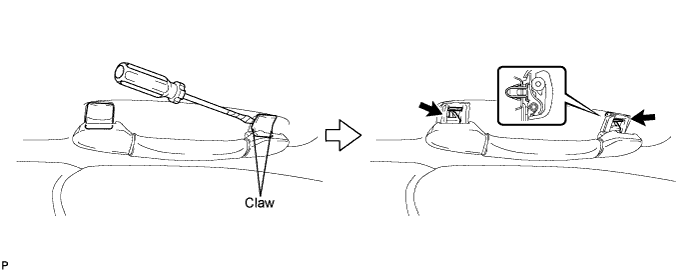
Tech Tips
Tape the screwdriver tip before use.
-
Disengage the 2 clips and remove the assist grip sub-assembly.
Tech Tips
Use the same procedure for the other 3 assist grips.
-
-
REMOVE ROOF HEADLINING ASSEMBLY (w/o Sliding Roof)
It is not necessary to completely remove the roof headlining. Slightly lower the rear section of the roof headlining so that the back window glass can be removed Click here.
-
REMOVE ROOF HEADLINING ASSEMBLY (w/ Sliding Roof)
It is not necessary to completely remove the roof headlining. Slightly lower the rear section of the roof headlining so that the back window glass can be removed Click here.
-
REMOVE AMPLIFIER ANTENNA ASSEMBLY
-
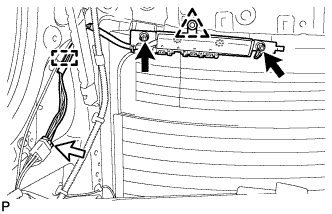
Disconnect the connector.
-
Disengage the clamp and remove the 2 nuts.
-
Disengage the clip and remove the amplifier antenna assembly.
Note
If reusing the removed amplifier antenna assembly, do not touch the contact terminals.
-
-
REMOVE NO. 1 BACK WINDOW MOULDING
-
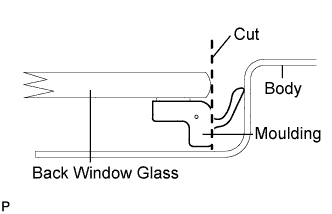
Using a knife, cut off the moulding as shown in the illustration.
Note
-
Do not damage the vehicle body with the knife.
-
If the vehicle body is damaged, repair the damaged portion by applying an anti-rust coating after removing the back window glass.
-
-
Remove the remaining moulding from the back window glass.
Tech Tips
When removing the moulding, make a partial cut, then pull and remove it by hand.
-
-
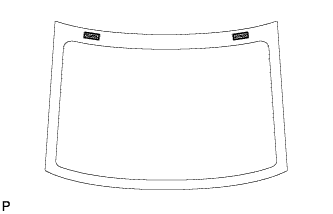
REMOVE BACK WINDOW GLASS
-
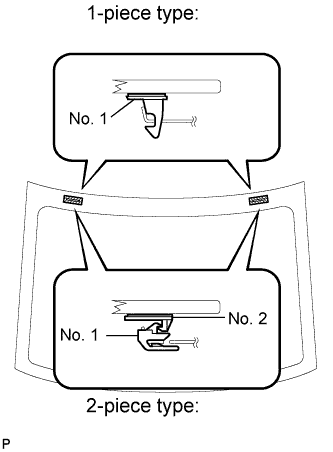
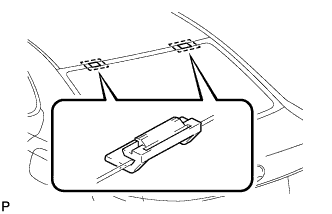
Disconnect the back window glass stoppers.
Note
-
There are No. 1 and No. 2 stoppers on the back window glass as shown in the illustration. Be careful not to damage the back window glass when cutting off the adhesive.
-
To prevent the back window glass from dropping when performing this operation, be sure to hold the back window glass using suction cups.
Tech Tips
Depending on the vehicle, 1-piece or 2-piece type stoppers are used.
-
-

Disconnect the 2 back window defogger connectors.
-
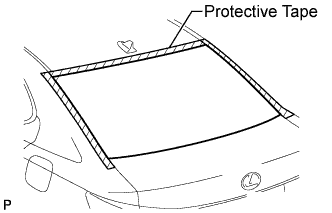
Apply protective tape to the vehicle body around the back window glass assembly.
Tech Tips
Apply protective tape to the vehicle body to prevent it from being scratched.
-
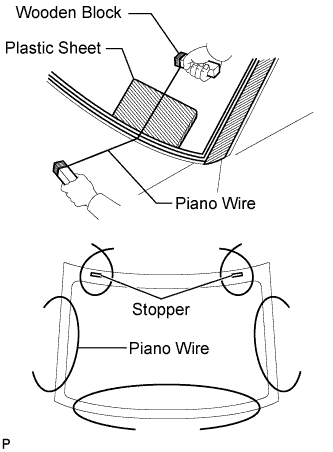
Pass a piano wire between the vehicle body and glass from the interior.
-
Tie both wire ends to wooden blocks or similar objects.
-
Cut off the adhesive by pulling the piano wire around the back window glass.
Note
-
When separating the back window glass, take care not to damage the paint or interior and exterior ornaments.
-
To prevent the package tray from being scratched when removing the back window glass, place a plastic sheet between the piano wire and package tray.
-
-
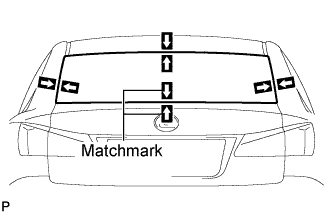
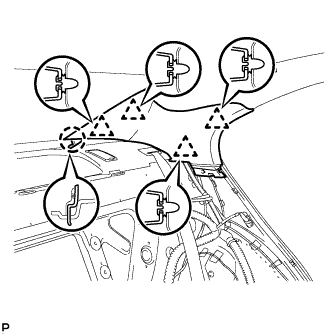
Place matchmarks on the back window glass and vehicle body on the locations indicated in the illustration.
Tech Tips
Matchmarks are not needed to be placed if the back window glass will not be reused.
-
Using suction cups, remove the back window glass assembly.
Note
-
Be careful not to drop the back window glass.
-
Leave as much adhesive on the vehicle body as possible when removing the back window glass.
-
-
-
REMOVE BACK WINDOW GLASS DAM
-
Using a scraper, remove the back window glass dam.
Note
-
Be careful not to damage the back window glass.
-
Be sure to replace the back window glass adhesive dam with a new one.
-
-
-
REMOVE NO. 1 BACK WINDOW GLASS STOPPER (for 1-piece Type)
-
Using a scraper, remove the 2 No. 1 back window glass stoppers.
Note
-
Be careful not to damage the back window glass.
-
Be sure to replace the No. 1 back window glass stoppers with new ones.
-
-
-
REMOVE NO. 2 BACK WINDOW GLASS STOPPER (for 2-piece Type)
-
Using a scraper, remove the 2 No. 2 back window glass stoppers.
Note
-
Be careful not to damage the back window glass.
-
Be sure to replace the No. 2 back window glass stoppers with new ones.
-
-
-
REMOVE NO. 1 BACK WINDOW GLASS STOPPER (for 2-piece Type)
-
Remove the No. 1 back window glass stoppers.
Note
Be sure to replace the No. 1 back window glass stoppers with new ones.
-
-
CLEAN BACK WINDOW GLASS
-
Using a scraper, remove the adhesive tape and adhesive sticking to the back window glass.
Note
Be careful not to damage the back window glass.
-
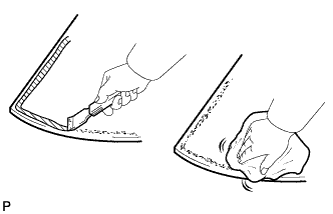
Clean the outer circumference of the back window glass with a non-residue solvent.
Note
-
Do not touch the glass surface after cleaning it.
-
Be careful not to damage the glass.
-
Even if using new glass, clean it with a non-residue solvent.
-
-
-
CLEAN VEHICLE BODY
-
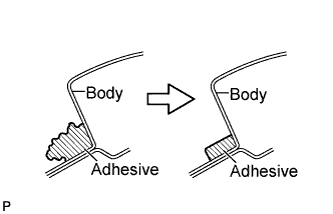
Clean and shape the contact surface of the vehicle body.
-
Using a knife, cut away any rough adhesive on the contact surface of the vehicle body to ensure the appropriate surface shape.
Note
Be careful not to damage the vehicle body.
Tech Tips
Leave as much adhesive on the vehicle body as possible.
-
Clean the contact surface of the vehicle body with a piece of cloth saturated with cleaner.
Tech Tips
Even if all the adhesive has been removed, clean the vehicle body.
-
-