STEERING GEAR REASSEMBLY

Note
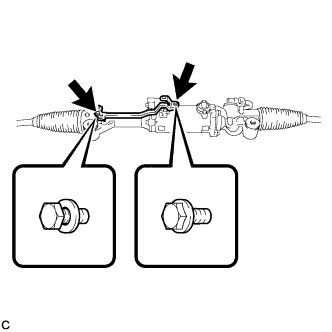
When installing, coat the parts indicated by arrows with lithium soap base glycol grease Click here.
-
INSTALL STEERING RACK END SUB-ASSEMBLY
-
Install 2 new claw washers.
Tech Tips
Align the claws of the claw washers with the steering rack grooves.
-
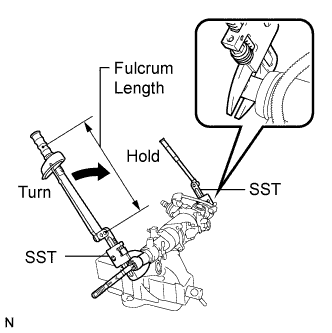
Using 2 SST, install the steering rack end sub-assembly (RH side).
- SST
- 09922-10010
- Torque:
- Without SST
- 103 N*m { 1050 kgf*cm, 76 ft.*lbf }
- With SST
- 76 N*m { 775 kgf*cm, 56 ft.*lbf }
Note
-
Use a torque wrench with a fulcrum length of 345 mm (1.13 ft.).
-
This torque value is effective when SST is parallel to the torque wrench.
Tech Tips
Using SST, hold the steering rack and install the steering rack end sub-assembly.
-
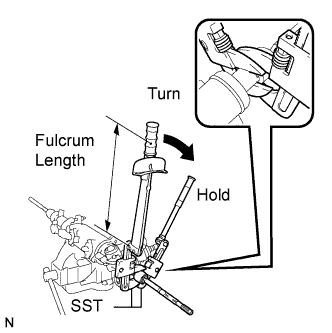
Using 2 SST, install the steering rack end sub-assembly (LH side).
- SST
- 09922-10010
- Torque:
- Without SST
- 103 N*m { 1050 kgf*cm, 76 ft.*lbf }
- With SST
- 76 N*m { 775 kgf*cm, 56 ft.*lbf }
Note
-
Use a torque wrench with a fulcrum length of 345 mm (1.13 ft.).
-
This torque value is effective when SST is parallel to the torque wrench.
Tech Tips
Using SST, hold the steering rack and install the steering rack end sub-assembly.
-
Using a brass bar and a hammer, stake the 2 claw washers.
Note
Avoid any impact to the steering rack.
-
-
INSTALL NO. 1 STEERING RACK BOOT
-

Apply lithium soap base glycol grease to the inside of the small opening of the No. 1 steering rack boot (LH side).
-

Temporarily install a new No. 1 steering rack boot clamp to the large opening of the No. 1 steering rack boot (LH side) at the position shown by the arrow (A).
Note
-
Use a new No. 1 steering rack boot clamp.
-
Do not expand the No. 1 steering rack boot clamp more than necessary for installation.
-
Do not deform the No. 1 steering rack boot clamp.
-
Tightening force of the No. 1 steering rack boot clamp becomes uneven if it is installed after being expanded as shown in the illustration. As a result, rust will be caused by water entering from the clearance between the No. 1 steering rack boot and rack housing, causing a malfunction.
-
Use only the supply parts which are applicable to the vehicle to secure the No. 1 steering rack boot.
Tech Tips
After disengaging the claw of a new No. 1 steering rack boot clamp, temporarily install it from the end without expanding the clamp more than necessary.
-
-
Install the No. 1 rack boot (LH side) to the groove on the rack housing.
Note
-
Be careful not to damage or twist the No. 1 steering rack boot.
-
Do not damage the No. 1 steering rack boot (LH side).
-
Ensure that the No. 1 steering rack boot clamp is installed before installing the No. 1 steering rack boot (LH side) to the rack housing.
-
-
Install the RH side by using the same procedure as the LH side.
-
-
INSTALL NO. 1 STEERING RACK BOOT CLAMP
-
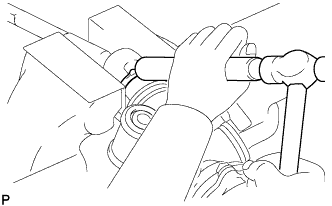
Using pliers and a screwdriver, install the No. 1 steering rack boot clamp (LH side).
Note
-
Be careful not to damage the steering rack boot.
-
Do not twist the steering rack boot.
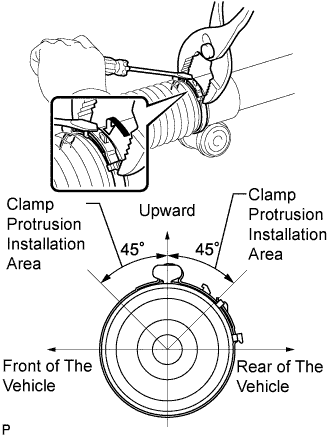
Tech Tips
Make sure that the protrusion of the steering rack boot clamp is positioned within the area shown in the illustration.
-
-
Install the RH side by using the same procedure as the LH side.
-
-
INSTALL STEERING RACK BOOT CLIP
-
Using pliers, install the 2 steering rack boot clips.
-
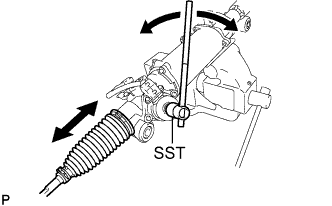
Using SST, turn the pinion and check that the rack boots expand and contract smoothly.
- SST
- 09616-00011
-
-
INSTALL TIE ROD END LH
-

Install the lock nut and the tie rod end LH to the rack end until the matchmarks are aligned.
Tech Tips
After adjusting toe-in, tighten the lock nut.
-
-
INSTALL TIE ROD END RH
Tech Tips
Perform the same procedure as the LH side.
-
INSTALL WIRE HARNESS CLAMP BRACKET
-
Install the wiring harness clamp bracket with the 2 bolts.
- Torque:
- 6.0 N*m { 61 kgf*cm, 53 in.*lbf }
-