REAR UPPER ARM INSTALLATION

Tech Tips
-
Use the same procedure for the RH side and LH side.
-
The procedure listed below is for the LH side.
-
TEMPORARILY TIGHTEN REAR NO. 1 UPPER CONTROL ARM ASSEMBLY
-
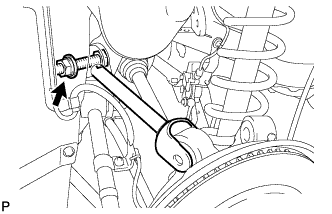
Temporarily tighten the rear No. 1 upper control arm assembly to the rear suspension member with the bolt, nut, and washer.
-
Temporarily tighten the rear No. 1 upper control arm assembly to the rear axle carrier sub-assembly with the bolt, nut, and washer.
-
-
TEMPORARILY TIGHTEN REAR NO. 2 UPPER CONTROL ARM ASSEMBLY
-
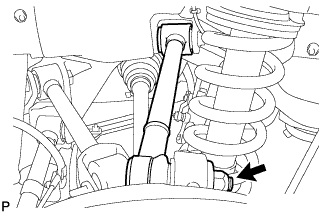
Insert the stud of the rear No. 2 upper control arm assembly to the rear axle carrier sub-assembly.
-
Temporarily install the rear No. 2 upper control arm assembly to the rear suspension member with the bolt, nut, and washer.
Tech Tips
Push the axle carrier downward.
-
Temporarily tighten the nut.
-
Install a new nut and fully tighten the nut.
- Torque:
- 70 N*m { 714 kgf*cm, 52 ft.*lbf }
-
-
TEMPORARILY TIGHTEN REAR STABILIZER LINK ASSEMBLY
-
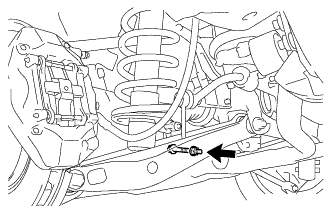
Temporarily install the stabilizer link assembly and the height control sensor link bracket to the rear No. 2 suspension arm assembly with the bolt and nut.
Tech Tips
Fully tighten the nut after stabilizing the suspension.
-
-
TEMPORARILY TIGHTEN REAR SHOCK ABSORBER WITH COIL SPRING
-
Temporarily install the rear shock absorber with coil spring with the bolt and nut.
Note
Turn the bolt while holding the nut.
-
-
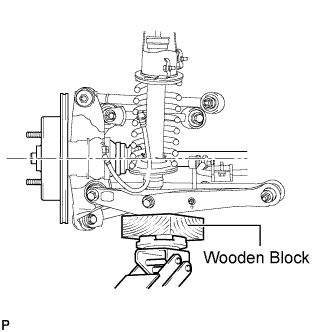
STABILIZE SUSPENSION
-
Install the rear wheels.
-
Lower the vehicle to the ground.
-
Bounce the vehicle up and down at the corners to stabilize the rear suspension.
-
Remove the rear wheels.
-
Jack up the axle carrier, with a wooden block placed between the jack and axle carrier, to apply a load to the suspension so that the rear drive shaft assembly becomes level.
-
-
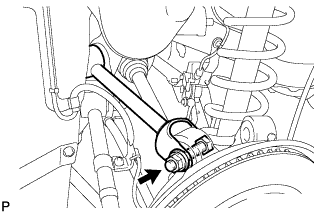
FULLY TIGHTEN REAR NO. 1 UPPER CONTROL ARM ASSEMBLY
-

Fully tighten the nut.
- Torque:
- 161 N*m { 1642 kgf*cm, 119 ft.*lbf }
-
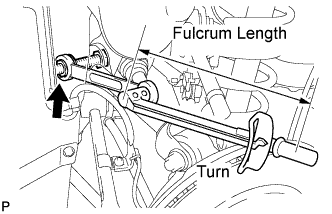
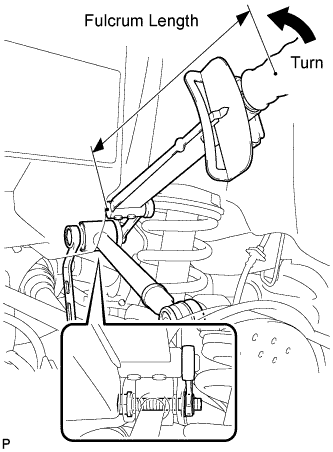
Using a ball joint lock nut wrench (19 mm), fully tighten the nut.
- Torque:
- without the ball joint lock nut wrench (19 mm)
- 161 N*m { 1642 kgf*cm, 119 ft.*lbf }
- with the ball joint lock nut wrench (19 mm)
- 119 N*m { 1214 kgf*cm, 88 ft.*lbf }
Note
-
Use a torque wrench with a fulcrum length of 425 mm (16.73 in.).
-
Use the recommended ball joint lock nut wrench (19 mm).
-
This torque value is effective when the ball joint lock nut wrench (19 mm) is parallel to the torque wrench.
-
-
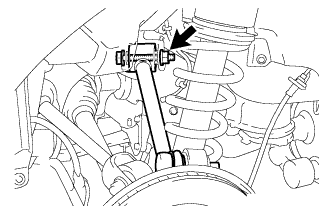
FULLY TIGHTEN REAR NO. 2 UPPER CONTROL ARM ASSEMBLY
-
Using a ball joint lock nut wrench (19 mm), fully tighten the nut.
- Torque:
- without the ball joint lock nut wrench (19 mm)
- 145 N*m { 1479 kgf*cm, 107 ft.*lbf }
- with the ball joint lock nut wrench (19 mm)
- 107 N*m { 1091 kgf*cm, 79 ft.*lbf }
Note
-
Use a torque wrench with a fulcrum length of 425 mm (16.73 in.).
-
Use the recommended ball joint lock nut wrench (19 mm).
-
This torque value is effective when the ball joint lock nut wrench (19 mm) is parallel to the torque wrench.
-
-
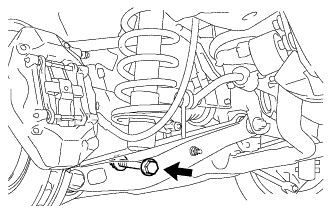
FULLY TIGHTEN REAR STABILIZER LINK ASSEMBLY
-
Fully tighten the nut.
- Torque:
- 27 N*m { 275 kgf*cm, 20 ft.*lbf }
-
-
FULLY TIGHTEN REAR SHOCK ABSORBER WITH COIL SPRING
-
Fully tighten the bolt.
- Torque:
- 110 N*m { 1122 kgf*cm, 81 ft.*lbf }
Note
Turn the bolt while holding the nut.
-
-
INSTALL NO. 2 DIFFERENTIAL SUPPORT PROTECTOR
-
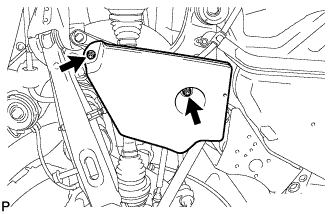
Install the No. 2 differential support protector with the 2 nuts.
-
-
INSTALL REAR WHEEL
- Torque:
- 103 N*m { 1050 kgf*cm, 76 ft.*lbf }
-
INSPECT AND ADJUST REAR WHEEL ALIGNMENT
-
INSPECT AND ADJUST HEADLIGHT AIMING