TOE CONTROL LINK INSTALLATION

Tech Tips
-
Use the same procedure for the RH side and LH side.
-
The procedure listed below is for the LH side.
-
TEMPORARILY TIGHTEN TOE CONTROL LINK SUB-ASSEMBLY
-
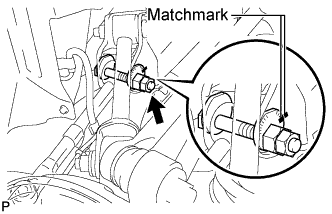
Install the toe control link sub-assembly and insert the toe adjust cam from the front of the vehicle. Then, install the toe adjust plate and temporarily tighten the nut.
Note
Align the matchmarks on the rear suspension member and toe adjust plate.
Tech Tips
Fully tighten the nut after stabilizing the suspension.
-
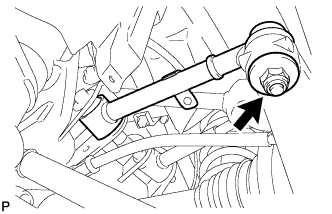
Install the toe control link sub-assembly with a new nut.
- Torque:
- 70 N*m { 714 kgf*cm, 52 ft.*lbf }
-
-
INSTALL REAR SPEED SENSOR WIRE
-

Install the rear speed sensor wire with the bolt.
- Torque:
- 6.0 N*m { 61 kgf*cm, 53 in.*lbf }
-
Connect the rear speed sensor wire connector.
-
-
STABILIZE SUSPENSION
-
Install the rear wheels.
-
Lower the vehicle to the ground.
-
Bounce the vehicle up and down at the corners to stabilize the rear suspension.
-
Remove the rear wheels.
-
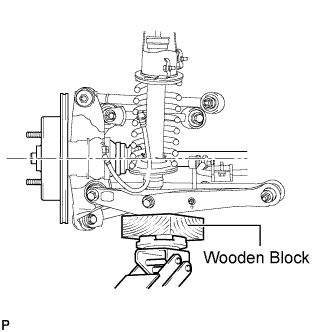
Jack up the axle carrier, with a wooden block placed between the jack and axle carrier, to apply a load to the suspension so that the rear drive shaft assembly becomes level.
-
-
FULLY TIGHTEN TOE CONTROL LINK SUB-ASSEMBLY
-
Fully tighten the nut on the rear suspension member side.
- Torque:
- 50 N*m { 510 kgf*cm, 37 ft.*lbf }
Note
Check that the matchmarks on the rear suspension member and toe adjust plate are aligned.
-
-
INSTALL REAR WHEEL
- Torque:
- 103 N*m { 1050 kgf*cm, 76 ft.*lbf }
-
INSPECT AND ADJUST REAR WHEEL ALIGNMENT