REPAIR INSTRUCTION CUSTOMIZE PARAMETERS
Note
-
When the customer requests a change in a function, first make sure that the function can be customized.
-
Be sure to make a note of the current settings before customizing.
-
When troubleshooting a function, first make sure that the function is set to the default setting.
Tech Tips
The following items can be customized.
-
POWER TILT AND POWER TELESCOPIC STEERING COLUMN SYSTEM
Tilt and Telescopic Display Default Content Setting Autoaway/Return function ON ON/OFF of the auto away/return function ON / OFF -
LEXUS PARKING ASSIST-SENSOR SYSTEM
Warning Tester Display Default Content Setting Fr & Rr Buzzer Volume M2 Function to change volume of buzzer / L, M1, M2, M3 or H L: Low volume
M1: Medium low volume
M2: Medium volume
M3: Medium high volume
H: High volume
Keep Sense Status Buzzer ON Function to make buzzer sound when distance between vehicle and obstacle does not change for more than 3 seconds ON / OFF Rear Buzzer Onset Range Wide Function to set rear buzzer activation range / Narrow or Wide Narrow: 600 mm(23.62 in.)
Wide: 1500 mm (59.06 in.)
Sensor Tester Display Default Content Setting Sensor Condition N Range ON Make the sensors available when the shift lever is in N / ON or OFF ON: Available
OFF: Not available
Non P/R Range Sensor F Function to set available sensors when shift position is not in P or R / F, Rcrn2 or F F, Rcrn2: Corner sensors are available
F: front sensors are available
-
LEXUS PARKING ASSIST-SENSOR SYSTEM (On Display and Navigation Module Display)
Note
-
When the customer requests a change in a function, first make sure that the function can be customized.
-
Be sure to make a note of the current settings before customizing.
-
When troubleshooting a function, first make sure that the function is set to the default setting.
-
Turn the engine switch on (IG).
-
Turn the LEXUS parking assist-sensor system on.
-
Select the following menus: Setup / Vehicle / LEXUS Park Assist.
-
Select the setting by referring to the table below.
Display Default Content Setting Alert volume 3 Change the buzzer volume setting. 1, 2, 3, 4 or 5
-
1: Low volume
-
2: Medium low volume
-
3: Medium volume
-
4: Medium high volume
-
5: High volume
Display On The display mode setting (when the LEXUS parking assist-sensor system is normal). On or Off Distance Wide Set the buzzer activation range for the rear center sensors. Narrow or Wide
-
Narrow: 600 mm (23.62 in.)
-
Wide: 1500 mm (59.06 in.)
-
-
-
POWER DOOR LOCK CONTROL SYSTEM
Door Lock Display Default Content Setting Unlock Key Twice OFF
ON*1
Function that unlocks only the driver side door when the driver side door key cylinder is turned to unlock once, and unlocks all doors when it is turned to unlock twice. For the OFF setting, turning it once unlocks all doors. ON / OFF Auto Lock ON Function that locks all doors when the vehicle speed reaches a certain level. ON / OFF Auto Lock/Shift OFF With the engine running and all doors closed, function that locks all doors when the shift lever is moved from P to any position other than P. ON / OFF Auto Unlock/Shift OFF Function that unlocks all doors when the shift lever is moved to P from any position other than P while the engine switch is on (IG). ON / OFF All Unlock/Open-Close ON*2
OFF*3
Function that unlocks the other doors when the driver side door is opened within approximately 45 seconds after the engine switch is turned off. ON / OFF
-
*1: w/o Double Locking System
-
*2: w/ Rear Fog Light
-
*3: w/o Rear Fog Light
-
-
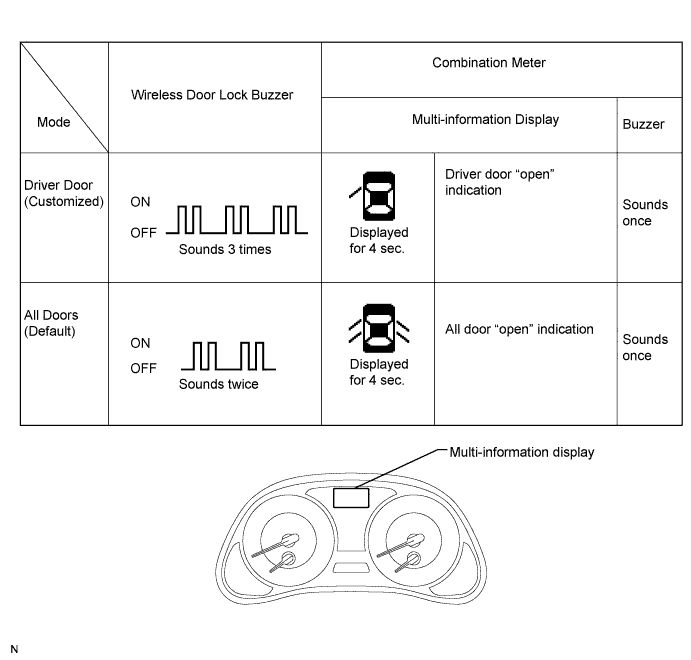
WIRELESS DOOR LOCK CONTROL SYSTEM
Wireless Door Lock Item (Display) Default Content Setting Wireless Control
(Wireless door lock control function)
ON This function turns the wireless door lock function on or off. ON / OFF Hazard Answer Back
(Hazard answer-back for wireless door lock operation)
ON When LOCK is pressed, all hazard warning lights flash once.
When UNLOCK is pressed, all hazard warning lights flash twice.
ON / OFF Open Door Warning ON If a door is not completely closed and LOCK is pressed, this function sounds a buzzer for 10 seconds. ON / OFF Auto Lock Time 30 s This function controls the amount of time from unlocking doors to automatic re-locking. 30 s / 60 s / 120 s Trunk Lid Operation
(Wireless luggage compartment door open function setting)
0.8 s This function changes operation method of transmitter to open luggage compartment door.
1TIME ON: Push once
2TIMES ON: Push twice
0.8 PR: Push for longer than 0.8 seconds
OFF: Does not operate
1TIME ON / 2TIMES ON / 0.8 PR / OFF Unlock 2 Operation
(Wireless unlock operated twice)
ON*1 or OFF*2 This function unlocks the driver side door when UNLOCK is pressed once, and unlocks all doors when pressed twice. If set to OFF, pressing UNLOCK once unlocks all doors. ON / OFF Panic Function*1 ON This function operates the theft deterrent system when PANIC is pressed and held for 0.8 seconds. ON / OFF Wireless Buzzer Resp*1
(Buzzer answer-back of Wireless)
ON This function makes the wireless door lock buzzer sound for answer-back when LOCK/UNLOCK is pressed. ON / OFF
-
*1: w/ Panic Switch
-
*2: w/o Panic Switch
-
-
ENTRY AND START SYSTEM (for Entry Function)
Entry & Start Tester Display Default Content Setting Ignition Available Area ALL Function that switches the entry ignition detection area. FRONT or ALL Park Wait Time 2.5 s Function that sets waiting time to permit opening the door after the door is locked with the entry lock function. 0.5 s, 1.5 s, 2.5 s or 5 s Trunk Open Mode ON Function that permits opening the luggage compartment door. ON or OFF Key Low Battery Warning ON Function that warns the driver that the key battery is low. ON or OFF -
ENTRY UNLOCK MODE SWITCHING
Note
Because the key (for card type) does not have a wireless transmitter function, it cannot be used to change the entry unlock mode.
-
To change the vehicle entry unlock mode, make sure that the vehicle power is off and simultaneously press and hold the key LOCK switch and another key switch for 5 seconds.
When the switches are pressed and held for 5 seconds, the entry door unlock mode changes to the mode that is not currently selected.
Note
After pressing and holding the switches for 5 seconds, wait 5 seconds before performing the same procedure again.
-
Driver door unlock mode:
When the driver door touch sensor is touched, only the driver door unlocks. When another touch sensor is touched, all doors unlock.
-
All door unlock mode:
When any touch sensor is touched, all doors unlock.
-
-
The certification ECU (smart key ECU assembly) receives this signal from the entry door control receiver and changes the entry and start system to the entry unlock mode.
-
The certification ECU (smart key ECU assembly) sounds the buzzers of the wireless door lock buzzer and combination meter to inform the user that the mode has been changed.
-
w/o Panic Switch:
Tech Tips
-
This procedure only changes the entry unlock mode of the entry and start system. It does not switch the unlocking of the wireless door lock control.
-
The above illustration is for LHD vehicles. For RHD vehicles, the left side and right side are reversed.
-
-
w/ Panic Switch:

Tech Tips
This procedure only changes the entry unlock mode of the entry and start system. It does not switch the unlocking of the wireless door lock control.
-
-
-
KEY CANCEL
Note
Because the key (for card type) does not have a wireless transmitter function, it cannot be used to perform the key cancel operation.
The key cancel operation disables the following functions:
-
Entry Unlock/Lock
-
Entry Luggage Compartment Open
-
Key Lock-in Prevention
-
Warning
-
Memory Call
-
The operation procedure is as follows:
Precondition:
Engine switch off, driver side door closed and unlocked
-
Press the UNLOCK switch of the key once.
-
Open the driver door within 5 seconds.
-
Press the UNLOCK switch of the key twice within 5 seconds.
-
Repeat open → close twice for the driver door within 30 seconds, and open again.
(Driver door: Open → Close → Open → Close → Open)
-
Press the UNLOCK switch of the key twice within 5 seconds.
-
Repeat open → close once for the driver door within 30 seconds, and open again.
(Driver door: Open → Close → Open)
-
Close the driver door within 5 seconds.
When key cancel is activated, the wireless door lock buzzer sounds twice.
To return to the original condition, perform the procedure again. When the original condition is returned, the wireless door lock buzzer sounds once.
-
-
-
THEFT DETERRENT SYSTEM
Theft Deterrent System Display(Item) Default Content Setting Warning by Horn*1 ON Function that uses the vehicle horn and theft deterrent horn as a warning device. ON / OFF Mech. Key Entry Alarm Cancel
(Key Alarm)*2
OFF Function that makes it possible to cancel the alarm with an unlock operation using the mechanical key. ON / OFF
-
*1: w/ Panic Switch
-
*2: w/o Panic Switch
-
-
LIGHTING SYSTEM (LIGHTING INT)
Illuminated Entry Display Default Content Setting I/L when ACC OFF ON Lights up the seat illumination when the engine switch is turned off. ON / OFF Light Control ON Dims (ON setting) or turns off (OFF setting) the footwell lights under the following conditions:
Engine switch on (IG), shift lever not in P, and all doors closed.
ON / OFF Illumination System ON Lights up the footwell lights when one of the following occurs: the engine switch is turned on (IG), or any door is unlocked or opened. ON / OFF Lighting Time 15 s Changes the lighting time of the seat illumination. 7.5 s / 15 s / 30 s I/L ON W/Unlock ON Lights up the seat illumination when the doors are unlocked. ON / OFF Shift Light Control AVAIL Lights up the shift illumination when the engine switch is turned on (ACC or IG). NOT AVL / AVAIL -
METER/GAUGE SYSTEM
-
Combination Meter
Note
-
Be sure to record the current value before customizing.
Tech Tips
The following items can be customized using the intelligent tester.
Combination Meter Tester Display Default Content Setting Key Remind Volume Large Function to change the volume of the key remind warning buzzer Large, Medium, Small Key Remind Sound Normal Function to change the cycle of the key remind warning buzzer Fast, Normal, Slow Units By Region Ml/g*1 or Km/l*2 Function to change the unit of the trip information display Ml/g, Km/l *1: for RHD
*2: for LHD
-
-
Seat Belt Warning Buzzer ON/OFF Setting
The seat belt warning buzzer ON/OFF setting, which is a setting of the buzzer function of the combination meter, can disable the driver and front passenger side seat belt buzzers.
Note
-
These buzzers should be on for safe driving. Perform the procedure only if it is necessary to disable buzzer.
-
When either the cable connected to the battery terminal or the combination meter connector is disconnected, these buzzers are set on (enabled).
-
The trip meter returns to 0 after starting this procedure, although it is not displayed.
Tech Tips
-
"b-oFF" indicates that the buzzer is OFF. "b-on" indicates that the buzzer is ON. The buzzer ON/OFF setting will be finished (the odometer will display "ODO") if the ODO/TRIP switch is not operated for 10 seconds or more. In this case, perform step 11 to check that the buzzer ON/OFF setting is complete. If it is not complete, start from step 1 again.
-
The following item can be customized without using the intelligent tester.
-
Driver and front passenger side seat belt buzzers:
-
Turn the engine switch on (IG).
-
Press the ODO/TRIP switch until the odometer displays "ODO".
-
Turn the engine switch off.
-
Turn the engine switch on (IG).
-
Press the ODO/TRIP switch immediately (within 6 seconds) and hold it down for 10 seconds or more.
-
Continue holding down the ODO/TRIP switch and fasten the driver side seat belt.
-
Check that the odometer displays either "b-on" or "b-oFF".
-
Press the ODO/TRIP switch to change the display to "b-oFF".
-
Turn the engine switch off and unfasten the driver side seat belt.
-
Turn the engine switch on (IG).
-
Check that no buzzer sounds at the vehicle speed is 20 km/h (12 mph) or more.
-
-
Front passenger side seat belt buzzer:
-
Turn the engine switch on (IG).
-
Press the ODO/TRIP switch until the odometer displays "ODO".
-
Turn the engine switch off.
-
Turn the engine switch on (IG).
-
Sit in the front passenger seat. Press the ODO/TRIP switch immediately (within 6 seconds) and hold it down for 10 seconds or more.
-
Remaining seated, continue holding down the ODO/TRIP switch and fasten the front passenger side seat belt.
-
Check that the odometer displays either "b-on" or "b-oFF".
-
Press the ODO/TRIP switch to change the display to "b-oFF".
-
Turn the engine switch off and unfasten the front passenger side seat belt.
-
Turn the engine switch on (IG).
-
Check that no buzzer sounds at the vehicle speed is 20 km/h (12 mph) or more.
-
-
-
-
AIR CONDITIONING SYSTEM
Air Conditioner Tester Display Default Content Setting Set Temperature Shift NORMAL Function to control with the shifted temperature against the display temperature +2 C / +1 C / NORMAL / -1 C / -2 C Air Inlet Mode AUTO When turning the A/C ON to make the cabin cool down quickly, This is the function to change the mode automatically to RECIRCULATION mode MANUAL / AUTO Compressor Mode AUTO Function to turn the A/C ON automatically by pressing the AUTO button when the blower is ON and the A/C is OFF MANUAL / AUTO Compressor/Air Inlet DEF operation LINK Function to turn the A/C ON automatically linked with the FRONT DEF button when A/C OFF NORMAL / LINK Evaporator Control AUTO Function to set the evaporator control to the AUTOMATIC position (AUTO) to save power, or to the coldest position (MANUAL) to dehumidify the air and to prevent the windows from fogging up MANUAL / AUTO Emission Gas Sensor Shift NORMAL Function to change the sensitivity of the exhaust gas sensor MU MORE / MORE / LI MORE / NORMAL / LI LESS / LESS / MU LESS Button Press Buzzer ON Function to sound a buzzer when button is pressed OFF / ON Foot/DEF Auto Mode ON Function to turn the airflow from FOOT/DEF ON automatically when AUTO MODE is ON OFF / ON Foot/DEF Automatic Blow Up Function ON Function to change the blower level automatically when the defroster is ON OFF / ON Foot Air Leak ON Function to cut off the airstream felt underfoot while the vehicle is moving OFF / ON Ambient Temperature Shift NORMAL Function to control the shifted ambient temperature in relation to the displayed ambient temperature +3 C / +2 C / +1 C / NORMAL / -1 C / -2 C / -3 C -
POWER WINDOW CONTROL SYSTEM
Power Window Tester Display Default Content Setting Door Key Linked P/W Up ON Function that raises all power windows when, with engine switch off, key in driver door key cylinder is turned to and held in lock position for more than 1.5 seconds ON / OFF Door Key Linked P/W Down ON Function that lowers all power windows when, with engine switch off, key in driver door key cylinder is turned to and held in unlock position for more than 1.5 seconds ON / OFF P/W Up w/ Transmitter ON Function that raises all power windows when, with engine switch off, lock switch on transmitter is pressed and held for more than 3.0 seconds ON / OFF P/W Down w/ Transmitter ON Function that lowers all power windows when, with engine switch off, unlock switch on transmitter is pressed and held for more than 3.0 seconds ON / OFF P/W Up w/Smart ON Function that raises all power windows when, with engine switch off, entry lock switch on driver side door outer handle is pressed and held for more than 3.0 seconds ON / OFF -
SLIDING ROOF SYSTEM
Sliding Roof Tester Display Default Contents Setting Door Key Related Open*1 ON Function to manually open sliding roof linked with power windows if holding driver side door key for 2.5 seconds or more to unlock position when engine switch is off ON / OFF Door Key Related Close*1 ON Function to manually close sliding roof linked with power windows if holding driver side door key for 2.5 seconds or more to lock position when engine switch is off ON / OFF Wireless Key Related Open*2 OFF Function to manually open sliding roof linked with power windows if pressing transmitter unlock switch for 3.4 seconds or more when engine switch is off ON / OFF Wireless Key Related Close*2 ON Function to manually close sliding roof linked with power windows if pressing transmitter lock switch for 3.4 seconds or more when engine switch is off ON / OFF Door Key Related Operation Slide Function to select tilt up or slide open of manual sliding roof operation linked with power windows
Activate by holding driver side door key for 2.5 seconds or more to unlock position when engine switch is off
Tilt / Slide Wireless Key Related Operation Slide Function to select tilt up or slide open of manual sliding roof operation linked with power windows
Activate by pressing on transmitter UNLOCK switch for 3.4 seconds or more when engine switch is off
Tilt / Slide
-
*1: This function is linked with the power window key-linked function. If the power window key-linked function is set to OFF, the sliding roof key-linked function will not operate even when it is set to ON.
-
*2: This function is linked with the power window wireless transmitter-linked function. If the power window wireless transmitter-linked function is set to OFF, the sliding roof wireless transmitter-linked function will not operate even when it is set to ON.
-
-
WIPER AND WASHER SYSTEM
Wiper Display Default Content Setting Speed Mode AVAIL Function to change to the intermittent operation when the vehicle comes to a stop from driving condition with the wiper switch in the LO position NOT AVL / AVAIL Auto Wiper AVAIL Function to operate the wiper automatically when it is raining NOT AVL / AVAIL Re-wiper Control SPD MOD Function to change the time until operating the wiper to prevent dropping after having used the washer SPD MOD / 3 s / OFF -
LIGHTING SYSTEM (LIGHTING EXT)
Illuminated Entry Display Default Content Setting Exterior Foot Light Control AVAIL Lights up the door mirror foot lights when either of the following occurs: the doors are unlocked with the transmitter, or the key enters any actuation area around the doors. NOT AVL / AVAIL Exterior Foot Light Lighting Time 15 s Changes the lighting time of the door mirror foot lights. 15 s / 7.5 s / 30 s Light Control Display Default Content Setting Sensitivity NORMAL Adjusts the sensitivity of the automatic light control system. LIGHT2 / LIGHT1 / NORMAL / DARK1 / DARK2 Response Time*1 0.1 s Changes the delay timing of lighting the taillights when going into a tunnel when the light control switch is in the AUTO position. 0.1 s / 1.0 s Disp Ex OFF Sen NORMAL Changes the ambient brightness level to brighten the dimmed lights such as the indicator lights of the combination meter, A/C indicator light, and clock. LIGHT2 / LIGHT1 / NORMAL / DARK1 / DARK2 Disp Ex ON Sen NORMAL Changes the ambient brightness level to dim the lights such as the indicator lights of the combination meter, A/C indicator light, and clock. LIGHT2 / LIGHT1 / NORMAL / DARK1 / DARK2
-
*1: w/o Airbag Cut Off Switch
Tech Tips
The sensitivity adjustment may be difficult to confirm. Check by driving the customer's vehicle.
-