- Click here
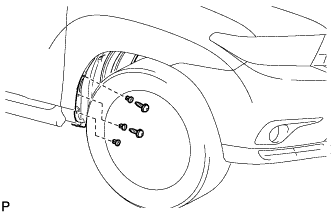
INSTALL FRONT FENDER LINER LH
-
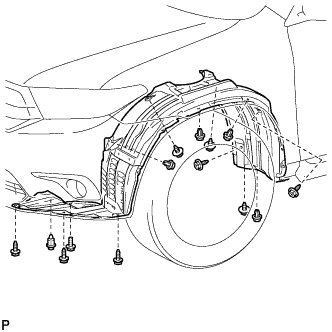
Install the front fender liner LH with the 5 clips and 8 screws.
-
Install the bolt.
-
Install 3 new grommets.
-
Using a 4 mm hexagon wrench, install the 2 screws.
-
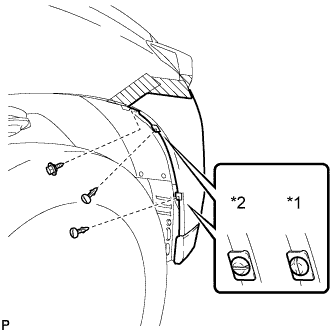
Install the screw and 2 pin hold clips.
Table 1. Text in Illustration *1 Correct *2 Incorrect Note:Insert the pin hold clip with the slot aligned vertically. Do not rotate the clip after inserting it. After installation, confirm that the slot is aligned vertically.
-
- Click here
INSTALL FRONT FENDER LINER RH
-
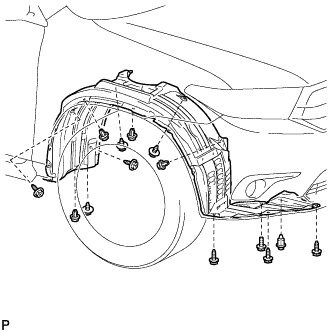
Install the front fender liner RH with the 5 clips and 8 screws.
-
Install the bolt.
-
Install 3 new grommets.
-
Using a 4 mm hexagon wrench, install the 2 screws.
-
Install the screw and 2 pin hold clips.
Table 2. Text in Illustration *1 Correct *2 Incorrect Note:Insert the pin hold clip with the slot aligned vertically. Do not rotate the clip after inserting it. After installation, confirm that the slot is aligned vertically.
-
- Click here
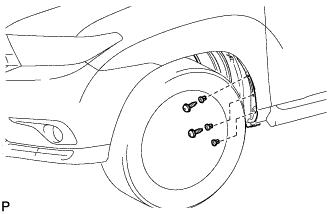
INSTALL FRONT WHEEL OPENING EXTENSION PAD (for LH Side)
-

Install the front wheel opening extension pad with the 2 screws.
-
- Click here
INSTALL FRONT WHEEL OPENING EXTENSION PAD (for RH Side)
Tip:Use the same procedure as for the LH side.
- Click here
INSTALL FRONT FENDER MOULDING SUB-ASSEMBLY LH
-
Clean the vehicle body surface.
-
Using a heat light, heat the vehicle body surface.
-
Remove the front fender side protector from the vehicle body.
-
Wipe off any tape adhesive residue with cleaner.
-
-
Clean the front fender moulding sub-assembly (if reusing the front fender moulding sub-assembly).
-
Using a heat light, heat the front fender moulding sub-assembly.
-
Remove the double-sided tape from the front fender moulding sub-assembly.
-
Wipe off any tape adhesive residue with cleaner.
-
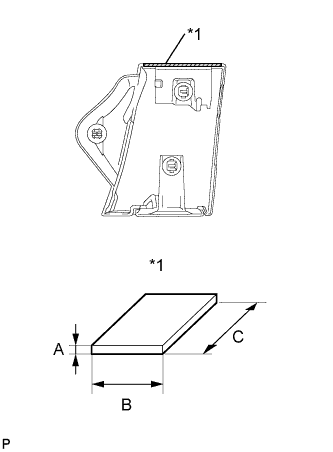
Apply new double-sided tape to the front fender moulding sub-assembly.
Table 3. Text in Illustration *1 Double-sided Tape Item Dimension A 1.2 mm (0.0472 in.) B 3.0 mm (0.1181 in.) C 72.0 mm (2.83 in.)
-
-
Install 2 new No. 4 clips on the front fender moulding sub-assembly.
-
Install a new pad on the front fender moulding sub-assembly.
-
Install the front fender moulding sub-assembly.
-
Using a heat light, heat the vehicle body and the front fender moulding sub-assembly.
-
Remove the release paper from the front fender moulding sub-assembly.
Tip:After removing the release paper, keep the exposed adhesive free from foreign matter.
-
Engage the 3 clips and install the front fender moulding sub-assembly.
-
-
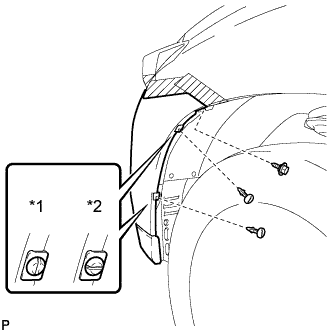
Using a 4 mm hexagon wrench, install the screw.
-
Install the clip.
-
- Click here
INSTALL FRONT FENDER MOULDING SUB-ASSEMBLY RH
Tip:Use the same procedure as for the LH side.