SIDE MUDGUARD INSTALLATION
Tech Tips
When installing the side mudguards, heat the vehicle body and side mudguards using a heat light.
| Heating temperature | ||||||
|---|---|---|---|---|---|---|
|
Note
Do not heat the vehicle body or side mudguards excessively.
-
INSTALL REAR DOOR OUTSIDE MOULDING SUB-ASSEMBLY
-
Clean the vehicle body surface.
-
Using a heat light, heat the vehicle body surface.
-
Remove the double-sided tape from the vehicle body.
-
Wipe off any tape adhesive residue with cleaner.
-
-
Clean the rear door outside moulding sub-assembly (if reusing the rear door outside moulding sub-assembly).
-
Using a heat light, heat the rear door outside moulding sub-assembly.
-
Remove the double-sided tape from the rear door outside moulding sub-assembly.
-
Wipe off any tape adhesive residue with cleaner.
-
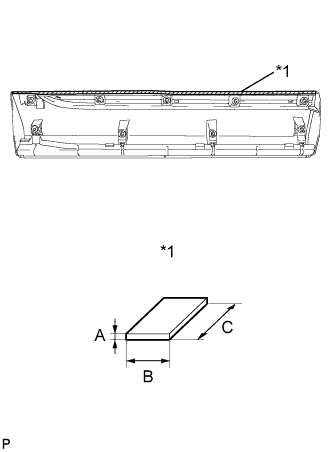
Text in Illustration *1 Double-sided Tape Apply new double-sided tape to the rear door outside moulding sub-assembly.
Item Dimension A 1.2 mm (0.0472 in.) B 6.0 mm (0.2362 in.) C 722.0 mm (2.37 ft.)
-
-
Install 2 new No. 3 clips on the rear door outside moulding sub-assembly.
-
Install 6 new No. 4 clips on the rear door outside moulding sub-assembly.
-
Install a new gasket on the rear door outside moulding sub-assembly.
-
Install the rear door outside moulding sub-assembly.
-
Using a heat light, heat the vehicle body and rear door outside moulding sub-assembly.
-
Remove the release paper from the rear door outside moulding sub-assembly.
Tech Tips
After removing the release paper, keep the exposed adhesive free from foreign matter.
-
Engage the 8 clips and install the rear door outside moulding sub-assembly.
-
-
Install the nut.
- Torque:
- 5.0 N*m { 51 kgf*cm, 44 in.*lbf }
-
Install the rear door No. 2 weatherstrip.
-
-
INSTALL FRONT DOOR OUTSIDE MOULDING SUB-ASSEMBLY
-
Clean the vehicle body surface.
-
Using a heat light, heat the vehicle body surface.
-
Remove the double-sided tape from the vehicle body.
-
Wipe off any tape adhesive residue with cleaner.
-
-
Clean the front door outside moulding sub-assembly (if reusing the front door outside moulding sub-assembly).
-
Using a heat light, heat the front door outside moulding sub-assembly.
-
Remove the double-sided tape from the front door outside moulding sub-assembly.
-
Wipe off any tape adhesive residue with cleaner.
-
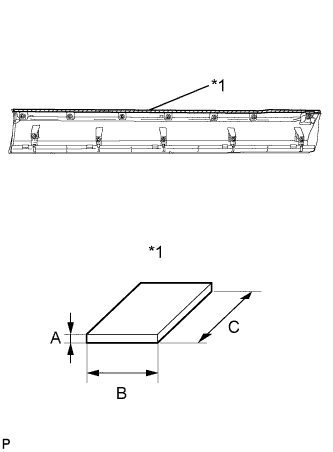
Text in Illustration *1 Double-sided Tape Apply new double-sided tape to the front door outside moulding sub-assembly.
Item Dimension A 1.2 mm (0.0472 in.) B 6.0 mm (0.2362 in.) C 1078.0 mm (3.54 ft.)
-
-
Install 3 new No. 3 clips on the front door outside moulding sub-assembly.
-
Install 8 new No. 4 clips on the front door outside moulding sub-assembly.
-
Install a new gasket on the front door outside moulding sub-assembly.
-
Install the front door outside moulding sub-assembly.
-
Using a heat light, heat the vehicle body and front door outside moulding sub-assembly.
-
Remove the release paper from the front door outside moulding sub-assembly.
Tech Tips
After removing the release paper, keep the exposed adhesive free from foreign matter.
-
Engage the 11 clips and install the front door outside moulding sub-assembly.
-
-
Install the nut.
- Torque:
- 5.0 N*m { 51 kgf*cm, 44 in.*lbf }
-
Install the front door weatherstrip.
-
-
INSTALL FRONT FENDER OUTSIDE MOULDING PAD
-
Wipe off any tape adhesive residue with cleaner.
-
Remove the release paper from the front fender outside moulding pad.
-
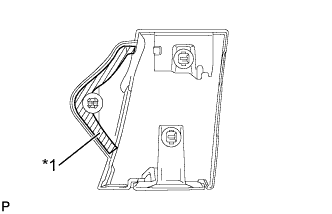
Text in Illustration *1 Front Fender Outside Moulding Pad Install a new front fender outside moulding pad to the front fender moulding sub-assembly.
-
-
INSTALL FRONT FENDER MOULDING SUB-ASSEMBLY
-
Clean the vehicle body surface.
-
Using a heat light, heat the vehicle body surface.
-
Remove the front fender side protector from the vehicle body.
-
Wipe off any tape adhesive residue with cleaner.
-
-
Clean the front fender moulding sub-assembly (if reusing the front fender moulding sub-assembly).
-
Using a heat light, heat the front fender moulding sub-assembly.
-
Remove the double-sided tape from the front fender moulding sub-assembly.
-
Wipe off any tape adhesive residue with cleaner.
-
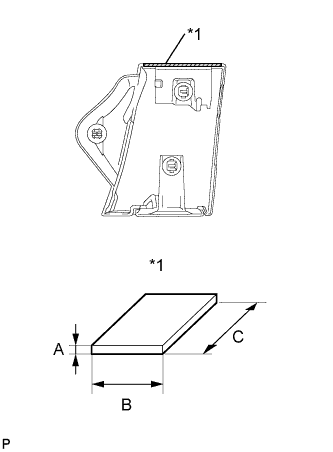
Text in Illustration *1 Double-sided Tape Apply new double-sided tape to the front fender moulding sub-assembly.
Item Dimension A 1.2 mm (0.0472 in.) B 3.0 mm (0.1181 in.) C 72.0 mm (2.83 in.)
-
-
Install 2 new No. 4 clips on the front fender moulding sub-assembly.
-
Install a new pad on the front fender moulding sub-assembly.
-
Install the front fender moulding sub-assembly.
-
Using a heat light, heat the vehicle body and the front fender moulding sub-assembly.
-
Remove the release paper from the front fender moulding sub-assembly.
Tech Tips
After removing the release paper, keep the exposed adhesive free from foreign matter.
-
Engage the 3 clips and install the front fender moulding sub-assembly.
-
-
Using a 4 mm hexagon wrench, install the screw.
-
Install the clip.
-